

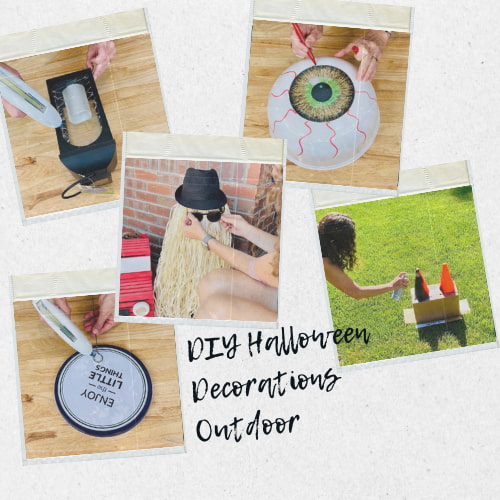
Easy and Fun DIY Halloween Yard Decorations on a Budget
Are you wondering how to make DIY Halloween yard decorations on a budget? Here are some easy Halloween decorations. These are DIY Halloween yard decorations using cheap materials you probably have around your own home. They take very little time and are a creative way to spruce up your outdoor space for a Halloween party, a haunted house, or just for trick-or-treaters. I have some ideas for easy, creepy Halloween decorations that you can use for your front door, front porch, or front yard!
DIY HalloweenYard Decorations on a Budget
Are you asking these questions?
- How do I make my yard look spooky for Halloween?
- How to decorate for Halloween outside on a budget?
- How to make Halloween yard decorations?
- What do you put outside on Halloween?
Halloween is just around the corner, and it’s time to transform your outdoor space into a spooky wonderland without breaking the bank. Dollar Tree is your one-stop shop for affordable supplies to create easy and fun DIY outdoor Halloween decorations. In this blog post, we’ll walk you through a variety of creative projects that will thrill your guests and trick-or-treaters. Let’s get started!
We will go over tons of options to decorate your yard this Halloween season. Several of these projects are easy to do as well as inexpensive. No need to buy expensive decorations when you can DIY it, now let’s get started!

DIY HalloweenYard Decorations on a Budget Video
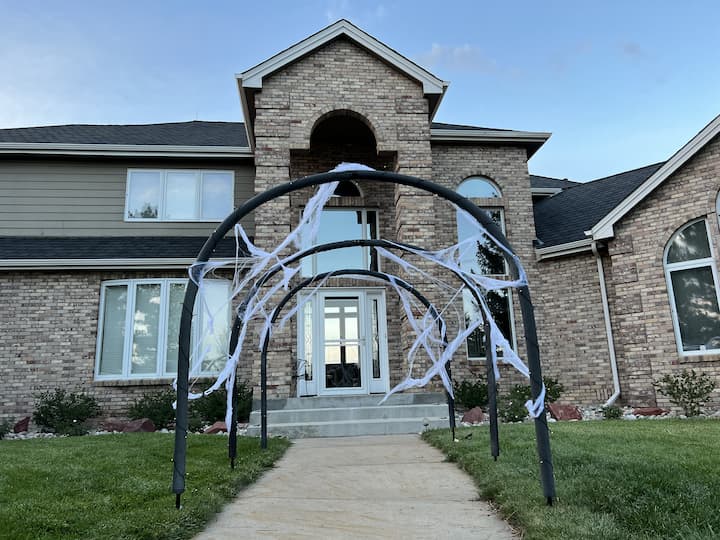

How do you make an archway for Halloween?
If you want to improve the first impressions of your home during this spooky season you could make Halloween arches for your front lawn, front yard, or front porch. This would also be great as a haunted house archway. This is an easy DIY outdoor project and the good news is it uses very simple affordable materials. You can also have so much fun customizing your archway. Find my project here at Easy Spooky and Fabulous Halloween Archway You Can Make In A Day
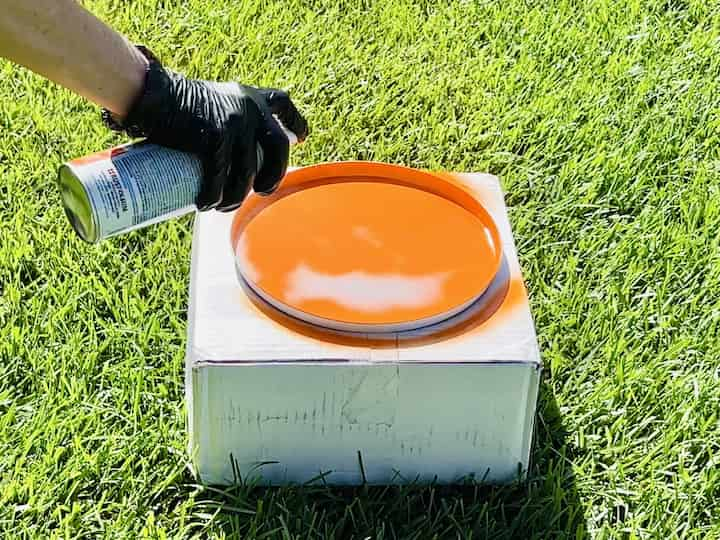
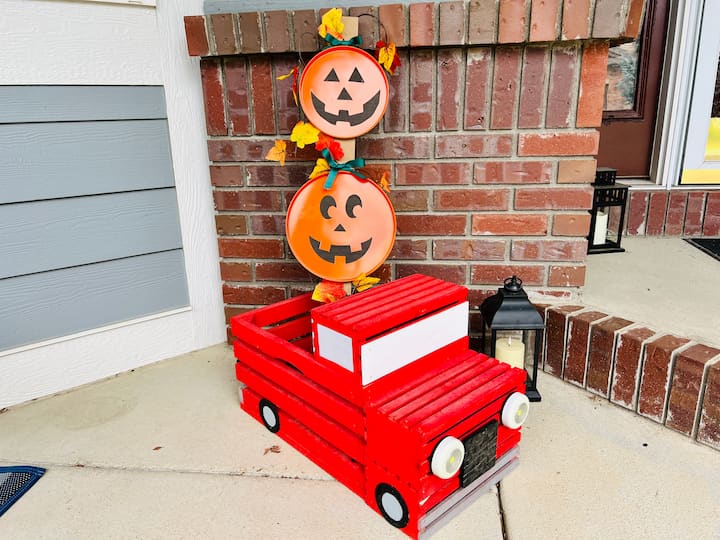
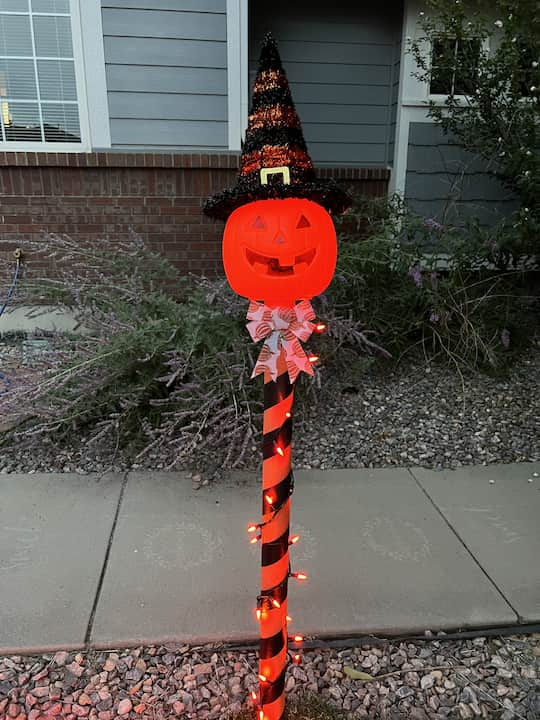
How do you make a Halloween pumpkin topiary?
Spray-paint the burner covers orange while they dry.
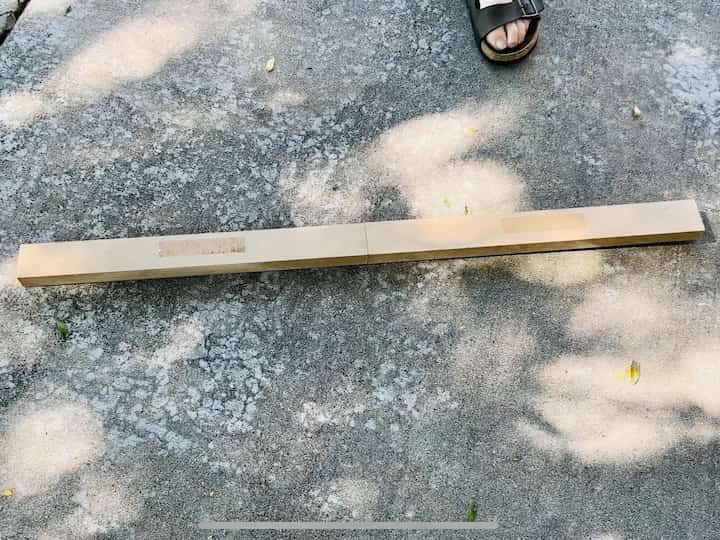
Hot glue the two signs together.
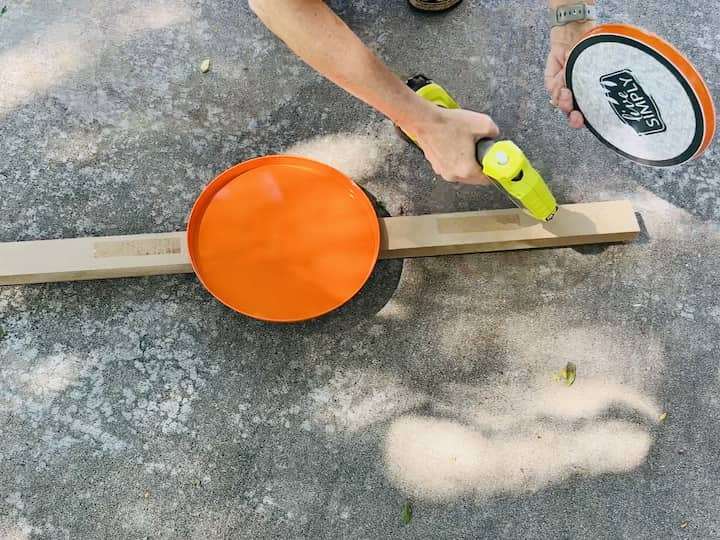
Attach the dry burner covers to the signs using hot glue.
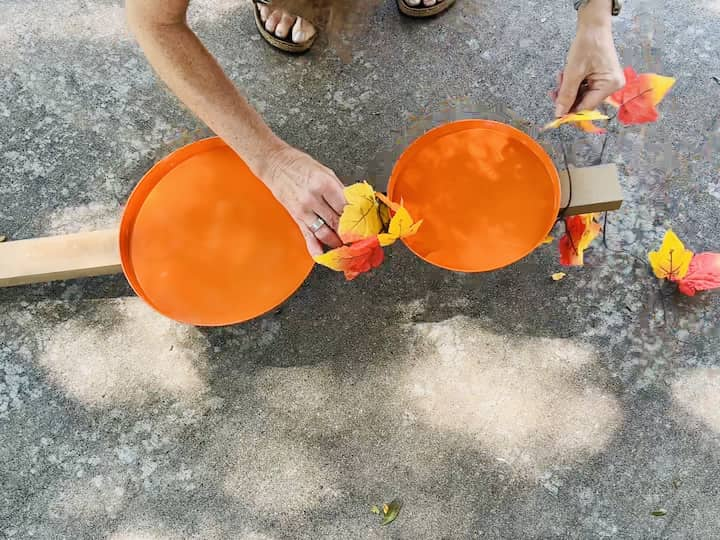
Wrap leafy vines and garland around the burner covers and signs.
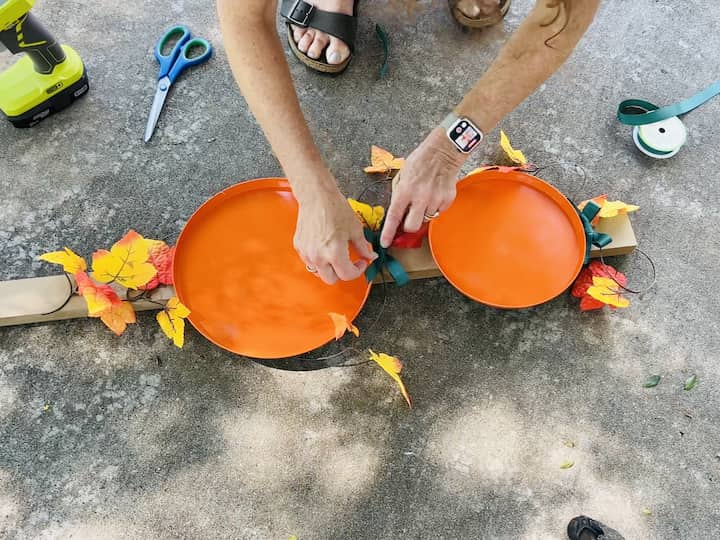
Create bows from green ribbon and hot glue them above each burner cover.
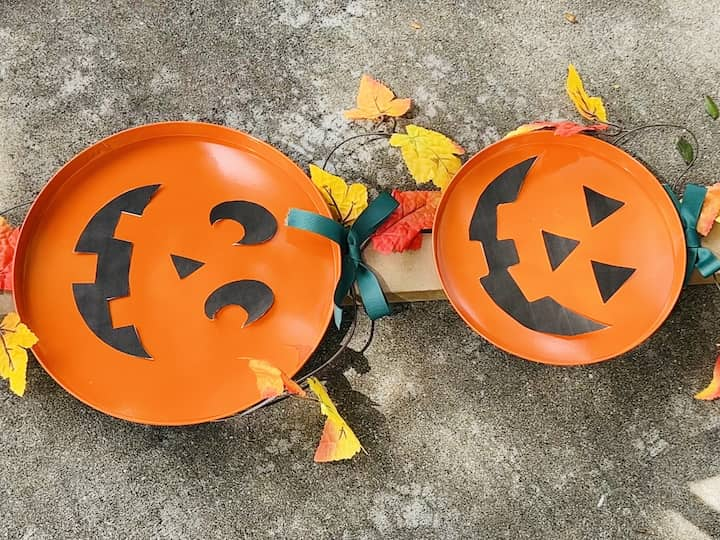
Add Jack-o’-Lantern faces to the burner covers to complete your topiary.
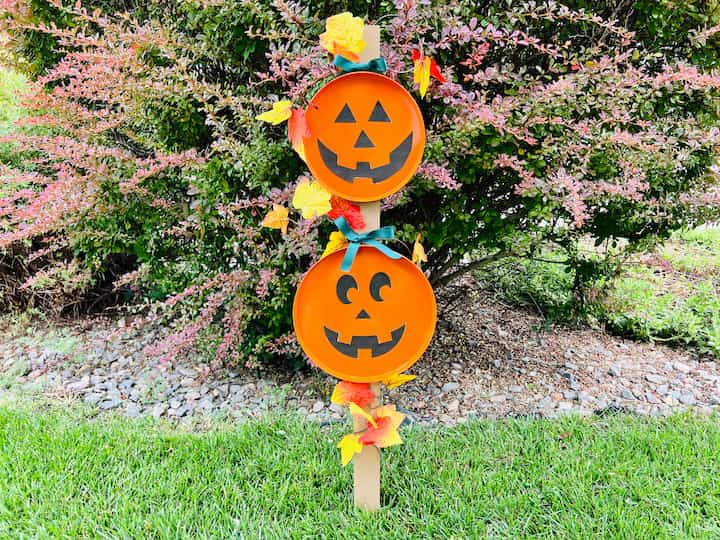
Set this cute pumpkin sign anywhere you like. If you are going to put it in the elements you might want to consider giving the face a coat of dishwasher safe Mod Podge to protect it, or you could paint on the face with multi-surface paint.
Are you looking for Halloween luminaries? Here’s a tutorial that will show you how to make some on a budget that is easy and fantastic. Easy and Fantastic Halloween Luminaries To Light The Walkway
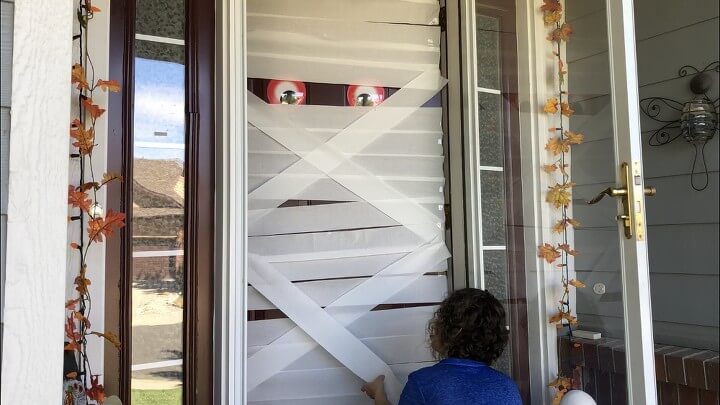
How Do You Make A Mummy Door?
This first DIY project is a mummy door and it’s a simple way to dress up your front door to greet party guests for Halloween. I taped strips of toilet paper (or you could use crepe paper or fabric) to the door.
I added a couple of eyes I found from Dollar Tree.
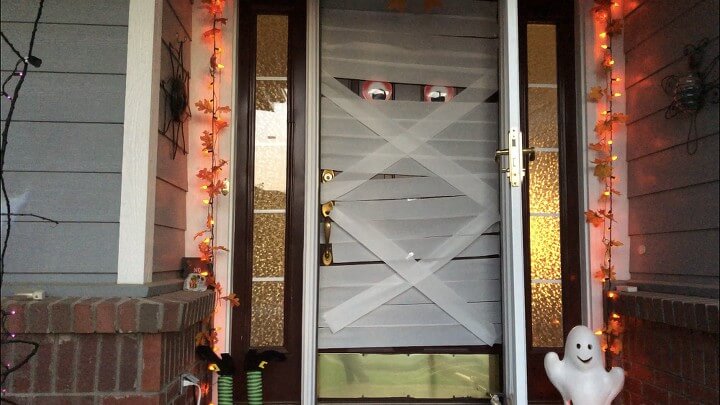
My kids were so excited to see this door (and so were the neighbor kids – they were spying on me all day)
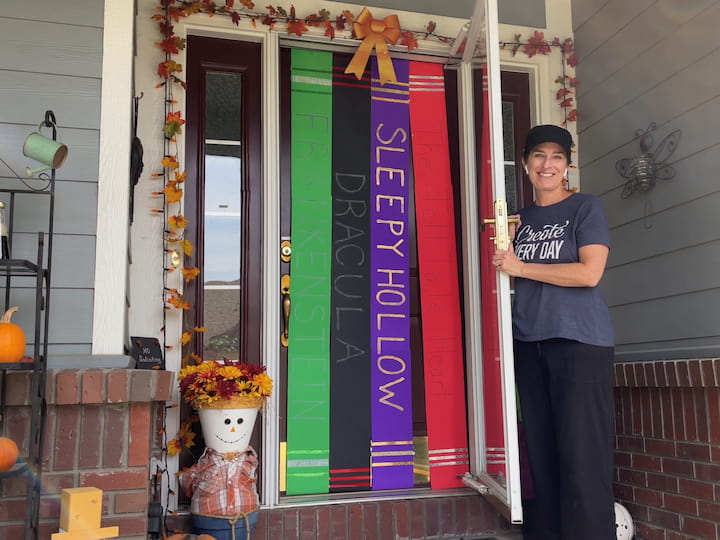
More Front door decorations – Your front door is the perfect canvas for Halloween crafts that will welcome guests to your front porch during this spooky season. I have a great way to make a fun Halloween door and the best part is that it is cheap and easy. It will really get you into the Halloween spirit. This is a simple project I want to share with you that you won’t want to miss! You can find this tutorial at How To Decorate A Door For Halloween Cheap and Easy
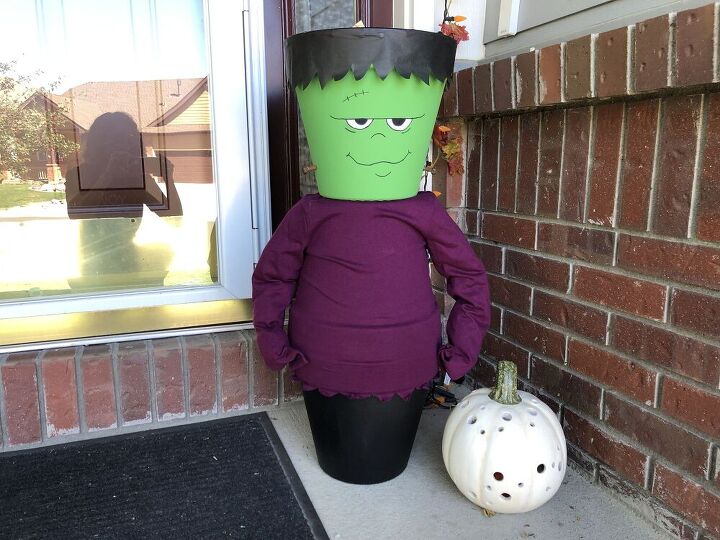
Do you want to know how to make Halloween Decorations? Many of you have seen my flower pot creations, my scarecrow, snowman, Santa, & Uncle Sam. I’m at it again creating a flower pot DIY Frankenstein (or Frankenstein planter). Today I’m sharing how I made my Halloween cute Frankenstein Candy Holder and you can find it here at Easy and Cute Halloween DIY Frankenstein Candy Holder
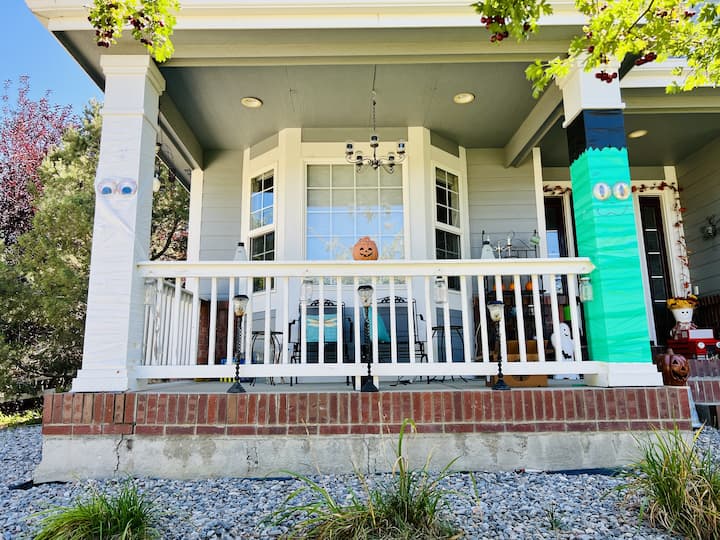
Are you looking for DIY Halloween Porch Decorating Ideas? There are several options that you can create easily on a budget at Easy Awesome DIY Halloween Porch Decorating Ideas on a Budget, it’ll start with the columns and give you many more ideas.
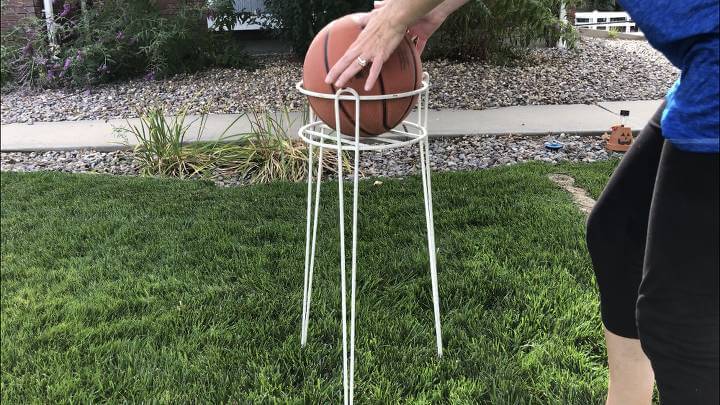
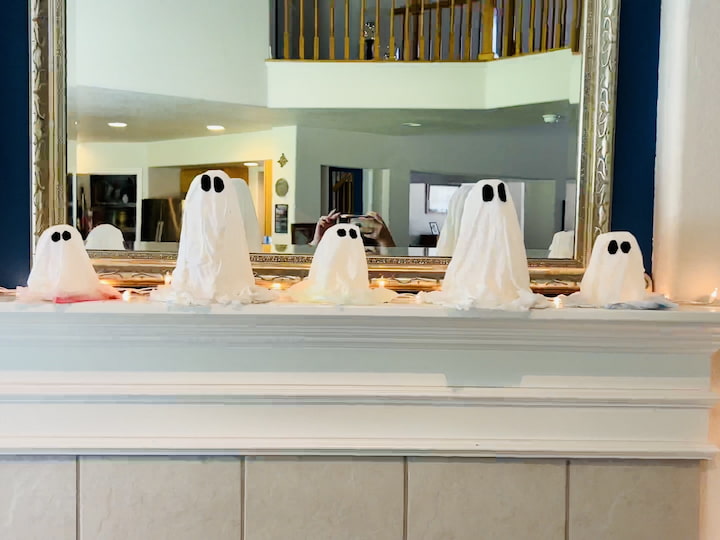
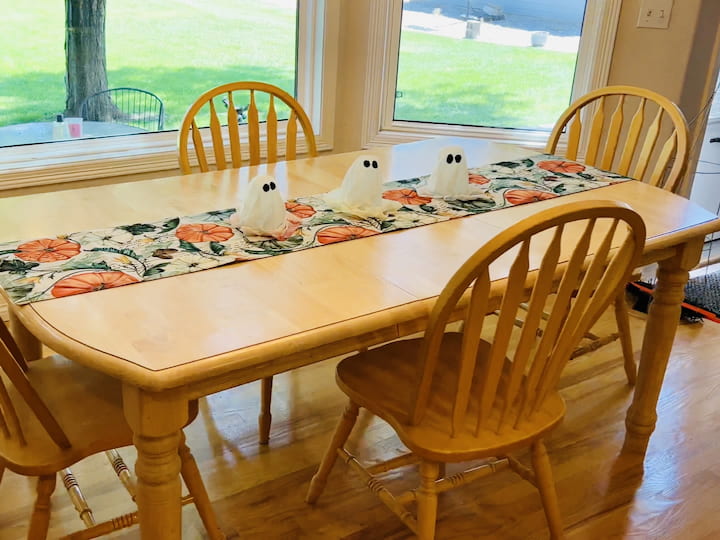
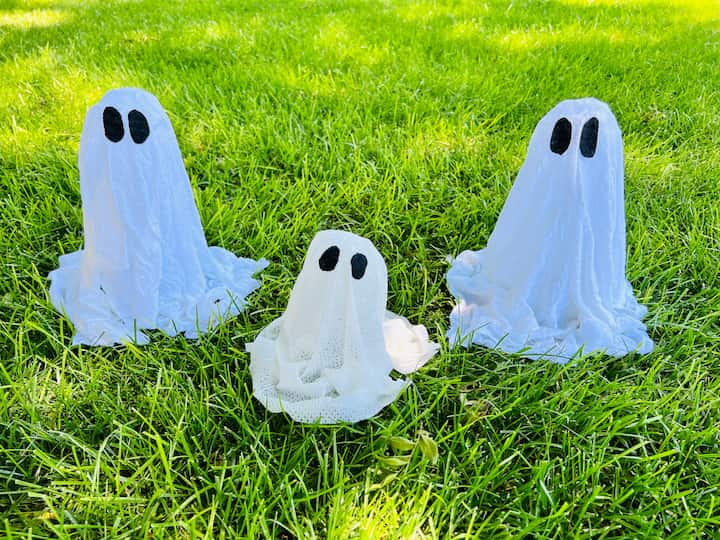
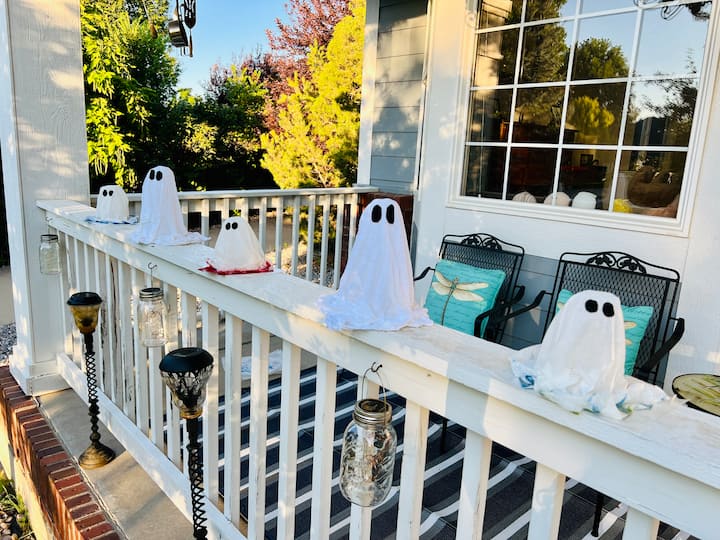
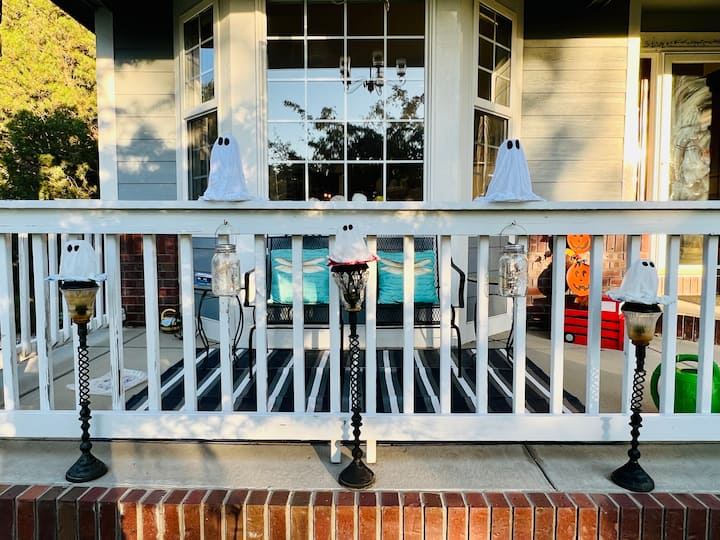
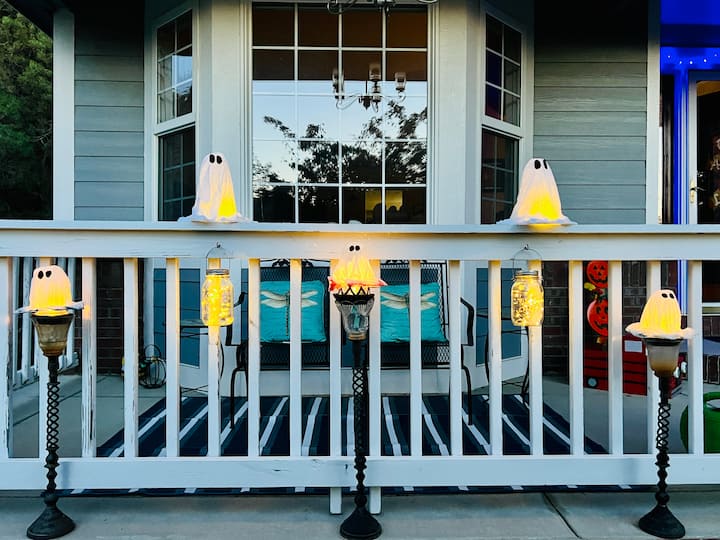
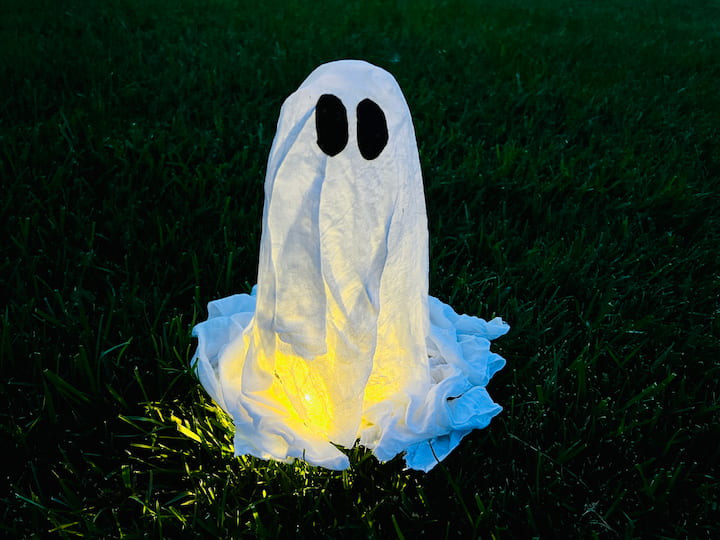
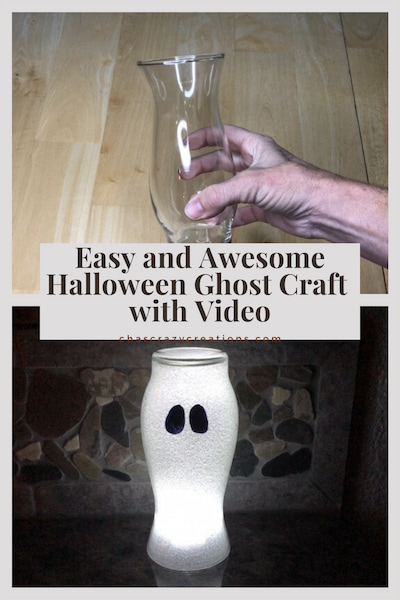
How do you make a homemade ghost? How do you make a simple ghost for Halloween?
The next outdoor Halloween decoration idea is a spooky ghost. I placed a basket ball on top of a plant stand I had. You could also use a foam ball with a tomato cage.
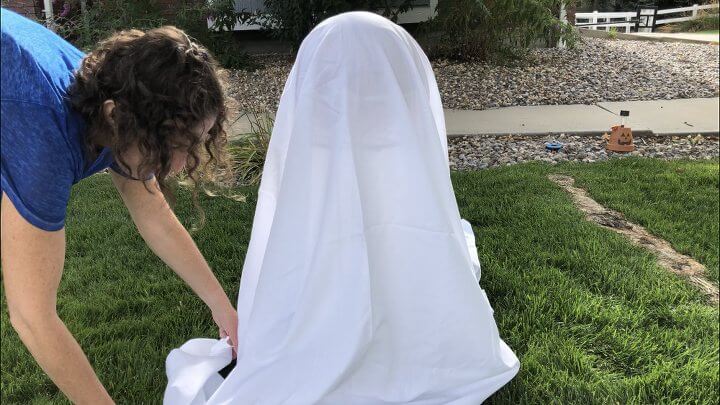
I set a full sized white sheet over the stand.

I added 2 felt eyes and my ghost was ready.
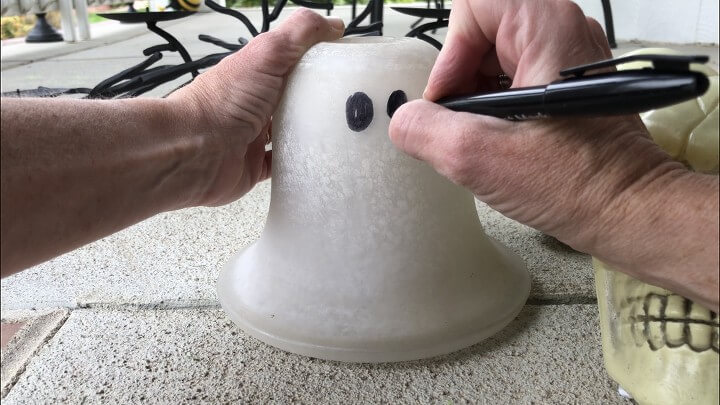
Another great way to add to your outdoor decorations is to make lights to use as Halloween porch decorations. I bought 2 glass lamp shades at a thrift store. You can also find these at home depot or your local craft store
I use a permanent marker to make some eyes. You can make these into a glow-in the dark lanterns by just hanging them on the porch.
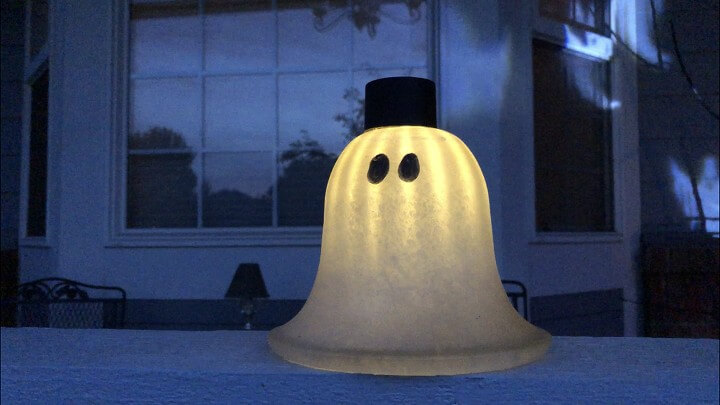
I put a solar light through the hole on the top so he’d glow.
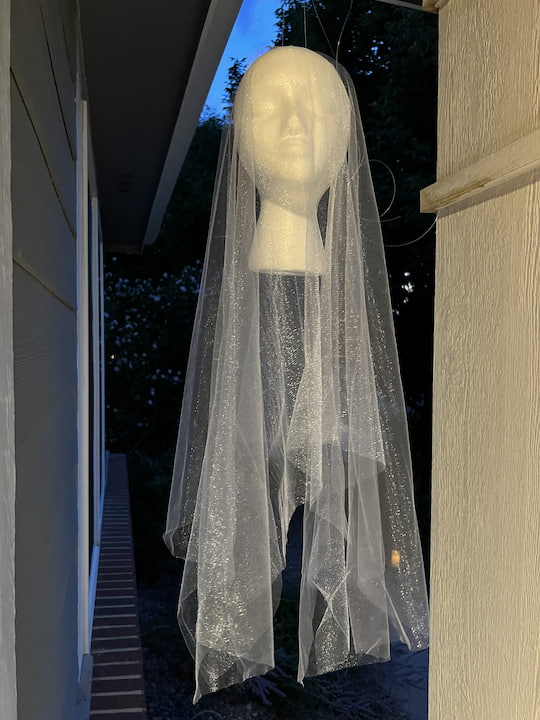
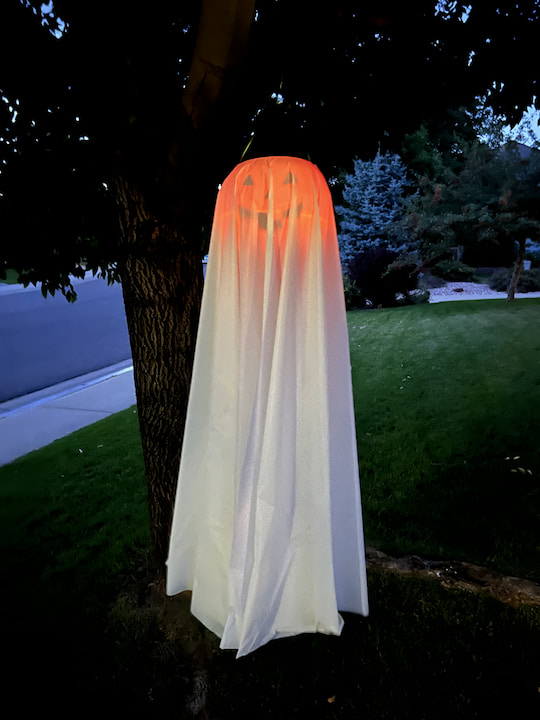
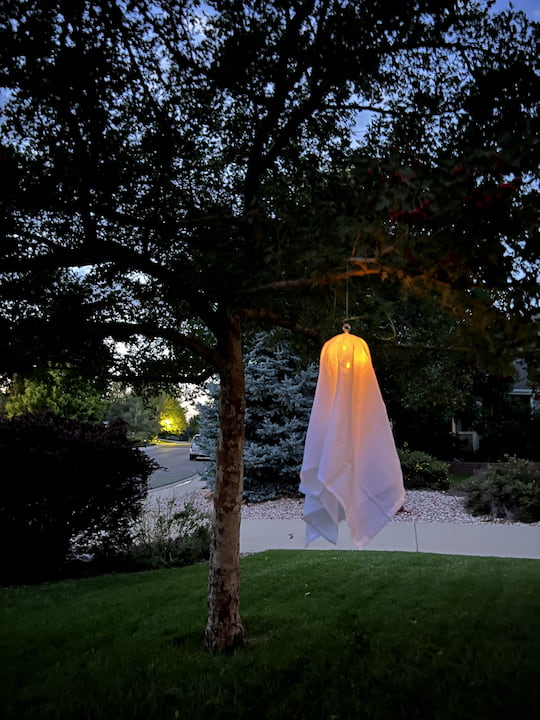
How do you make a floating ghost for Halloween?
- How do you make a floating ghost decoration?
- How to make a ghost decoration for outside?
- How do you make a hanging fabric ghost?
Are you looking for DIY Halloween Ghosts? I created several versions of these spooky spirits and some of them light up the night.
This is an easy DIY Halloween decoration and as you will see it can be adapted to make several ghost crafts and ghost shapes. This is a great way to decorate your front yard or front porch for a Halloween party or for trick-or-treaters. You just need a few supplies from Dollar Tree or Walmart to make these floating ghosts and you can find the full tutorial at : Easy Spooky Glowing DIY Halloween Ghosts for Indoor or Outdoor
These DIY Halloween ghosts are easy to create with an awesome and spooky glow. You can find the full tutorial for these fun creations at: Easy Awesome and DIY Spooky Halloween Ghosts on a Budget
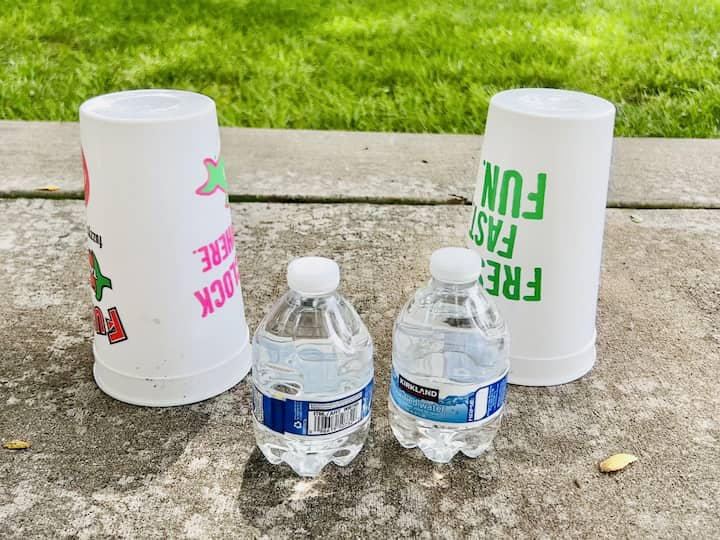

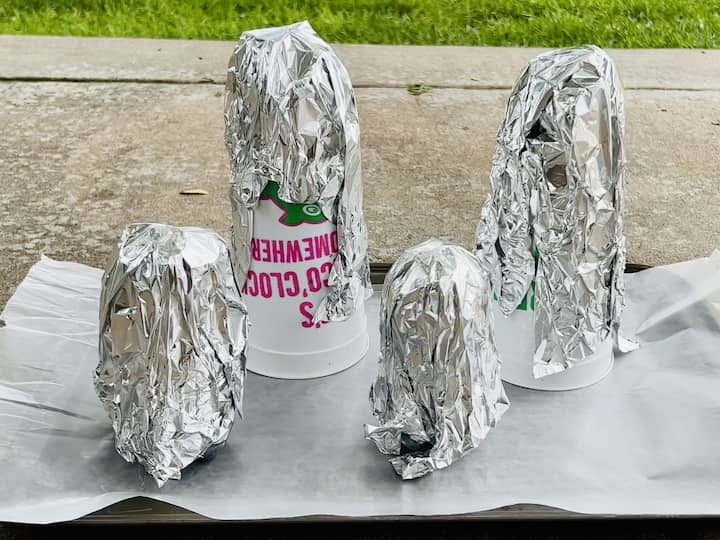
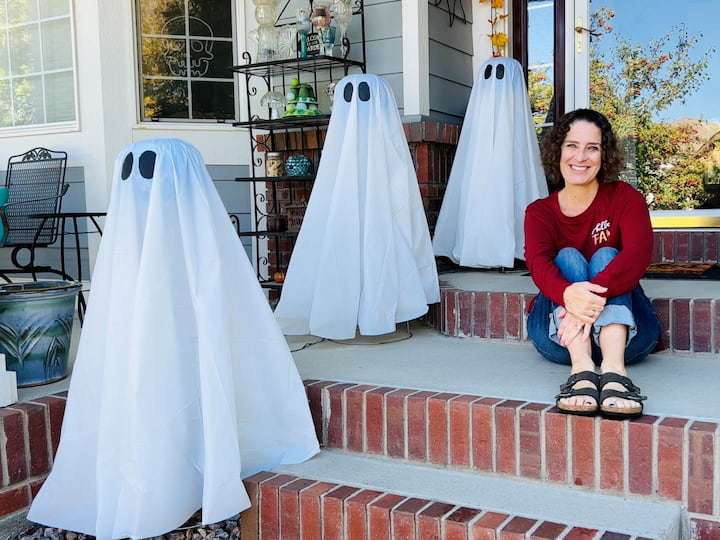
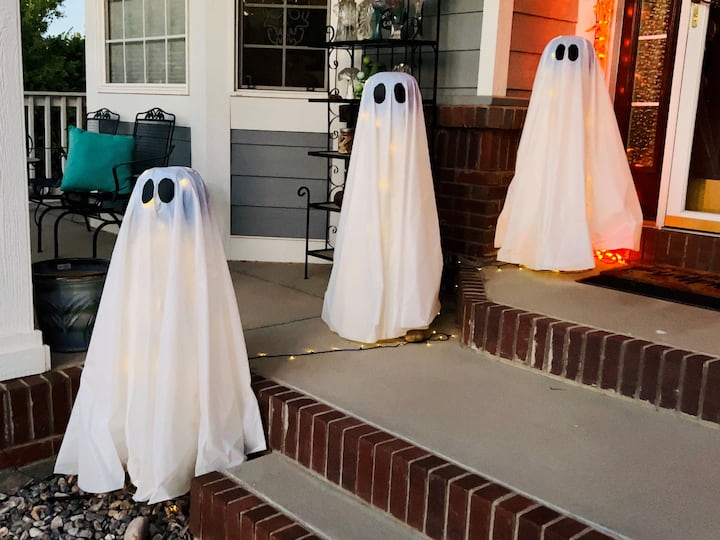
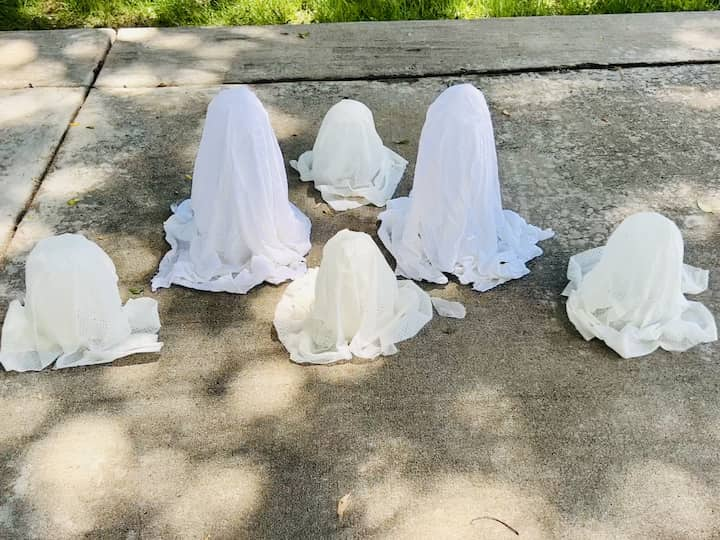
How do you make a hanging ghost out of cheesecloth?
Cover your work surface with wax paper. Place cups and water bottles on the wax paper. Create tin foil balls and place them on top of each cup or bottle. Wrap tin foil around the entire structure.

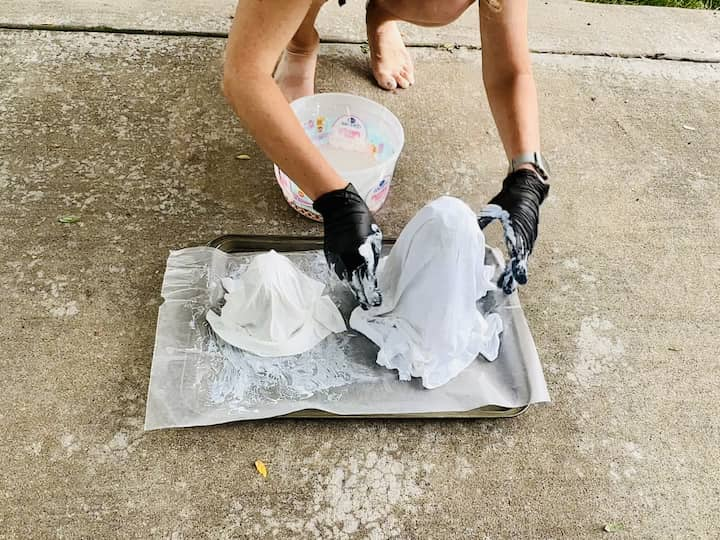
Wet cheesecloth, reusable wipes or dish towels with outdoor Mod Podge and wrap them around the sculptures.
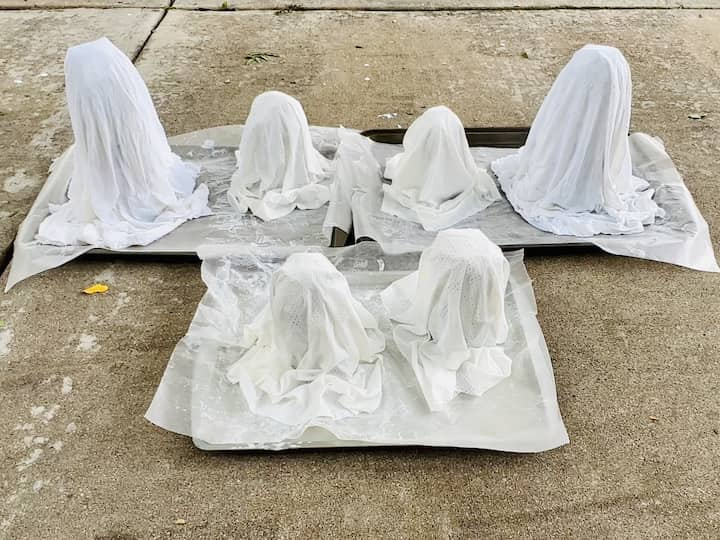
Let them dry completely, then remove the cups, waterbottles, and tinfoil from inside.
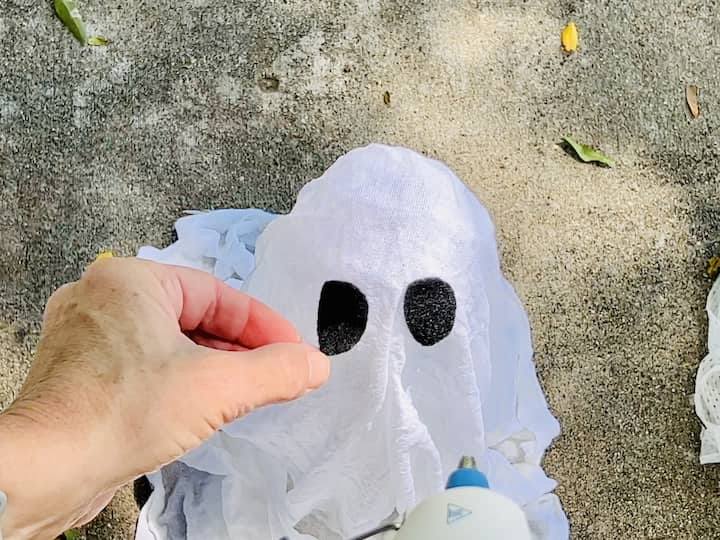
Cut out felt eyes and hot glue them onto the sculptures.
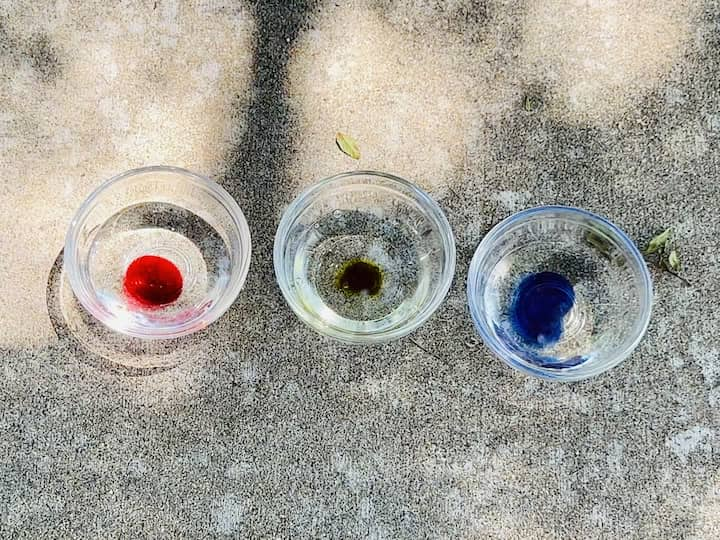

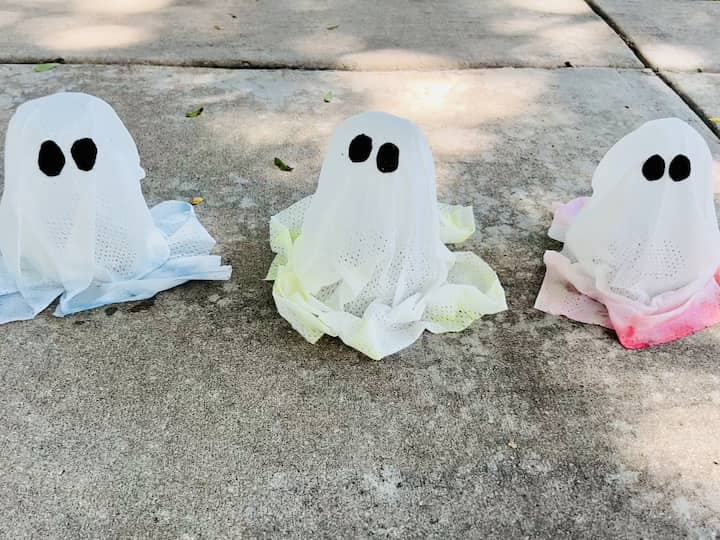
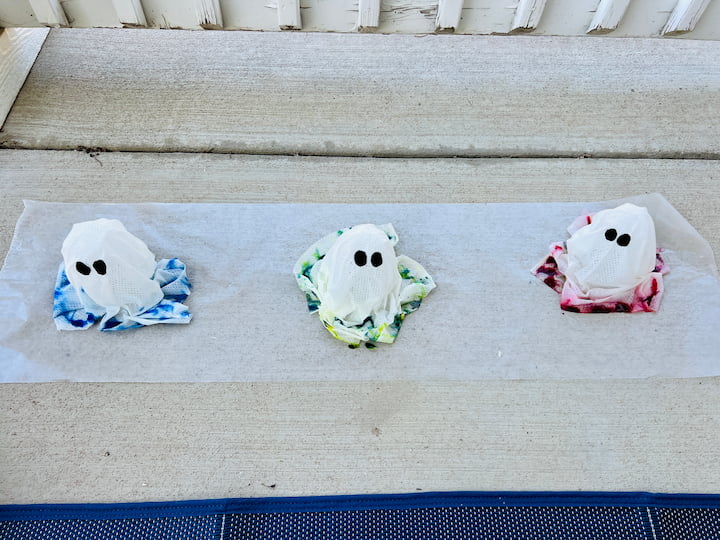
Add color by spraying the sculptures with a mixture of food coloring and rubbing alcohol.

Once they’re dry you can use them inside or outside, and in a variety of ways.
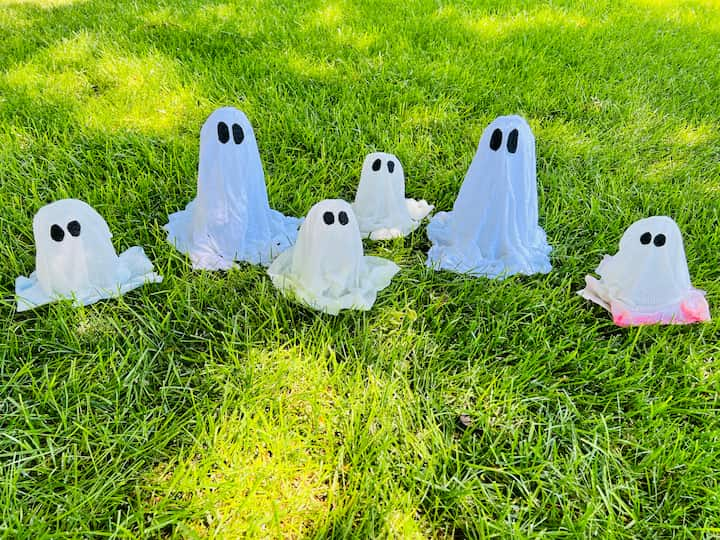
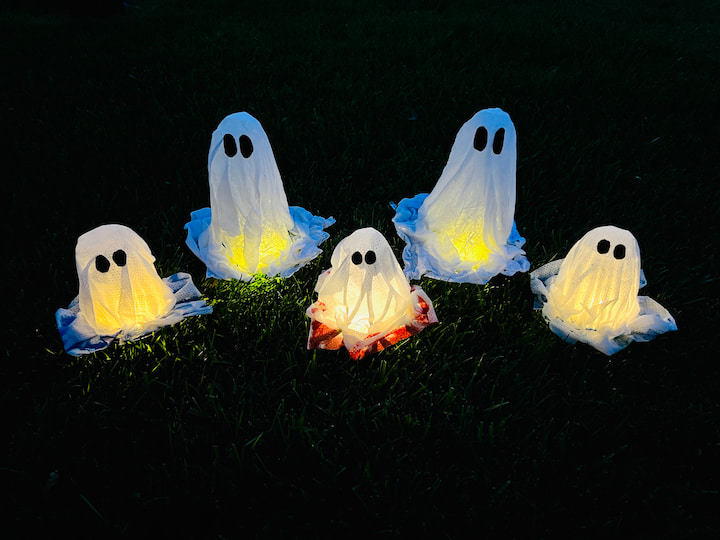
I decided to pull the base off of a solar light and stick it underneath the ghost to give them an added glow at night. You could use battery operated tealights or LED lights instead if you choose.
You can even use these fantastic ghosts to light your walkway on Halloween night.
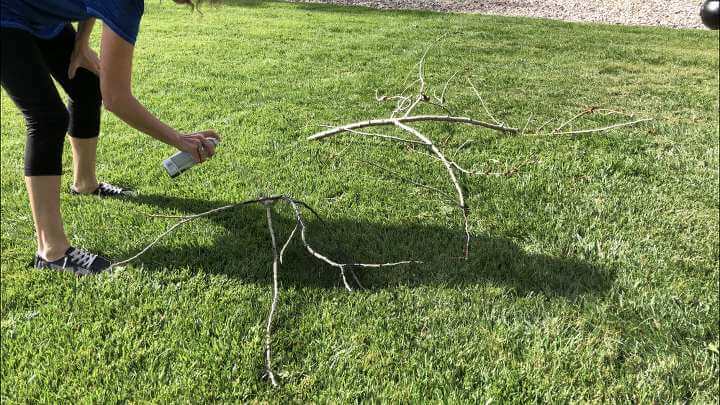
How Do You Make A Halloween Tree?
Easy DIY Halloween decorations can use natural materials found right in your yard.; I took a couple branches we had from fall clean up. I used black spray paint and painted them black then let them dry.
I used black spray paint and painted them black then let them dry.
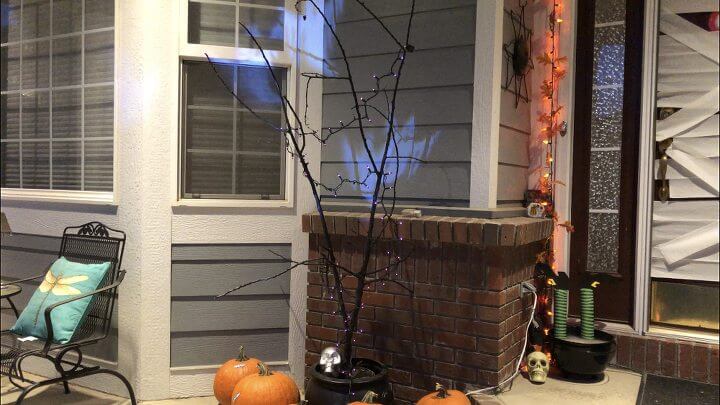
I put them in a flower pot and filled it with dirt to keep them in place.
I set the flower pot in a plastic cauldron I had on hand. You can find something similar at the dollar store.
I added some purple lights for added glow. You could also cut out creepy giant spiders, witches’ brooms, black birds, skeleton hands, bones, a skull or scary ghosts to hang on the tree.
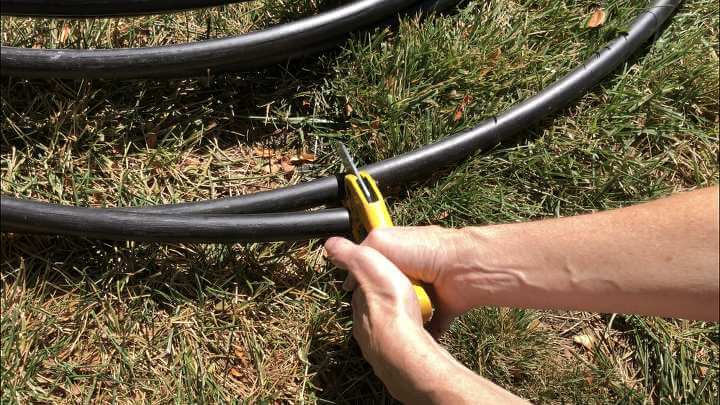
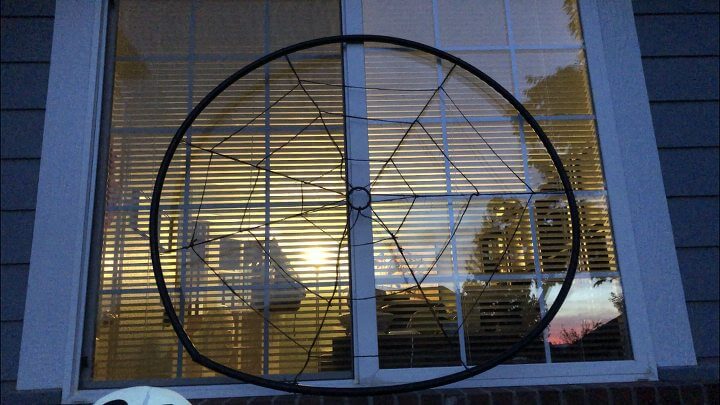
How Do You Make A Giant Spiderweb?
No spooky Halloween decorations are complete without spider webs. I cut some sprinkler pipe so that I could make a circle with it. You could also use pvc pipe.
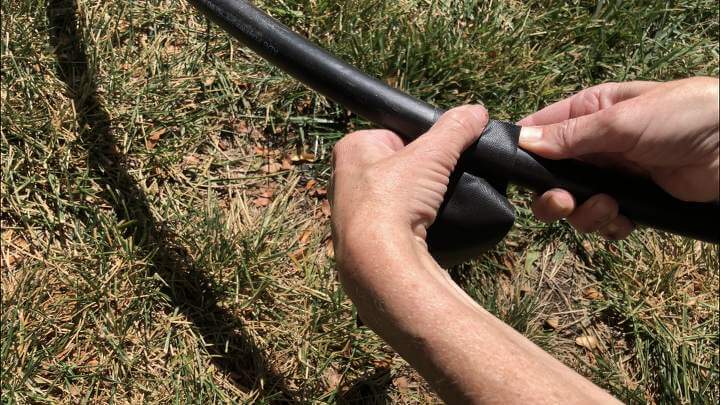
I taped it together with some gaffers tape.
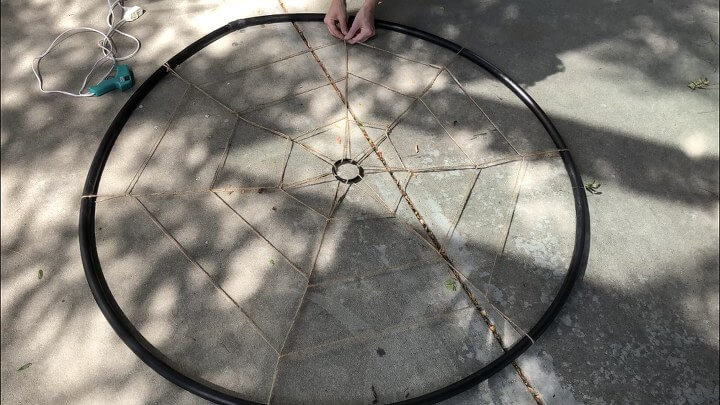
I used some twine I had on hand and created the web by weaving it around the tubing.
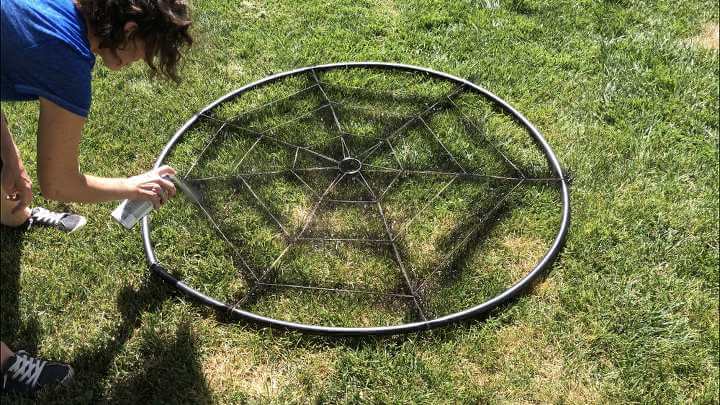
I spray-painted the twine black and let it dry.
I set my web in front of a window so it would be lit up on Halloween night.
Learn more about “Creating Seasonal Decor for Your Home” to create seasonal decor that doesn’t cost an arm and a leg.
Try making a graveyard by using scrap pieces of wood to make tombstones. Use dark paint on the wood and add an inscription.
You can choose so many from the basic glowing yellow light but most commonly the light colors that referred to as Halloween colors are orange, purple, and green.
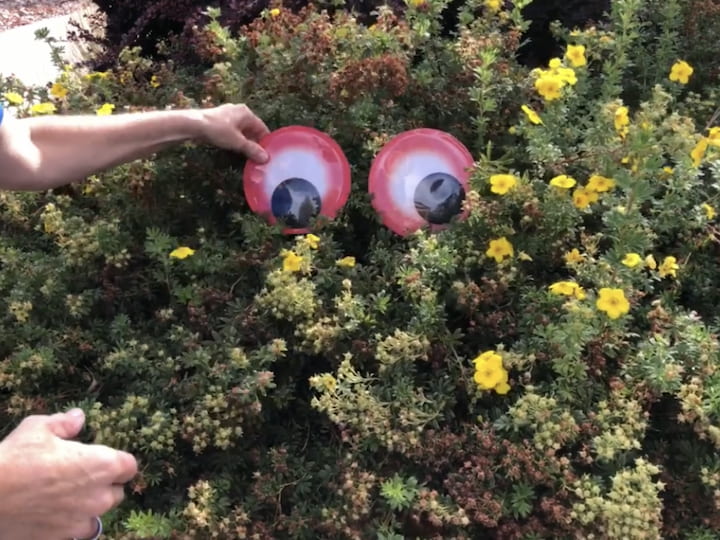
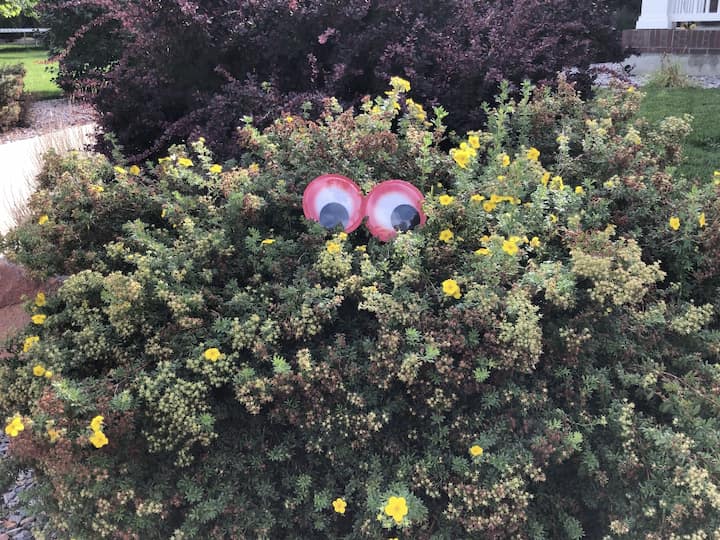
Easy Halloween Monster
Grab some large google eyes, and add them to a bush, tree, or tree trunk and you can create an easy DIY monster.
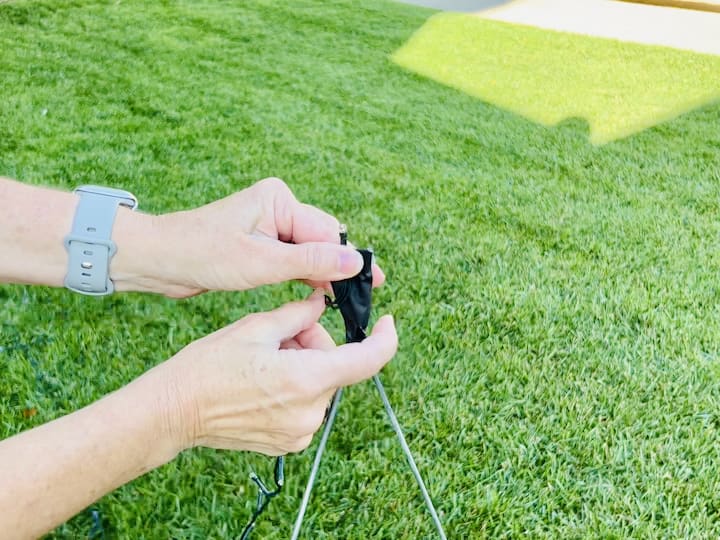
How do you make a witches hat out of a tomato cage?
Turn the tomato cage upside down and tape all the prongs together.
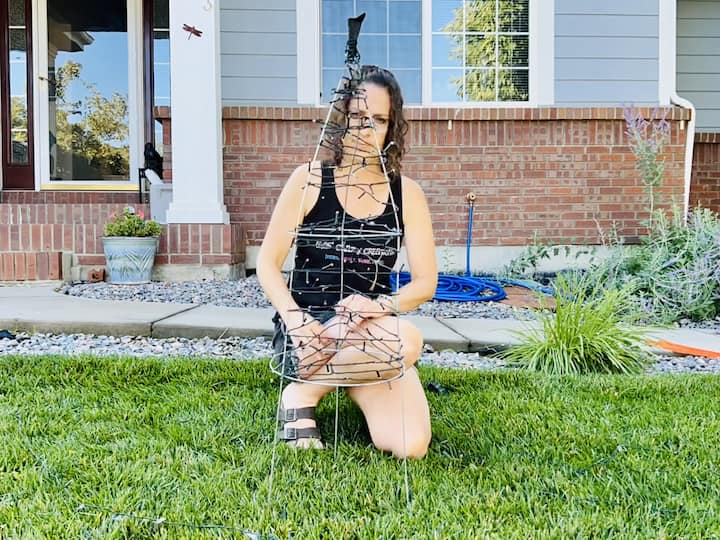
Place one end of your solar lights on top of the cage and wind the lights around it from top to bottom.
Wrap the rectangle tablecloth around the tomato cage, cutting off excess fabric, and tape it in place.
Unfold the circle tablecloth and roll it into a cone shape, trimming any excess.
Place the circle tablecloth on the ground, put the wrapped tomato cage on top, and secure the solar panel in the ground to ensure it gets sunlight.
Your giant witch hat is ready to impress both in the daytime and as the sun sets with its glowing solar lights.
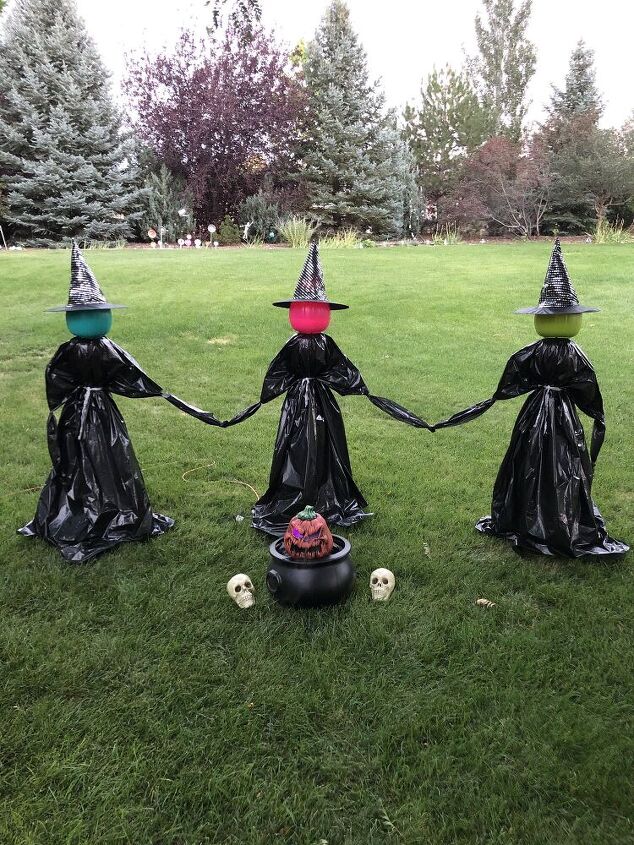
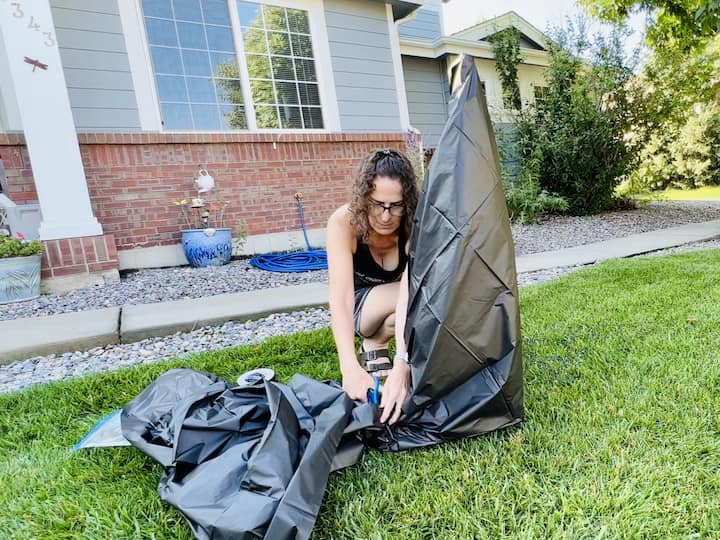
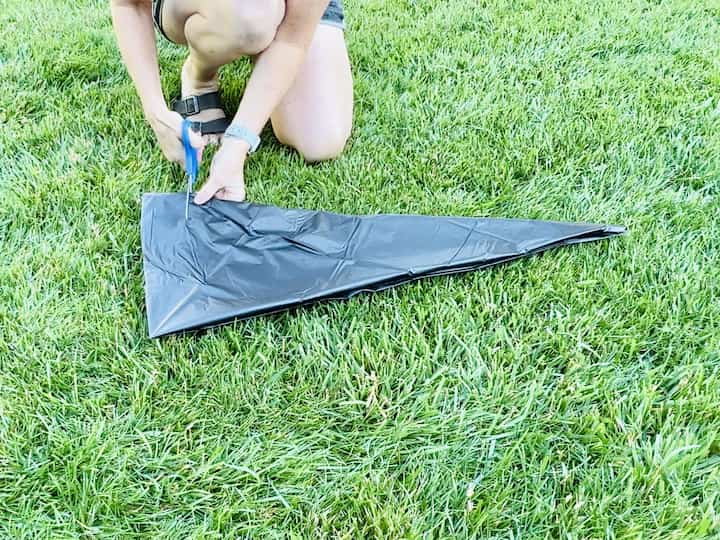
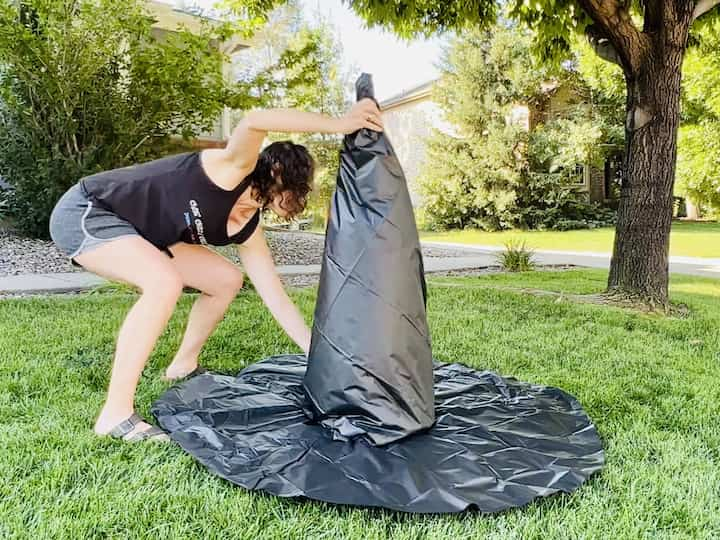
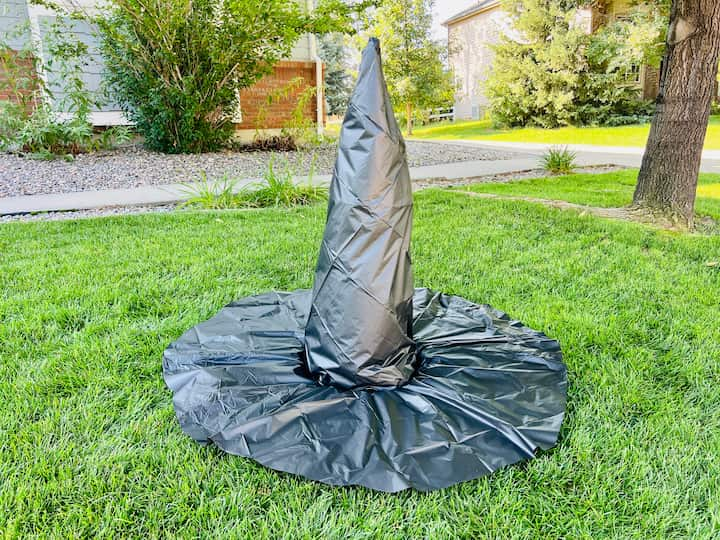
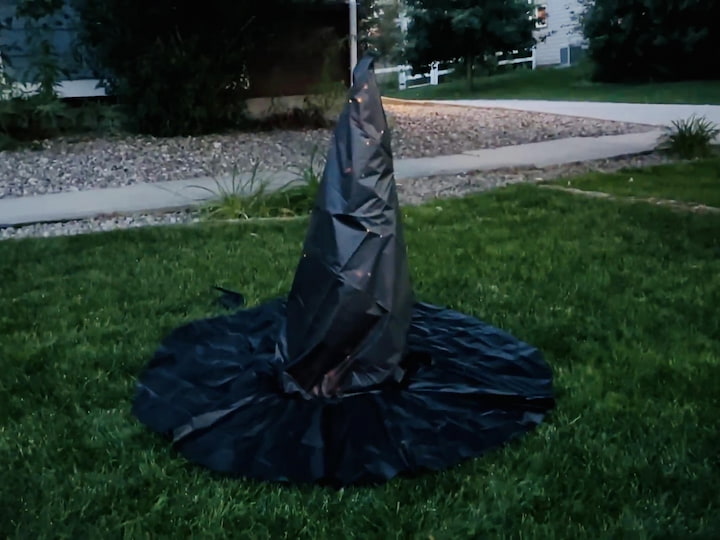
How do you make an easy Halloween witch?
Do you like decorating for Halloween but don’t want to break the bank doing it? I’m sharing how to make an easy Halloween witch on a budget! It’s super easy to make with just a few supplies and you probably have them on hand (like a black trash bags). You can see the full tutorial at How To Make An Easy Halloween Witch
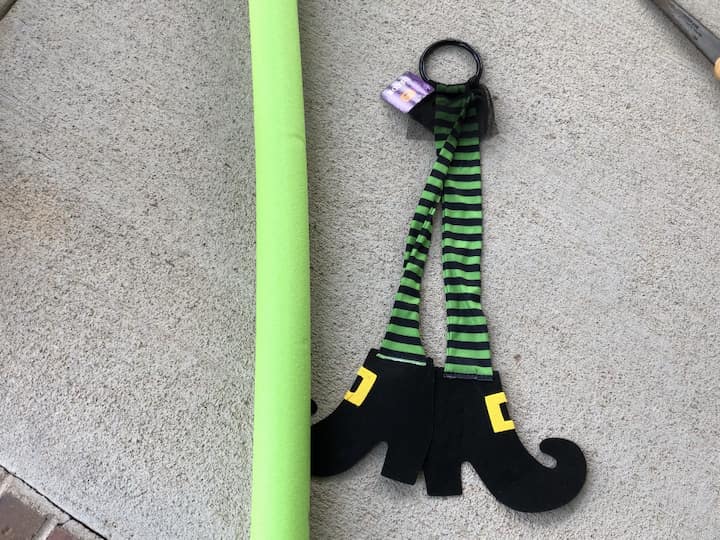
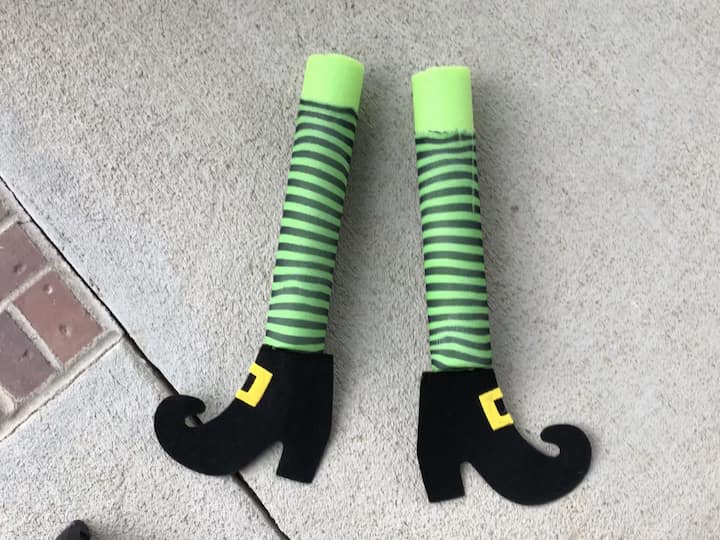
What do you need to make a cauldron?
Start with cutting a pool noodle in half, and cut the legs off a wicked witch legs dollar store decoration. Slide the witch legs onto the pool noodle.
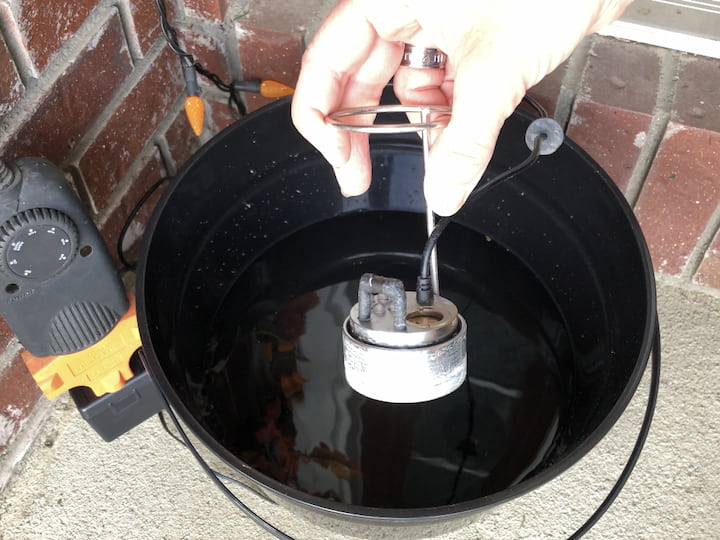
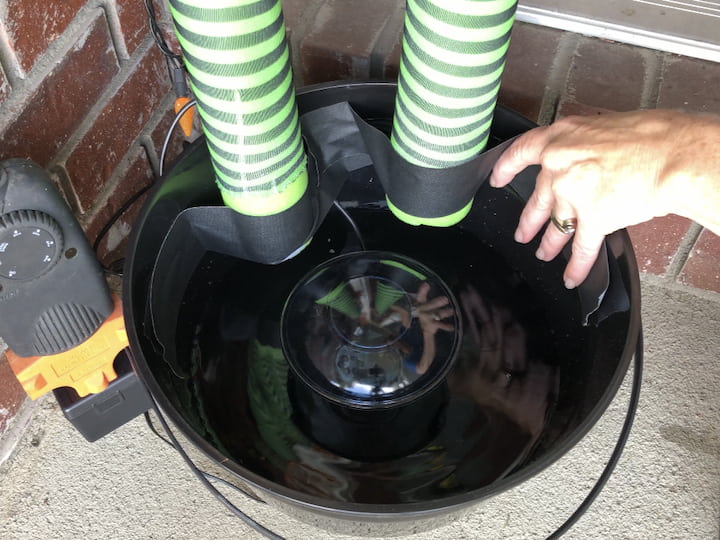
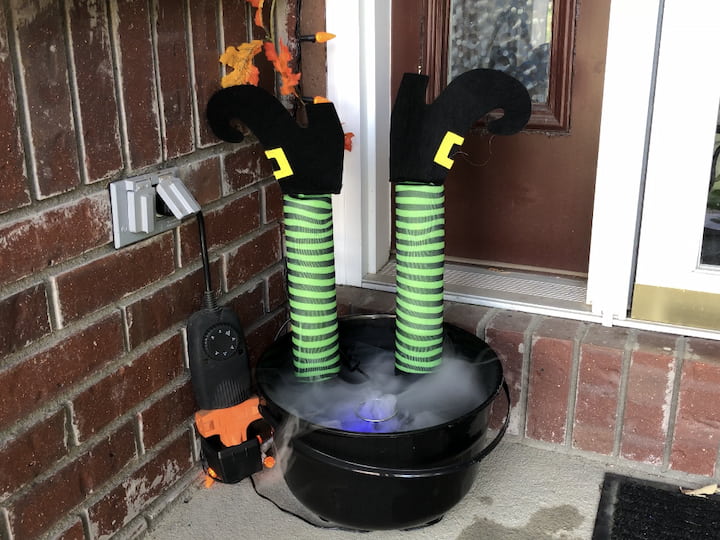
Add some water to the bottom of a plastic cauldron. Tape the legs upside down into the cauldron. Add a fog atomizer to the cauldron to create the misting effect.
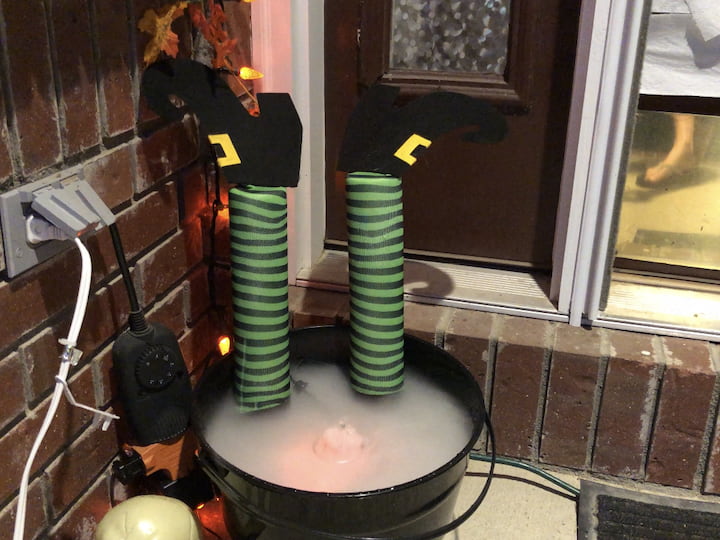
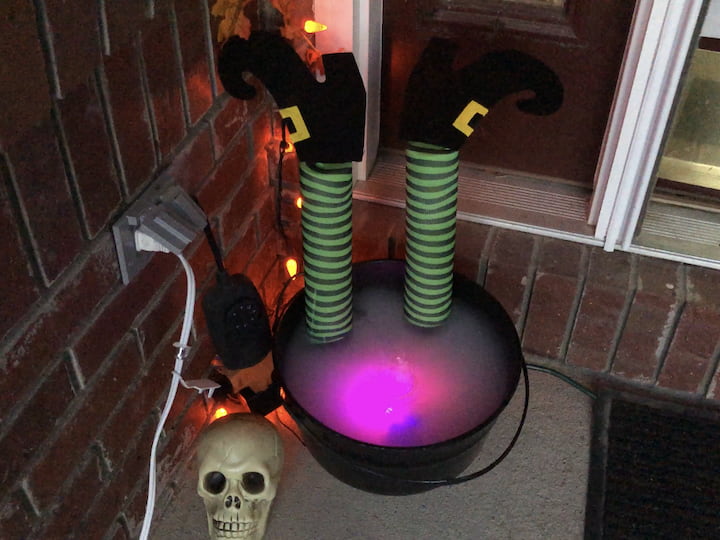
Your witch’s cauldron looks great by day and glows at night!
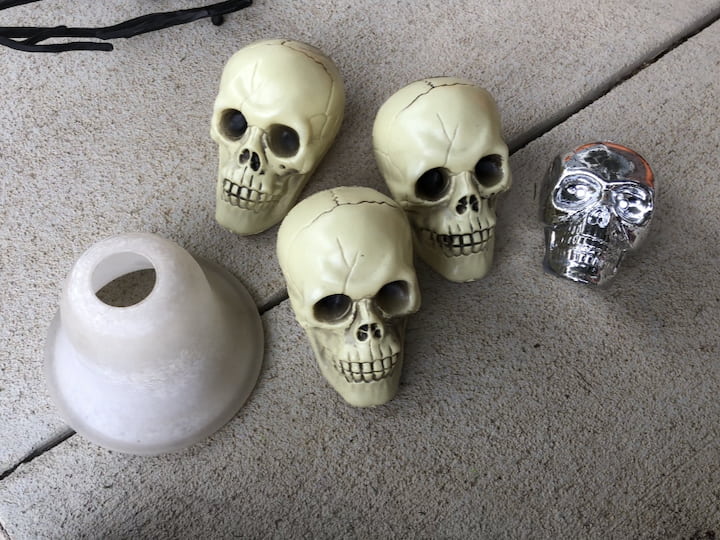
Glowing Skulls for DIY Halloween Outdoor Decorations
Grab some skulls from Dollar Tree
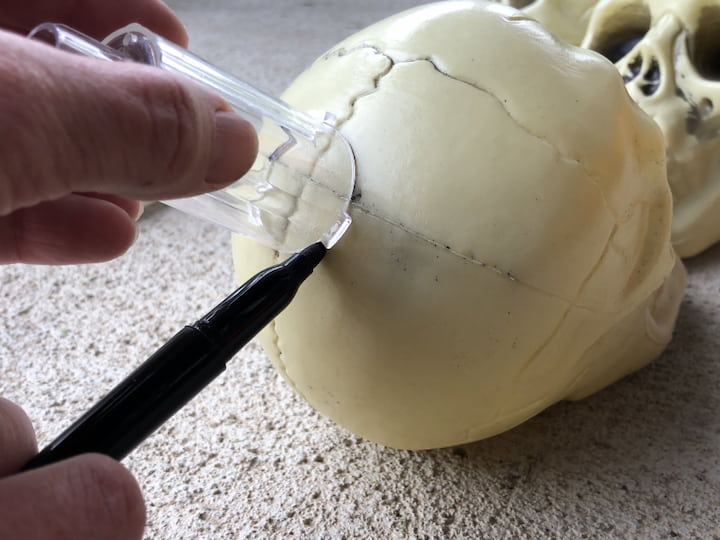
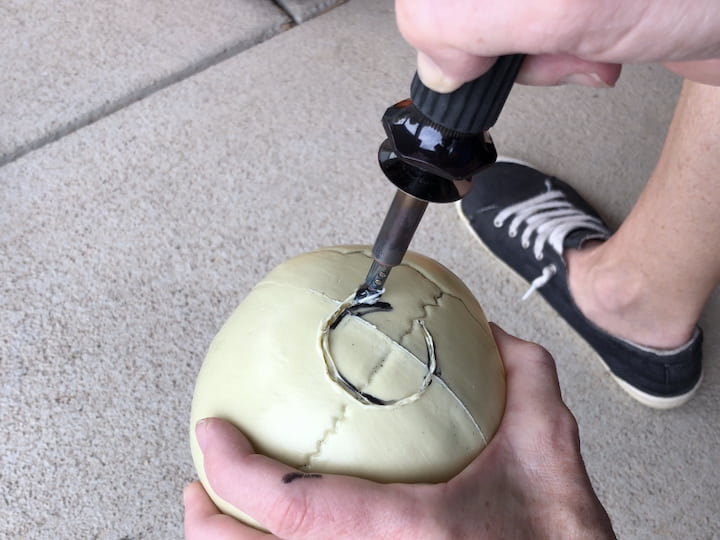
Remove the base from a solar light, and draw a circle onto the skull. Use a wood burning tool to cut through the plastic and remove the circle.
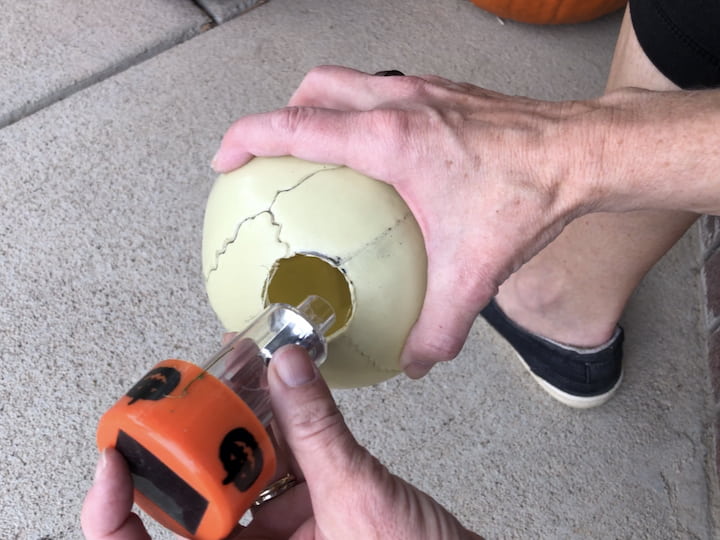
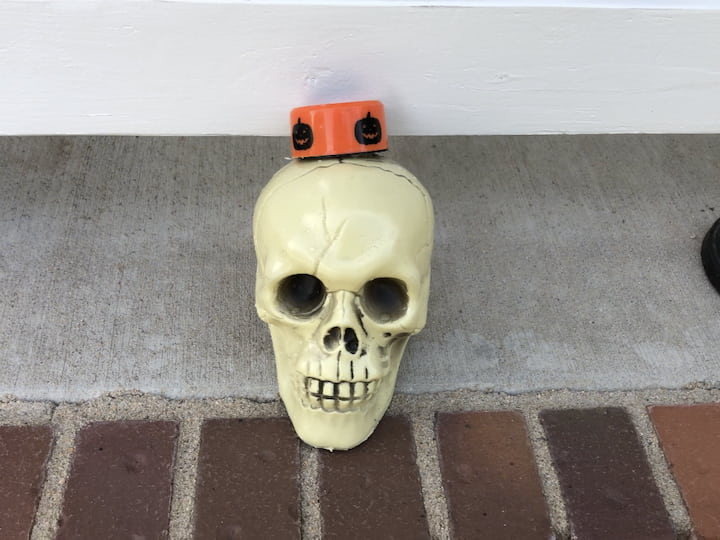
Place the solar light into the skull.
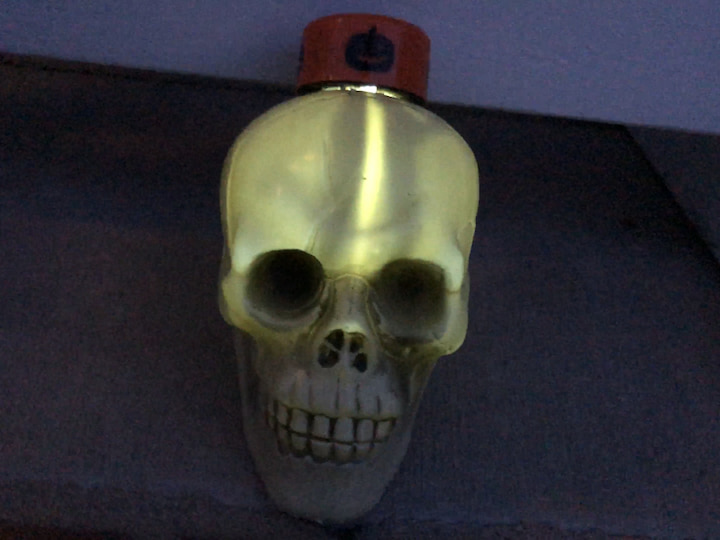
Watch your skull glow at night, and these make a great walkway decoration.
How do I make a graveyard in my yard for Halloween?
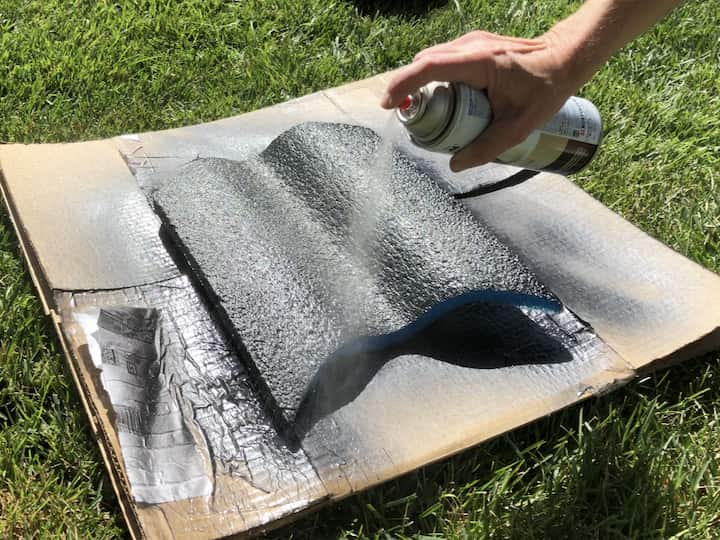
Grab a foam kickboard and paint it with black spray paint, then once that dries give it a coat of stone or concrete spray paint.
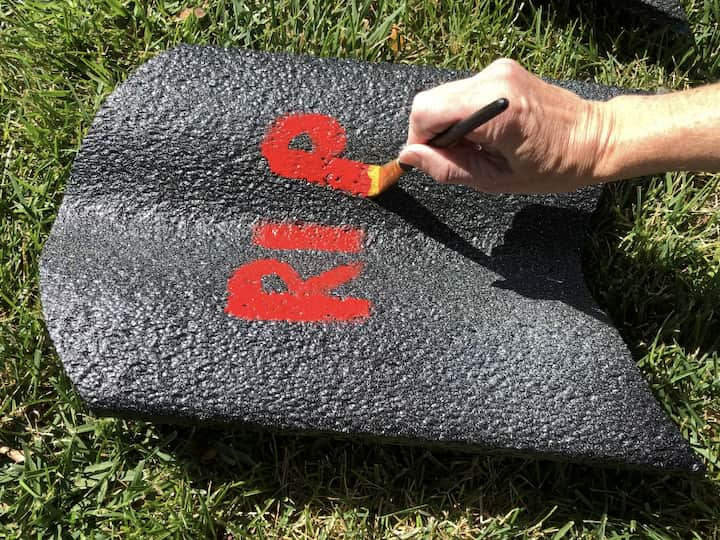
Once that dries, use red multi surface paint to paint on words of your choice.
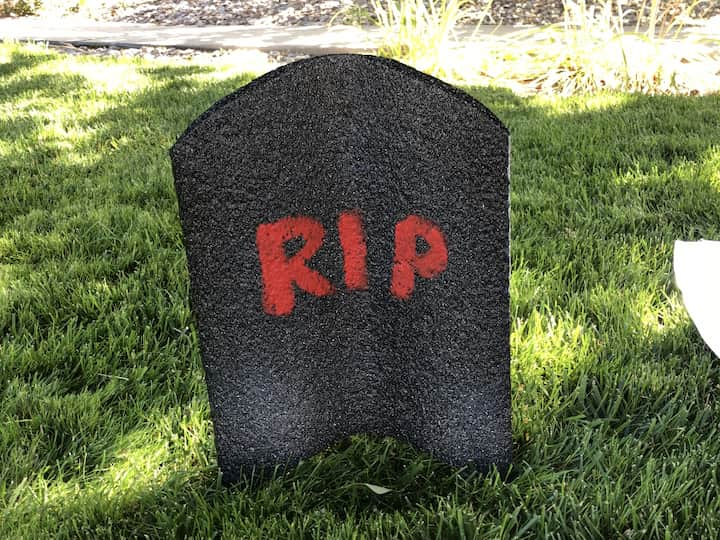
Stake into the ground and make several more to create your creepy graveyard.
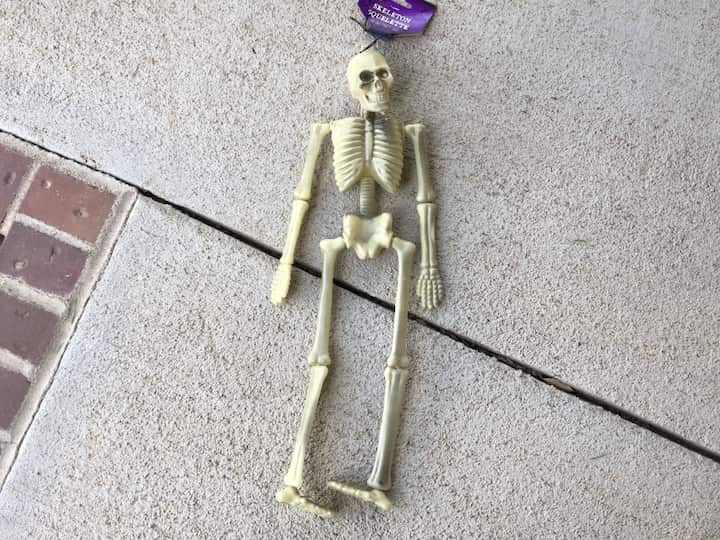
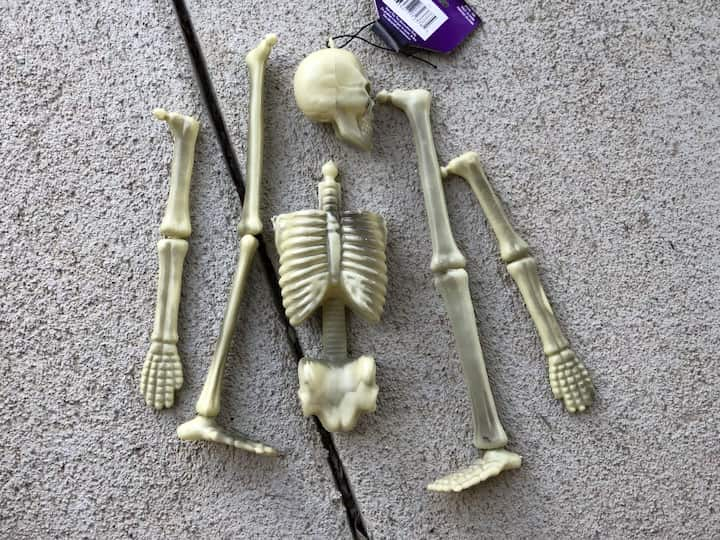
Make a DIY Skeleton Windchime for Halloween Outdoor Decorations
Start by pulling apart a dollar store skeleton.
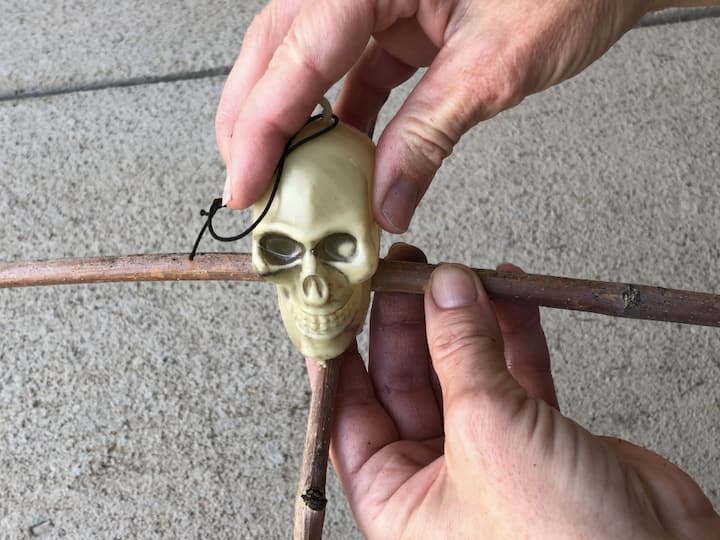
Glue two sticks together, and glue the skeleton head on top of that.
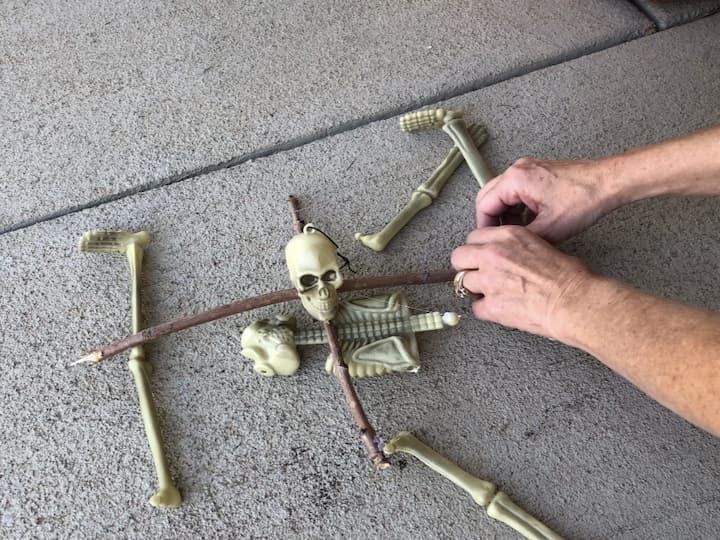
Tie pieces of fishing line to the other skeleton bones, and tie or hot glue those to the sticks.
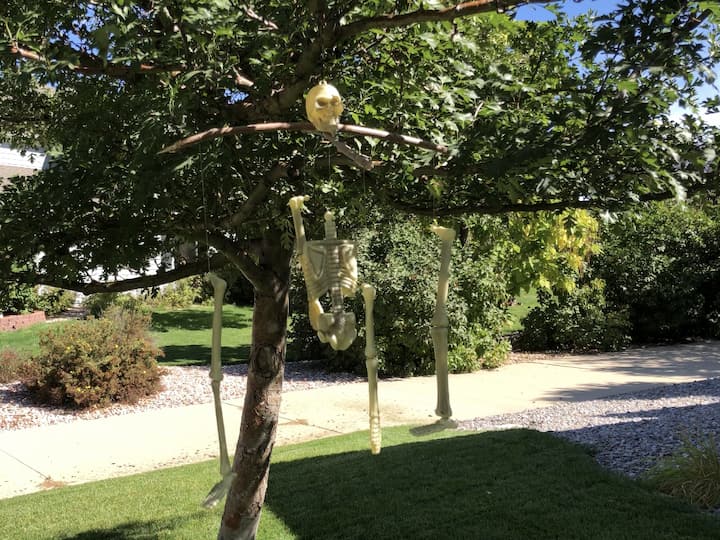
Hang it up on your porch or a tree branch.
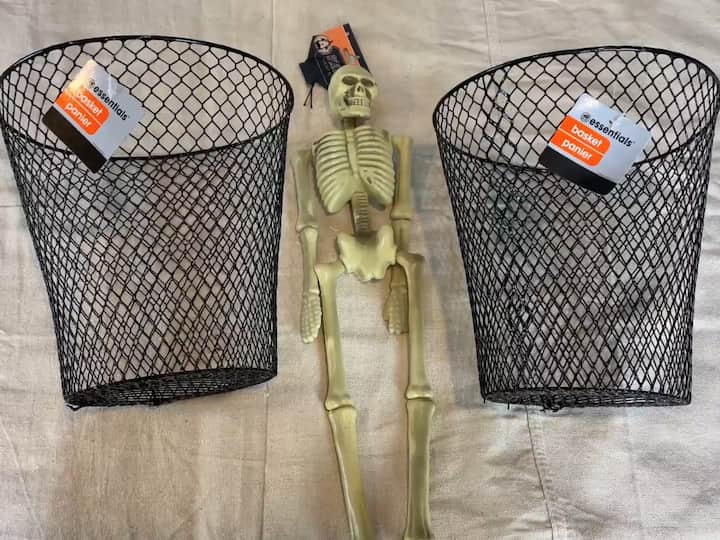
DIY Skeleton In A Cage
This is a fun project you can do using materials from your local dollar tree store, thrift store or craft store. You can usually find a wide variety of creepy skeletons in the Halloween section.
DIY Skeleton in a Cage Supplies Needed
- 2 wire trash cans
- 1 skeleton
- pipe cleaners or zip ties
Skeleton Cage Instructions
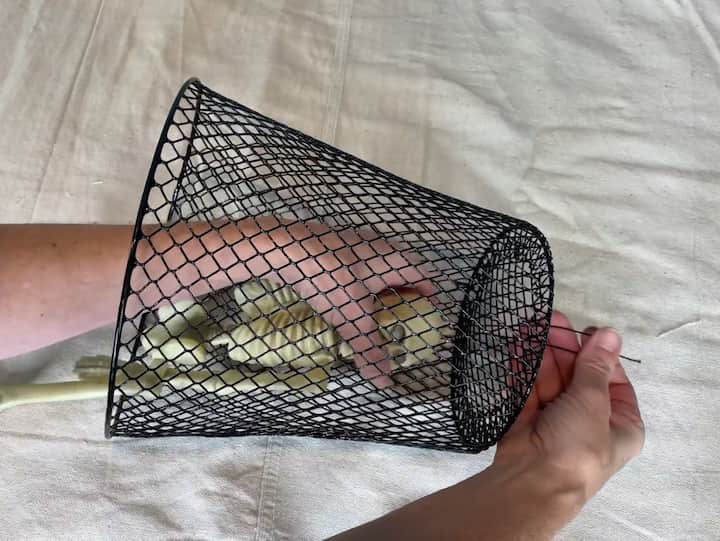
1. Tie the skeleton to the trash can
I removed the knot that came with the skeleton, and I tied it to the bottom of the trash can.

2. stack the trash cans
Stack the trash cans with the skeleton inside.
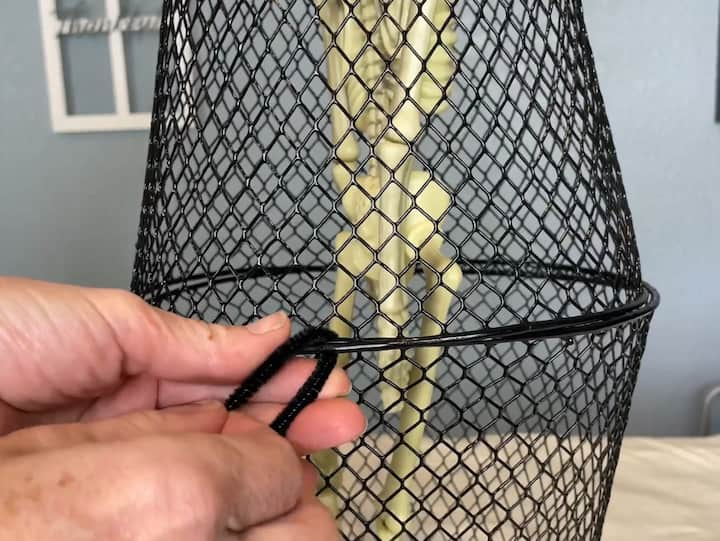
3. Adhere the trash cans together
I used pipe cleaners to make the trashcans stay together. I would have used Dollar Tree zip ties but they were out of stock at all of our stores.
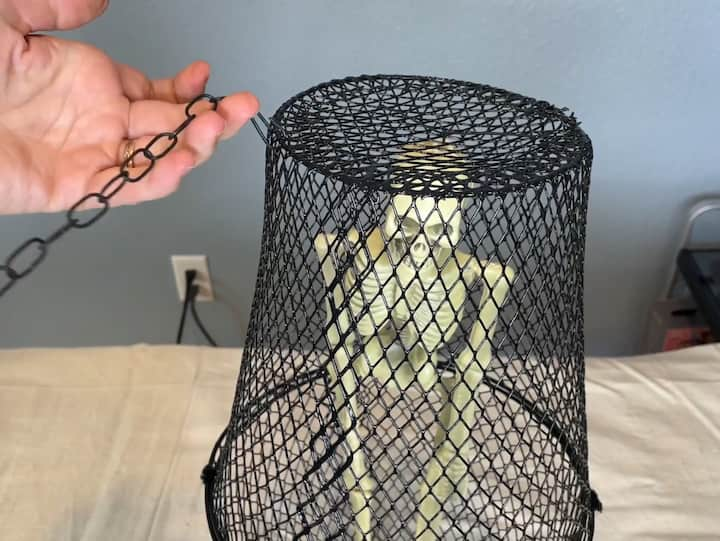
4. Add chains to the top
I had a Dollar Tree flower hanging basket, so I removed the chains from the basket it and used them on the top of the trash can where the skeleton head is.
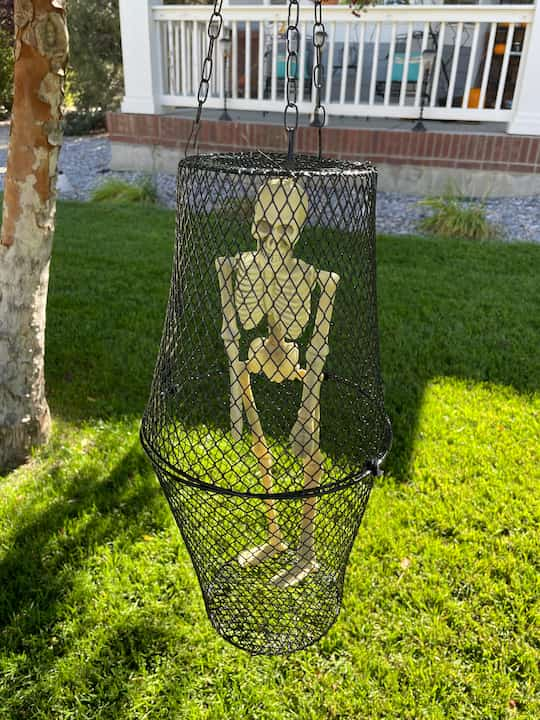
5. Hang your skeleton outside
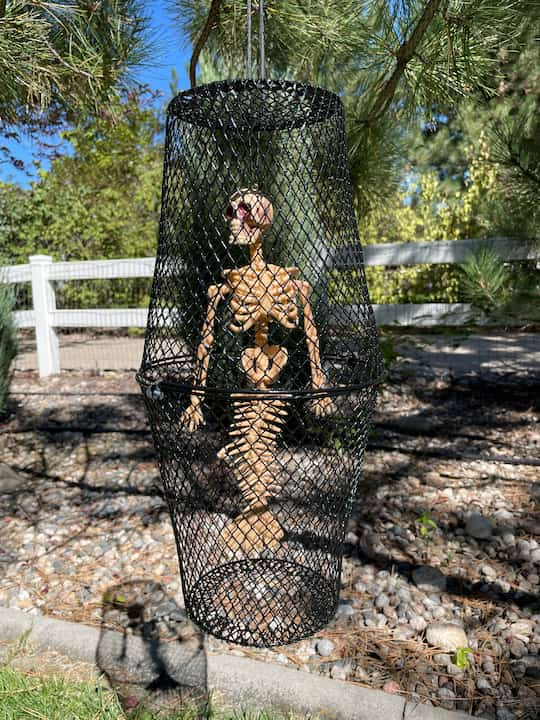
I created a second cage and this time I put a skeleton mermaid from Dollar Tree inside the cage. I used black paracord to tie the trash cans together and hang the cage.
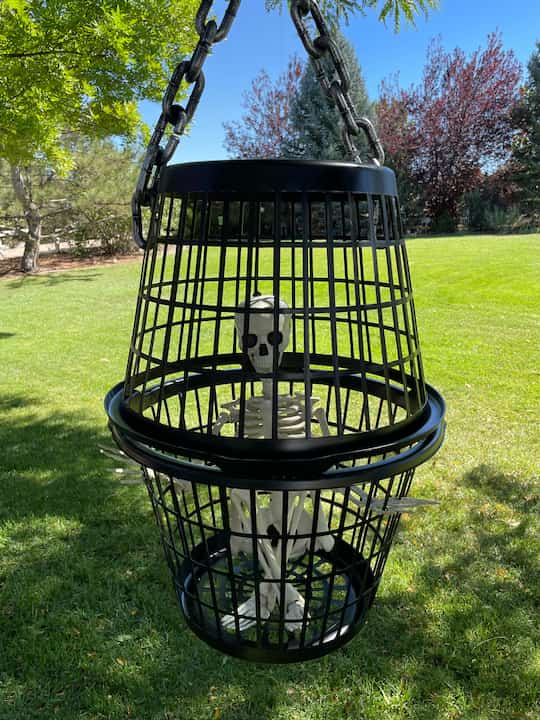
This skeleton cage is made from 2 Dollar Tree laundry baskets. I used black spray paint on the laundry baskets, added a skeleton and chains from Walmart, and hot glued the laundry baskets together. This project cost about $20 to make.
This skeleton cage would be great to hang on the front porch to welcome trick-or-treaters
Dollar Tree Halloween Crafts Skeleton Cage Video
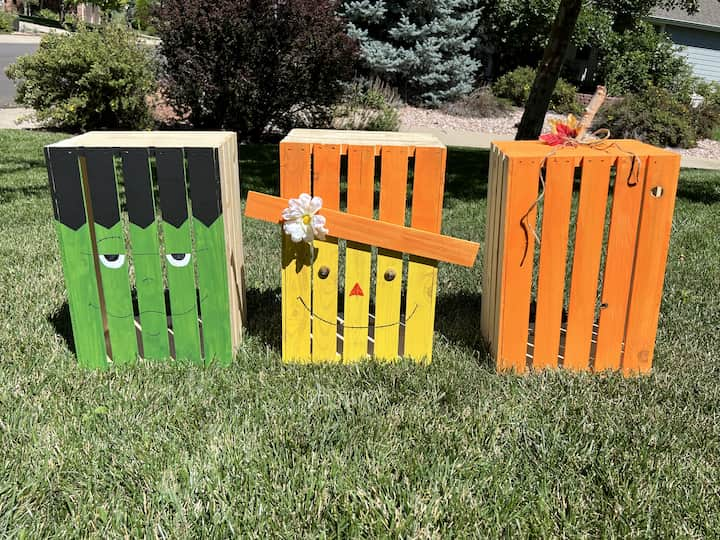
Outdoor Halloween Decor with Crates
Fall is my favorite time of year and I am always looking for unique fall decor ideas. I like to find ways to dress up my front yard with harvest displays, autumn decorations, or other seasonal accents. These fun fall decorations are a great way to welcome guests. They can be used as fall porch decor, yard decor, or as part of your outdoor fall displays. The Simplest Ways to Make the Best of Outdoor Fall Decor
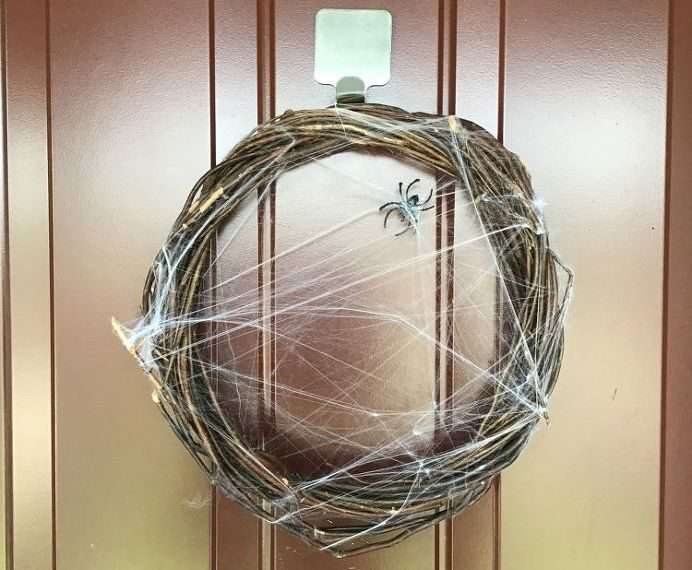
How to make a wreath for Halloween from Dollar Tree?
Are you looking for a Halloween wreath? Look no further as I share a super easy Dollar Tree DIY Halloween wreath! Easy DIY Halloween Wreath Dollar Tree
DIY HalloweenYard Decorations on a Budget Video
Shop any of these stores and I receive a small commission at no cost to you.
 It's the Great Pumpkin, Cha...Shop on Amazon
 Hallmark Oversized Peanuts ...Shop on Amazon
") It's the Great Pumpkin, Cha...Shop on Amazon
It's the Great Pumpkin, Cha...Shop on Amazon Peanuts Halloween Charlie B...Shop on Amazon
 Halloween Songs for KidsShop on Amazon


Thanks for being so creative for the rest of us!! Love it all best basketball ghost
Thank you so very much Debbie. I’m thrilled you like the ghost
Chas,
such cute yard ideas for Halloween. Congratulations, you are being featured on Thursday Favorite Things. Hope you stop by. http://www.eclecticredbarn.com/2019/10/thursday-favorite-things_31.html
Hugs,
Bev
Thank you so very much for the feature Beverly, I truly appreciate it and can’t wait to join you at the next party 🙂
So many fun ideas in this post! Thank you for linking up to Creative Compulsions!
Thank you so much Michelle
These are some great ideas! I’ve pinned them to my Halloween Board so next year I’ll be set.
Thank you so much Susan and thanks for the Pin 🙂
Thank you for sharing at #ThursdayFavoriteThings. Pinned and shared. Have a lovely week. I hope to see you at next week’s party too!
Thank you so much Marilyn, and I hope you’re having a wonderful weekend.
Such a fun display of Halloween decorations!
Thank you Tamar 🙂
So many great DIY ideas in this post. Thanks for sharing with us at Creatively Crafty Link Party #CCBG
Thank you so much Janet 🙂
Hi Chas, Found this post on a linky party and I am sharing this for the weekend edit over at Everyday Edits dot co! Love the ideas! laura
Thank you so much Laura, so nice of you to share – I appreciate the support.
Brilliant selection. I love the mummy door
Mollyx
Thank you so much Molly 🙂
Love it, especially your basketball ghost, he’s pretty cute! Thanks so much for sharing your talent with us at the Creative Muster. Looking forward to seeing what you’ll be sharing next week. Pinning!
Robin?
Thank you so much Robin, and thanks for the Pin and support. I truly appreciate it.
Great ideas! Not all decor needs to be a budget breaker.
Thank you Kathy
Such fun decor! Visiting you from the hearth and home link party. laurensparks.net
Thank you so much Lauren and thanks for stopping by
These are awesome! Not sure which one to start on first! I saw your link at the Hearth and Soul Link Party—thanks for sharing!
Thank you so much Amy, and thanks for stopping by.
I love the tree! We have tons of sticks and branches in our yard from a tree that recently broke. I need to do this!
Thank you so much Michelle. The trees are so easy to make and so fun 🙂
cute
Thank you so much Faith
welcome