The Ultimate Guide to Concrete Crafts

Are you looking for concrete crafts? Concrete isn’t just for sidewalks and driveways anymore. The versatility and durability of this material have made it popular for a wide range of DIY concrete crafts and projects. These crafts range from beginner-friendly planters to sophisticated concrete pendant lamps. So, get your bag of concrete ready as we dive into this amazing world of concrete creativity.

1. Why Choose Concrete for Crafting?
Concrete crafts are becoming increasingly popular. The material’s rugged texture and neutral color make it an excellent choice for home decor. Whether you’re interested in creating practical items like candle holders or something more ambitious like your own concrete countertops, there are endless creative ideas to explore.
2. The Basics: Types of Concrete Mixes
What kind of concrete do you use for crafts?
Not all cement mixtures are created equal. It’s essential to understand the different types of concrete mixes. Portland cement, sand, and gravel are the basic components, but the type of mix and consistency can vary.
- Portland Cement: The base of many cement mixtures.
- Setting Time: Each mixture has its own setting time.
- Consistency: Varies based on what you’re planning to craft.
For crafts, you’ll want to choose a concrete mix that is specifically formulated for smaller projects and provides a smoother finish. There are several types of concrete mixes suitable for crafts, and the choice depends on your specific needs and preferences. Here are a few options:
- Quick-Setting Cement:
- This type of concrete mix is designed to set quickly, often within 20 to 30 minutes. It’s a good choice for small crafts where you want faster results. Quick-setting cement is available from various brands, including Quikrete.
- Concrete Countertop Mix:
- Countertop mixes are formulated to produce a smooth and durable finish, making them suitable for crafting projects. They often contain fine aggregates that contribute to a polished appearance. Some countertop mixes may require longer curing times.
- Sculpture or Craft Concrete Mix:
- Some manufacturers offer specialty concrete mixes specifically designed for sculpting or crafting. These mixes may have finer particles, making them easier to work with for detailed projects.
- White Concrete Mix:
- If you want to create crafts with a lighter or white appearance, consider using a white concrete mix. These mixes are formulated to produce a lighter color, making them suitable for projects where the natural gray color of concrete may not be desirable.
- Polymer-Modified Concrete Mix:
- Polymer-modified concrete mixes often contain additives that improve flexibility and adhesion. These mixes can be a good choice for crafts that may require some flexibility, such as thin or curved pieces.
When selecting a concrete mix for crafts, consider the following factors:
- Setting Time: Quick-setting mixes are ideal for projects with a short timeline, while others may require more extended curing times.
- Smooth Finish: Look for mixes that are designed to produce a smooth and refined surface, especially if you want to create detailed or decorative crafts.
- Color Options: Some concrete mixes come in different colors, or you can add pigments to achieve the desired color for your crafts.
- Project Size: Choose a mix appropriate for the size and complexity of your craft project.
Always follow the manufacturer’s instructions on the packaging for mixing ratios, curing times, and other specific guidelines. Additionally, consider wearing appropriate protective gear, such as gloves and safety goggles, when working with concrete mixes.
3. Basic Materials needed:
- Silicone Mold/Plastic Cup: For crafting smaller items.
- Sandpaper: For smoothing out rough edges.
- Spray Bottle: To maintain the right moisture level.
How to make concrete crafts?
Making concrete crafts can be a fun and creative DIY project. Here’s a general guide on how to make concrete crafts:
Materials and Tools Needed:
- Concrete Mix: Choose a concrete mix suitable for crafts. Options include Quick-Setting Cement or specialty mixes like Countertop Mix, which may provide smoother finishes.
- Water: To mix with the concrete according to package instructions.
- Molds: Use silicone molds, plastic molds, or other materials to shape the concrete. You can purchase molds or create your own.
- Mixing Container: A bucket or mixing tray for combining the concrete and water.
- Stirring Stick or Mixer: To mix the concrete thoroughly.
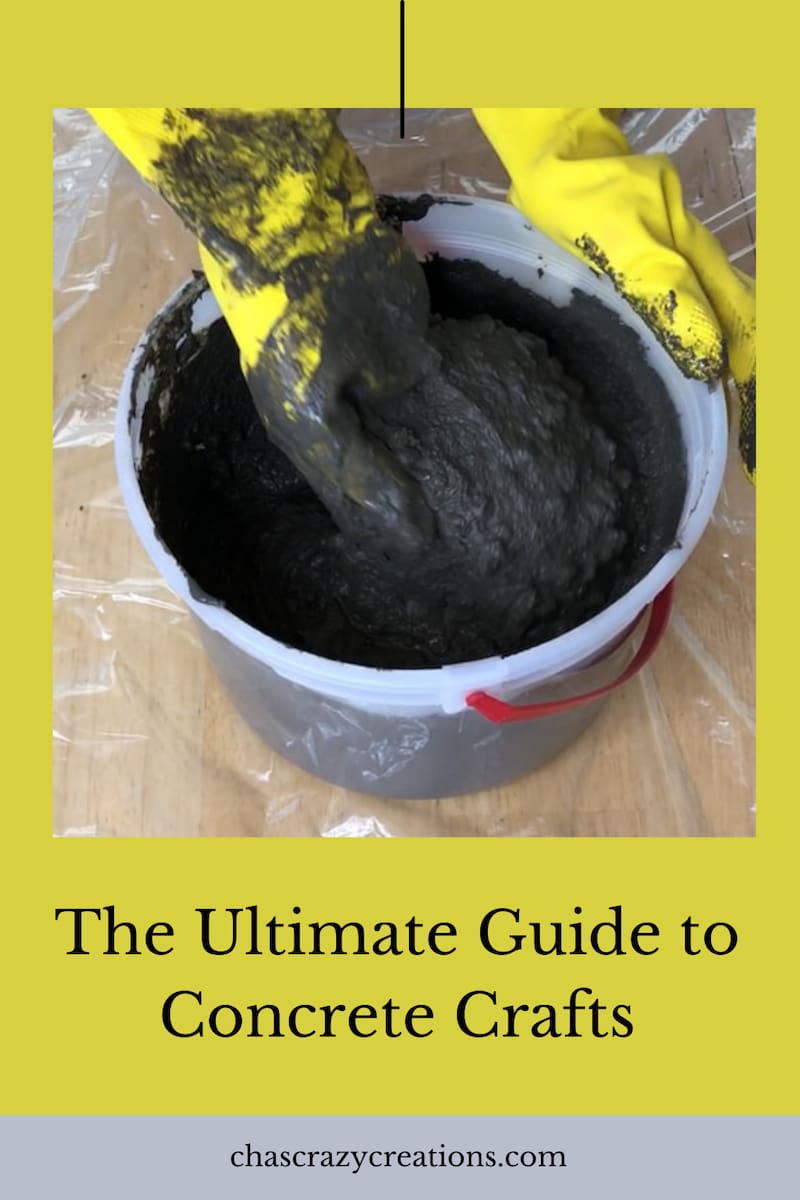
- Protective Gear: Wear gloves, safety goggles, and a mask to protect yourself from concrete dust.
- Release Agent (optional): To help release the cured concrete from the molds more easily.
- Trowel or Finishing Tools: For smoothing and finishing the concrete surface.
- Sandpaper or Abrasive Pads (optional): For sanding and refining the surface.
Steps:
- Prepare the Workspace:
- Work in a well-ventilated area and cover your work surface with plastic or a drop cloth to make cleanup easier.
- Prepare the Molds:
- If you’re using molds, apply a release agent to help release the cured concrete. This step is optional but can make demolding easier.
- Mix the Concrete:
- Follow the instructions on the concrete mix packaging to create the concrete mixture. Typically, this involves combining the dry mix with water until you achieve a workable consistency.
- Fill the Molds:
- Pour the mixed concrete into the molds. Tap the molds gently on a flat surface to release air bubbles and ensure the concrete settles evenly.
- Smooth and Finish:
- Use a trowel or other finishing tools to smooth the surface of the concrete. You can create different textures and finishes depending on your preference.
- Curing:
- Allow the concrete to cure according to the manufacturer’s recommendations. Quick-setting mixes may cure in a few hours, while others may take longer.
- Demold:
- Once the concrete has fully cured, carefully remove it from the molds. If you encounter resistance, the concrete may need more time to cure.
- Optional Sanding:
- If desired, you can sand the cured concrete to refine the surface and smooth any imperfections.
- Sealing (optional):
- Consider applying a concrete sealer to protect and enhance the appearance of the finished crafts.
- Decorate (optional):
- After sealing, you can paint, stain, or decorate your concrete crafts as desired.
Remember to follow safety guidelines, especially when working with concrete mix and dust. Always wear appropriate protective gear and work in a well-ventilated space. Experiment with different molds, colors, and finishes to create unique and personalized concrete crafts.
What can I make out of concrete?
Concrete is a versatile material that can be used to create a wide range of items, both functional and decorative. Here are some ideas for things you can make out of concrete:
Planters and Garden Decor
Planters are among the easiest concrete crafts. You can use plastic bottles or silicone molds as your molds. There are numerous tutorials available that provide step-by-step photos to ensure you follow directions precisely.
Concrete planters are sturdy and versatile outdoor containers made from durable cement material. These planters provide a modern and industrial aesthetic while offering stability for plants, making them a stylish and practical choice for garden or patio décor.
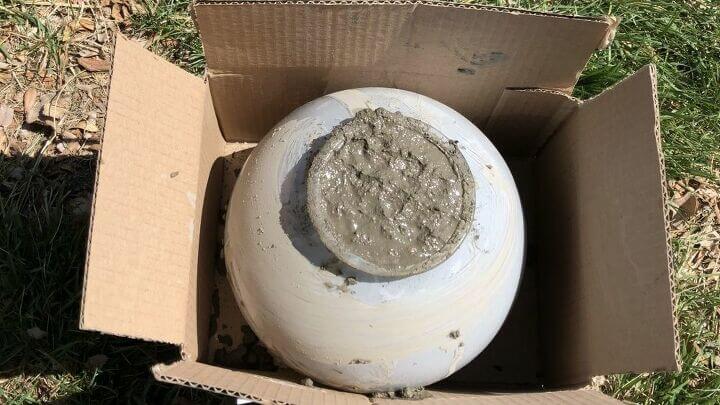

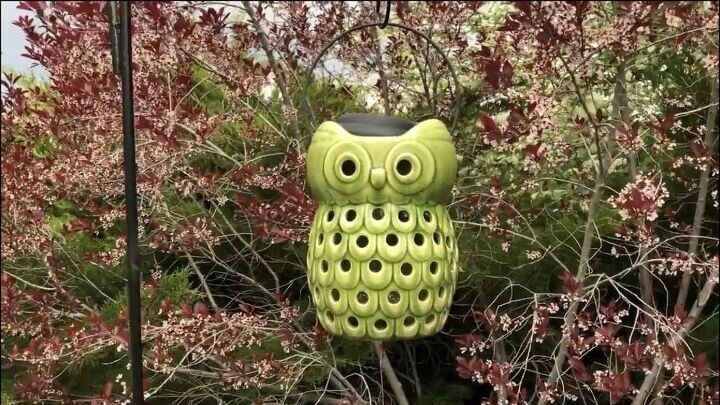
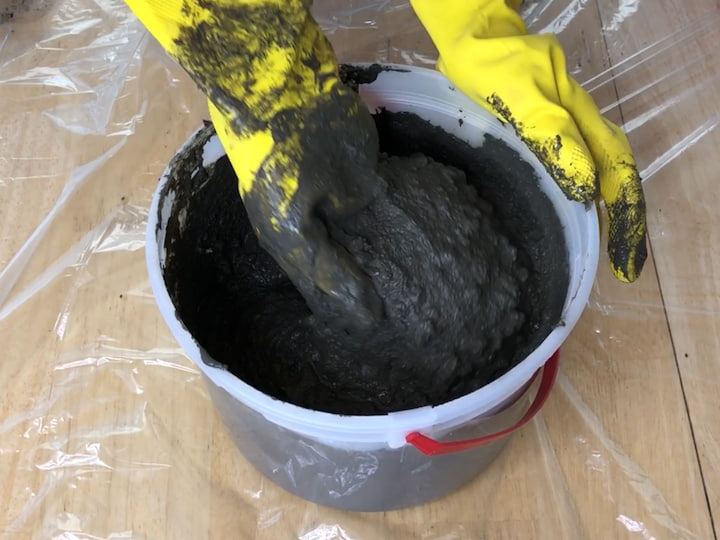
Garden Sculptures Garden Globe – I mixed the cement mix and water to make a “mud” consistency. I placed it in a light fixture I found at the thrift store and let it dry. I gently broke the glass with a hammer and removed the cement ball from the glass and placed it in my yard. You can find the full tutorial at Easy and Awesome DIY Gazing Ball Garden Globe for your Yard
Concrete Bowls are great for birdbaths, planters, and so many more ideas.
Stepping stones DIY concrete stepping stones offer a creative and customizable way to enhance your garden or walkway. By mixing and pouring concrete into personalized molds, you can craft unique and durable stepping stones that add a personalized touch to your outdoor space while providing a functional pathway.
Furniture
Creating DIY concrete furniture involves molding and casting concrete to fashion custom pieces for interior or outdoor spaces. From sleek tables to minimalist benches, this hands-on approach allows for unique designs and sizes tailored to individual preferences. The process typically includes crafting molds, mixing and pouring concrete, and adding personal touches like pigments or embedded elements for a customized and modern aesthetic.
Concrete tables with their robust and versatile nature, provide a contemporary and durable centerpiece for indoor or outdoor spaces.
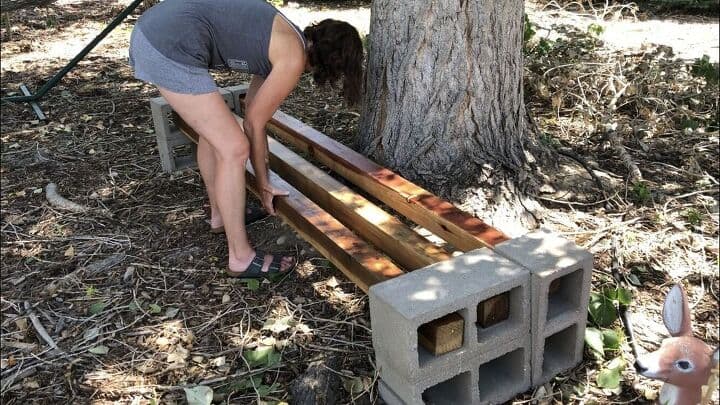
Benches crafted from concrete offer a sleek and minimalist seating solution, blending functionality with a modern aesthetic. I created one with cinderblocks and wood, but you could craft the whole thing out of concrete if you’d rather. You can find the tutorial at How To Make A DIY Cinderblock Bench
Concrete stools and outdoor seating options add an industrial chic flair to gardens or patios, combining strength with style for enduring and eye-catching furniture pieces.
Home Decor
Engage in the art of DIY concrete crafts to craft distinctive home decor pieces. Whether it’s personalized plant pots, geometric candle holders, or intricately molded trays, working with concrete allows for endless creativity. Mixing and pouring concrete into molds, adding pigments or textures, and finishing with sealants can result in unique and contemporary home decor items that reflect your individual style.
Concrete Candle Holders: Create stylish and modern concrete candle holders by mixing and pouring concrete into customized molds. Experiment with different shapes, sizes, and textures to craft unique holders that add a touch of industrial charm to your home decor. Once set, these DIY candle holders can be further personalized with paints or metallic accents.
Concrete Bookends: Crafting concrete bookends involves molding the material into geometric or artistic shapes that complement your bookshelf. Mix and pour the concrete into chosen molds, and once set, sand and seal the bookends for a polished finish. The result is a set of sturdy and aesthetically pleasing bookends that showcase your love for literature in a contemporary way.
Concrete Wall Shelves: Design your own minimalist and functional wall shelves by creating concrete brackets and pairing them with wooden or glass shelves. Pour the concrete into molds that suit your desired design and size, allowing it to cure before attaching the shelves. These DIY concrete wall shelves add an industrial flair to your space while providing a practical solution for displaying decor items.
Concrete Clocks: Crafting concrete clocks involves molding the material into a clock face shape and embedding clock mechanisms during the pouring process. Experiment with textures, colors, and sizes to create a unique timepiece that doubles as a decorative element. Once cured, assemble the clock components, and enjoy a customized concrete clock that stands out as a functional work of art in your home.
Kitchen Accessories
Elevate your kitchen decor with DIY concrete crafts for unique and functional accessories. Craft sleek and modern concrete utensil holders by molding the material into geometric shapes or personalized designs. Design custom concrete coasters by pouring and curing the material in molds, adding a touch of industrial charm to your dining space. Create chic concrete trivets or cutting boards by combining concrete with other materials for a stylish and durable kitchen accent. These handmade concrete kitchen accessories not only serve a practical purpose but also add a touch of contemporary elegance to your culinary space.
Concrete Countertops: Transform your kitchen with DIY concrete countertops, a project that involves mixing and pouring concrete onto molds fitted to your countertop dimensions. Add pigments or textured finishes for a personalized touch, creating a durable and modern surface that complements your kitchen decor.
Concrete Cutting Boards: Craft your own unique cutting boards by combining concrete with wooden or metallic elements. Pour the concrete into custom molds, incorporating designs or patterns, and once cured, pair it with a wooden base for a stylish and functional addition to your kitchen.
Concrete Trivets: Design contemporary trivets by molding concrete into desired shapes and sizes, creating sturdy and heat-resistant platforms for hot pots and pans. Add flair to your dining table or kitchen countertops with these functional yet aesthetically pleasing DIY concrete trivets.
Concrete Coasters: Personalize your space with DIY concrete coasters by pouring the material into molds and allowing it to set. Experiment with colors, textures, and shapes to craft custom coasters that not only protect your surfaces but also serve as unique and eye-catching elements in your home decor.
Lighting Fixtures
Illuminate your space with a touch of industrial elegance by crafting DIY concrete lighting fixtures. Create pendant lamps by molding and casting concrete shades, experimenting with shapes and textures to achieve a modern aesthetic. Whether it’s sleek hanging bulbs or intricately designed concrete lampshades, these handmade lighting fixtures offer a unique blend of functionality and contemporary style, adding a personalized and sophisticated touch to your home.
Pendant Lights: Elevate your lighting game with DIY concrete pendant lights. Mold and cast concrete into stylish and customizable shades, experimenting with shapes and finishes. Hang these unique fixtures to add an industrial-chic flair to your space, combining functionality with a touch of modern design.

Table Lamps: Craft your own personalized table lamps by incorporating concrete into the base design. Experiment with geometric shapes or intricate molds to create a modern and sturdy foundation. Pair the concrete base with a complementing lampshade to achieve a contemporary look that stands out on your bedside table or desk.
I made this concrete lamp and you can find the tutorial at Super Cool and Easy DIY Dollar Tree Concrete Light
Wall Sconces: Enhance your wall decor with handmade concrete wall sconces. Mold the concrete into sleek and minimalist shapes, allowing for the creation of unique fixtures that provide both ambient and functional lighting. Install these custom sconces to infuse a touch of industrial elegance into your living space.
Art and Sculptures
Express your creativity with DIY concrete art and sculptures. Mold and carve concrete into abstract or intricate shapes to craft unique and durable sculptures that add a touch of modern sophistication to your indoor or outdoor space. Experiment with pigments, textures, and finishes to create personalized concrete art pieces, allowing you to showcase your artistic flair in a medium known for its versatility and longevity.
Abstract Sculptures: Unlock your artistic expression with DIY concrete abstract sculptures. Mold and shape the concrete into fluid or geometric forms, allowing for a dynamic and modern interpretation of art. These unique sculptures become captivating focal points, showcasing your creativity and adding a contemporary touch to your living space.
Wall Art Panels: Elevate your wall decor with custom-made concrete art panels. Pour and mold concrete into desired shapes or textures, creating visually intriguing and tactile pieces that serve as distinctive wall art. Whether it’s minimalist designs or intricate patterns, these concrete panels add depth and character to your interior, merging functionality with artistic expression.
Statues: Craft your own timeless and weather-resistant statues by molding concrete into classic or modern forms. From garden sculptures to indoor decor, concrete statues provide a durable and aesthetically pleasing addition to your surroundings. Experiment with finishes and detailing to personalize these statues, creating enduring pieces that stand as unique focal points in your home or outdoor space.
Outdoor Features
For those interested in larger projects, outdoor crafting with concrete is an exciting area to explore.
Fire Pits: Transform your outdoor space into a cozy haven with a DIY concrete fire pit. Mold and cast the concrete into a custom shape, adding both functionality and a stylish focal point to your patio or backyard. The durability of concrete ensures a long-lasting and visually appealing addition to your outdoor entertainment area.
Fountain: Create a serene atmosphere in your garden with a handmade concrete fountain. Sculpt the material into elegant or contemporary shapes, allowing water to cascade in a soothing manner. These DIY concrete fountains not only add a touch of sophistication to your outdoor landscape but also provide a tranquil focal point.
Pathway Pavers: Enhance your garden or walkway with personalized concrete pathway pavers. Pour and mold the concrete into various shapes and sizes, creating durable stepping stones that contribute both functionality and aesthetic appeal. These DIY pavers offer a practical solution for navigating outdoor spaces while adding a touch of modern charm.
Outdoor Bar or Kitchen Countertops: Upgrade your outdoor entertaining experience by crafting DIY concrete countertops for your bar or kitchen area. Mold and cast the concrete to fit your specific dimensions, adding a sleek and durable surface that complements your outdoor decor. These countertops provide a stylish and practical space for preparing meals or serving drinks while withstanding the elements.
Household Items
Infuse an industrial aesthetic into your living space with DIY concrete crafts for household items. Craft custom plant pots, mixing and pouring concrete into unique molds for a modern and durable botanical display. Experiment with sleek concrete coasters, molding the material into geometric shapes for functional and stylish table protection. These handmade concrete creations add a contemporary touch to everyday items, showcasing your creativity and transforming the ordinary into extraordinary elements of home decor.
Concrete Soap Dishes: Elevate your bathroom decor with handmade concrete soap dishes. Mold the concrete into sleek and minimalist designs, creating functional yet stylish platforms for your soap bars. The durability of concrete ensures a long-lasting and modern addition to your daily hygiene routine.
Towel Hooks: Craft durable and stylish towel hooks by molding concrete into unique shapes and designs. These DIY concrete hooks add an industrial-chic element to your bathroom or kitchen, offering both practicality and a touch of modern aesthetics.
Picture Frames: Personalize your home decor with DIY concrete picture frames. Mold the concrete into desired shapes and sizes, providing a contemporary and robust border for your favorite memories. These unique frames become statement pieces, showcasing your photos in a distinctive and modern way.
Desk Organizers: Bring order to your workspace with DIY concrete desk organizers. Pour and mold concrete into functional shapes like trays or pencil holders, creating durable and stylish solutions for keeping your desk clutter-free. These concrete organizers add a touch of sophistication to your office while serving a practical purpose.
Magnets and Jewelry Less commonly cited but still popular are concrete magnets and jewelry. These make a great gift and are perfect for those who are short on space.
Personal Accessories
Elevate your personal style with DIY concrete crafts for accessories. Craft custom-made concrete jewelry such as minimalist earrings or pendant necklaces by molding the material into unique shapes and adding personalized touches. Experiment with pigments and textures to create one-of-a-kind concrete accessories that add a contemporary and industrial flair to your fashion statement.
Concrete jewelry (pendants, earrings, bracelets)
Watch Stands: Craft personalized watch stands with DIY concrete creations. Mold the concrete into sleek and modern designs that not only showcase your timepieces elegantly but also add a touch of industrial charm to your dresser or nightstand. These durable and stylish watch stands offer a unique way to organize and display your favorite watches.
Key Holders: Upgrade your entryway organization with handmade concrete key holders. Create minimalist and functional designs by molding the concrete into sleek shapes, providing a sturdy and modern solution for keeping your keys in order. These DIY key holders add both style and practicality to your home, ensuring your keys are easily accessible and well-organized.
Pet Accessories
Spoil your furry friends with personalized pet accessories crafted from concrete. Design custom pet food and water bowls by molding concrete into sleek and modern shapes, adding a durable and stylish touch to your pet’s dining area. Create unique pet-friendly concrete toys or cozy beds, blending functionality with an industrial-chic aesthetic to enhance your pet’s comfort and playtime.
Concrete Pet Bowls: Craft personalized and durable pet bowls with DIY concrete creations. Mold the concrete into sleek and modern shapes, ensuring a sturdy and stylish feeding solution for your pets. These custom-made concrete pet bowls add a touch of contemporary design to your pet’s dining area.
Outdoor Pet Houses: Provide your furry friend with a comfortable and weather-resistant shelter by crafting outdoor pet houses with concrete. Mold the material into a customized and insulated design, ensuring a durable and stylish home for your pet that withstands the elements. These concrete pet houses blend functionality with a modern aesthetic for a pet-friendly outdoor retreat.
DIY Concrete Projects
Concrete Letters or Numbers: Personalize your outdoor space with DIY concrete letters or numbers. Mold the concrete into desired shapes, creating durable and decorative elements for your garden or home exterior. Whether it’s house numbers or decorative initials, these concrete crafts add a touch of uniqueness and industrial charm to your outdoor decor.
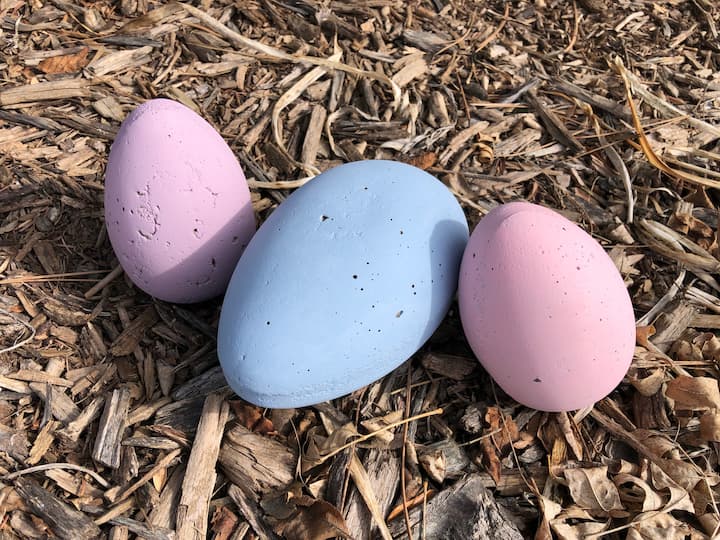
Seasonal DIY Concrete decor: My item collecting dust is our plastic eggs. My kids are now adults so they are just sitting there doing nothing. So here we go, we’ll get started with my first project, you can hop over to Mona’s to see hers, and I’ll have many more Easter painting ideas below as well. You can find this tutorial at DIY Easter Painting Ideas: Easy And Fun
Remember that when working with concrete, you can add pigments or use molds to create different shapes and designs. Additionally, you can experiment with different finishing techniques to achieve various textures and looks. Before starting a project, make sure to understand the basics of working with concrete, including mixing ratios, curing times, and safety precautions.
Always wear appropriate protective gear, such as gloves and safety goggles, and follow safety guidelines when working with concrete.
Concrete Crafts Q & A
How to seal concrete crafts?
Sealing concrete crafts is a good idea to protect them from moisture, stains, and general wear and tear. Here’s a guide on how to seal concrete crafts:
Materials and Tools Needed:
- Concrete Sealer: Choose a sealer suitable for crafts. Acrylic sealers are often a good choice for indoor crafts, providing a clear finish.
- Applicator: Depending on the size and intricacy of your concrete crafts, you might use a small paintbrush, foam brush, or even a spray sealer.
- Protective Gear: Wear gloves and safety goggles to protect yourself during the sealing process.
Steps:
- Prepare the Crafts:
- Ensure that your concrete crafts are clean and free of any dust or debris. If necessary, wipe them down with a damp cloth to remove any loose particles.
- Choose the Right Sealer:
- Select a concrete sealer suitable for crafts. Acrylic sealers are often recommended for indoor projects, as they provide a clear finish and are easy to work with.
- Read and Follow Instructions:
- Carefully read and follow the manufacturer’s instructions on the sealer. This includes information on application, drying times, and any other specific guidelines.
- Test in an Inconspicuous Area:
- Before applying the sealer to the entire craft, it’s a good idea to test it in a small, inconspicuous area to ensure that it doesn’t negatively affect the appearance or color of the concrete.
- Apply the Sealer:
- Using your chosen applicator, apply the sealer to the concrete craft. Work in small sections to ensure even coverage.
- If you’re using a brush, apply the sealer with long, even strokes. If you’re using a spray sealer, follow the instructions on the can for proper application.
- Ensure Even Coverage:
- Pay attention to ensure that the sealer is applied evenly across the entire surface of the craft. Be cautious not to leave streaks or bubbles.
- Allow Drying Time:
- Let the sealer dry completely according to the manufacturer’s recommendations. This may take a few hours.
- Apply Additional Coats (if needed):
- Depending on the level of protection you desire, you may need to apply multiple coats. Follow the recommended drying times between coats.
- Inspect and Touch Up:
- Once the sealer is dry, inspect the craft for any missed spots or uneven application. Touch up as needed.
- Cure Completely:
- Allow the sealed concrete craft to cure fully before handling or displaying it.
Always refer to the specific instructions provided by the manufacturer of the concrete sealer for the best results. The type of sealer and the application process can vary, so it’s crucial to follow the guidelines provided with the product you choose.
Can I use quikrete for crafts?
Yes, you can use Quikrete for crafts. Quikrete is a popular brand of concrete mix that comes in various formulations, including those designed for smaller craft and DIY projects. Here are some tips for using Quikrete for crafts:
- Choose the Right Quikrete Product:
- Quikrete offers different types of concrete mixes for various applications. For crafts and smaller projects, you may want to use a product like Quikrete Quick-Setting Cement or Quikrete Countertop Mix, which are designed for faster curing times and may have a smoother finish.
- Follow Mixing Instructions:
- Read and follow the mixing instructions on the Quikrete packaging carefully. Ensure that you use the correct water-to-mix ratio to achieve the desired consistency.
- Use Molds for Shaping:
- Consider using molds to shape the concrete for your crafts. You can find a variety of molds designed for concrete projects, or you can create your own using materials like silicone or plastic.
- Add Pigments or Dyes (Optional):
- If you want to add color to your concrete crafts, you can use concrete pigments or dyes. Mix them into the concrete before pouring it into the molds. Follow the recommended guidelines for the specific coloring agent you choose.
- Smooth and Finish the Surface:
- After pouring the concrete into the molds, tap the molds gently on a flat surface to release air bubbles and help settle the concrete. You can also use a trowel or other tools to smooth and finish the surface of the concrete before it sets.
- Curing Time:
- Allow the Quikrete to cure according to the manufacturer’s recommendations. Quick-setting mixes may cure in a matter of hours, while other mixes may take longer. Be patient and let the concrete fully cure before handling or finishing.
- Sealing (Optional):
- Depending on the type of Quikrete mix you use and the intended use of your crafts, you may consider applying a concrete sealer to protect and enhance the appearance of the finished pieces.
- Safety Precautions:
- Always follow safety precautions when working with concrete. Wear appropriate protective gear, such as gloves and safety goggles, and work in a well-ventilated area.
Do I need to prime concrete before painting?
Yes, it is generally recommended to prime concrete surfaces before painting them. Priming helps create a smooth and uniform surface, improves adhesion of the paint, and enhances the durability and longevity of the painted finish. Concrete is a porous material, and using a primer helps seal the pores, preventing the paint from being absorbed unevenly.
Here are some key reasons why priming concrete is advisable before painting:
- Improves Adhesion: Primers provide a bonding surface for the paint, allowing it to adhere better to the concrete. This helps prevent peeling, cracking, or flaking of the paint over time.
- Seals Porosity: Concrete is porous, and if not sealed, it can absorb moisture and other contaminants, leading to paint failure. Priming helps seal these pores, creating a barrier that prevents moisture and other substances from penetrating the surface.
- Enhances Color and Finish: Priming can improve the color accuracy and appearance of the final paint job. It helps create a consistent base for the paint, ensuring that the color is vibrant and uniform.
- Increases Durability: A primer creates a protective layer on the concrete, increasing the durability of the painted surface. This is especially important for areas that may be subjected to heavy foot traffic or other stresses.
When choosing a primer for concrete, it’s important to select one that is suitable for both the type of concrete you are painting and the type of paint you plan to use. Follow the manufacturer’s recommendations for application and drying times.
Before applying the primer, make sure the concrete surface is clean, dry, and free of any contaminants such as dirt, grease, or loose particles. Additionally, it’s a good idea to patch and repair any cracks or imperfections in the concrete before priming and painting.
Always refer to the specific product recommendations and instructions from the paint and primer manufacturers for the best results.
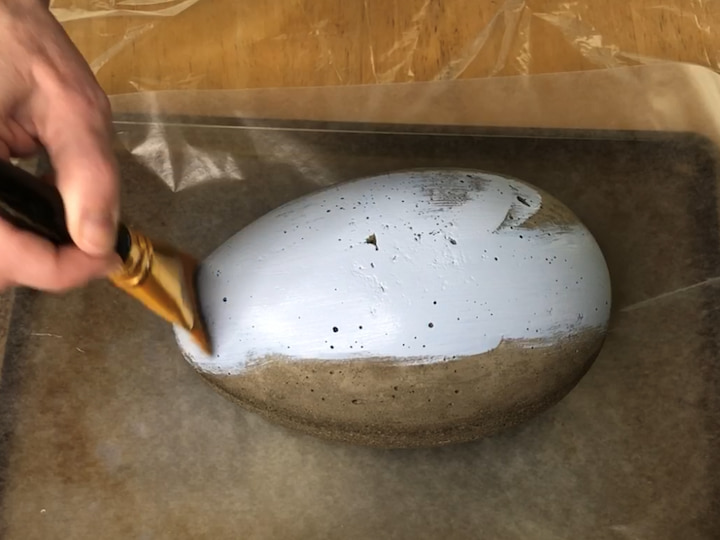
What paint is best for cement crafts?
Selecting the right paint for your cement crafts is important to ensure good adhesion, durability, and a desired aesthetic finish. Here are some types of paints commonly used for painting cement crafts:
- Acrylic Paint:
- Pros: Acrylic paint is versatile, available in a wide range of colors, and adheres well to concrete surfaces. It dries quickly and is relatively easy to work with. It’s suitable for both indoor and outdoor projects.
- Cons: While acrylic paint is durable, it may require a sealant to protect the finish on outdoor projects.
- Outdoor Paints:
- Pros: Specifically formulated for exterior use, outdoor paints provide additional weather resistance and durability. Look for paints labeled as suitable for concrete or masonry surfaces.
- Cons: Outdoor paints may have a limited color range compared to acrylics, but they are designed to withstand the elements.
- Latex Paint:
- Pros: Latex paint is a good option for interior cementcrafts. It’s easy to clean, dries quickly, and is available in various finishes.
- Cons: While latex paint is suitable for indoor projects, it may not be as durable for outdoor applications without proper sealing.
- Chalk Paint:
- Pros: Chalk paint provides a matte finish and adheres well to various surfaces, including cement. It can be sanded for a distressed look.
- Cons: Chalk paint may require a sealant, especially for outdoor projects, to protect against moisture.
- Epoxy Paint:
- Pros: Epoxy paint forms a hard, durable, and glossy finish. It’s resistant to moisture and chemicals, making it suitable for high-traffic areas.
- Cons: Epoxy paint can be more challenging to work with, often requiring proper surface preparation, and may have a strong odor during application.
- Spray Paint:
- Pros: Spray paint offers even coverage and is convenient for small projects or intricate details. It comes in various finishes and is suitable for both indoor and outdoor use.
- Cons: Overspray can be an issue, so use in a well-ventilated area or outdoors. Consider masking off areas you don’t want to paint.
- Concrete Stains:
- Pros: Concrete stains penetrate the surface, providing a natural and semi-translucent color. They can enhance the appearance of concrete without completely covering its texture.
- Cons: Stains may not offer as much color variety as traditional paints.
- Sealers and Waterproofing Paints:
- Pros: These products provide an additional layer of protection, especially for outdoor cement crafts. Some sealers may enhance the color of the concrete.
- Cons: While not traditional paints, sealers and waterproofing paints can be used in conjunction with other paints to enhance durability.
Why concrete cracks? and Can concrete cracks be repaired?
Concrete can crack for various reasons, and understanding the causes helps in preventing and effectively addressing the issue. Here are some common reasons why concrete cracks:
- Shrinkage:
- Cause: Concrete undergoes a drying process called hydration, during which it loses water and shrinks. Shrinkage cracks often occur as a result of this natural process.
- Prevention: Proper mix design, the use of shrinkage-compensating concrete, and controlling the rate of drying can help minimize shrinkage cracks.
- Settlement:
- Cause: Uneven settling of the ground beneath the concrete can lead to cracks. This may be due to soil compaction issues, poor subgrade preparation, or changes in moisture content.
- Prevention: Proper site preparation, compaction of the subgrade, and adequate drainage can help prevent settlement-related cracks.
- Overloading:
- Cause: Excessive loads or pressure on the concrete can cause it to crack. This is common in areas subjected to heavy traffic or loads beyond the design capacity.
- Prevention: Designing concrete structures to handle expected loads and using reinforcement where necessary can prevent cracking due to overloading.
- Temperature Changes:
- Cause: Thermal expansion and contraction due to temperature variations can lead to cracks, especially in large slabs.
- Prevention: Control joints and expansion joints are designed to accommodate temperature-related movements and help prevent random cracking.
- Inadequate Reinforcement:
- Cause: Lack of proper reinforcement, such as rebar or mesh, can make concrete more susceptible to cracking, especially under tension.
- Prevention: Adequate reinforcement based on the design requirements can help prevent cracks due to tensile forces.
- Poor Workmanship:
- Cause: Inadequate mixing, improper placement, or finishing techniques can contribute to concrete cracking.
- Prevention: Following proper construction practices, such as using the correct water-to-cement ratio, ensuring proper curing, and employing skilled labor, can minimize the risk of cracks.
Can Concrete Cracks Be Repaired?
Yes, concrete cracks can be repaired. The method of repair depends on the type and extent of the crack. Here are common methods for repairing concrete cracks:
- Epoxy Injection:
- Suitable for structural cracks, epoxy injection involves injecting epoxy into the crack to bond and seal it. This method is effective for restoring the structural integrity of the concrete.
- Polyurethane Injection:
- Polyurethane injection is used for both structural and non-structural cracks. It involves injecting a flexible polyurethane material into the crack, which expands and fills the void.
- Concrete Patching Compounds:
- For smaller cracks or surface imperfections, concrete patching compounds can be applied. These compounds come in various formulations, including fast-setting options for quick repairs.
- Overlay or Resurfacing:
- For cosmetic purposes or to repair surface cracks, overlay or resurfacing products can be applied to create a new, smooth surface.
- Concrete Replacement:
- In cases where the damage is extensive, removing and replacing the damaged concrete may be necessary, especially for structural elements.
Before attempting any repair, it’s essential to assess the cause of the crack and address the underlying issue to prevent future cracking. Additionally, follow the recommended guidelines and instructions provided by the repair material manufacturer for the best results.
Before applying paint, ensure that the concrete surface is clean, dry, and properly prepared. Additionally, consider applying a primer suitable for concrete surfaces to enhance paint adhesion. Always follow the specific instructions provided by the paint manufacturer for the best results.
Quikrete can be a convenient and reliable option for small-scale concrete crafts. However, always check the specific product details and recommendations on the Quikrete packaging for the best results with your particular project.
With the rising popularity of concrete crafts, now is the perfect time to engage your creativity and make something awesome. Whether you’re a beginner or have some experience, there are projects, tutorials, and even seller’s listings out there to help you on your crafting journey.
Happy Crafting!