

DIY Christmas Signs: Easy Dollar Store Upcycles

Are you looking for DIY Christmas Signs? I found some fun wooden signs at the dollar store. I had the most fun upcycling them in different ways for the holiday season.
‘Tis the season to infuse your home with warmth, joy, and a dash of creativity! In the spirit of the holidays, why not try your hand at DIY Christmas signs? Crafting your own festive decorations not only adds a personal touch to your space but also brings a unique charm to your holiday celebrations. Join us on this creative journey, and discover the joy of making something truly special for the season.
Gather DIY Christmas Sign Inspiration:
Transforming your home into a winter wonderland has never been more charming and personal than with DIY Christmas signs.
You might also enjoy my post: Dollar Tree Christmas Finds & DIY Ideas! Let’s Go Shopping for Christmas!. Whether you’re a seasoned crafter or a newcomer to the world of easy DIY projects, these wooden Christmas signs are the perfect canvas to infuse your space with the warmth of the holiday spirit. Visit your local craft store to gather the essentials – frames, wreaths, garlands, and vinyl letters – and embark on a creative journey that will elevate your holiday decor to new heights.

If you’re a fan of the farmhouse style, consider crafting rustic charm with buffalo check patterns and wooden Christmas tree designs. A simple bow or ribbon loop adds a touch of elegance to your porch sign, creating a warm welcome for guests and passersby alike. For an extra layer of personalization, use a Cricut or Silhouette machine to cut out free SVG files, enabling you to effortlessly design and create stunning holiday-themed signs.
Bring your DIY Christmas decorations to life by combining elements like holly, berries, and Santa illustrations. The versatility of scrap wood allows you to experiment with different shapes and sizes, ensuring your mantle or front porch becomes a visual feast of holiday delights. Unleash your creativity with hot-glue, creating intricate designs that capture the essence of the season.
Embrace the holiday spirit with Noel signs that speak to the joy and magic of Christmas. Use vinyl letters to add messages of cheer, creating DIY Christmas signs that are not only visually stunning but also carry heartfelt sentiments. Don’t forget to document your creative process and share the results on Instagram, where your personalized creations can inspire others.
The combination of frames, wreaths, and garlands makes the process enjoyable and accessible. If you’re drawn to a more minimalist approach, a wooden Christmas sign with a single word like “Joy” or “Believe” can have a profound impact. For those seeking an easy tutorial, look no further. And, of course, a hot glue gun becomes your trusty companion, helping you secure bows, wreaths, and other embellishments with ease.
Whether you’re crafting DIY Christmas ornaments or larger porch signs, the possibilities are as endless as your imagination. Pinterest is a treasure trove of inspiration, offering a plethora of DIY tutorials and ideas to suit every taste. So, dive into the world of personalized holiday decor, where every loop of ribbon, every wreath, and every carefully chosen element contributes to creating a Sweet Tea Life infused with the magic of the season.
DIY Christmas Signs Video
How to make cheap Christmas decorations?
DIY Christmas Signs Materials List
- Wood Signs or Blanks
- Folk Art Ultra Dye
- Folk Art Chalkboard Paint
- Folk Art Paint
- Folk Art Wood Tint
- Folk Art Treasure Gold
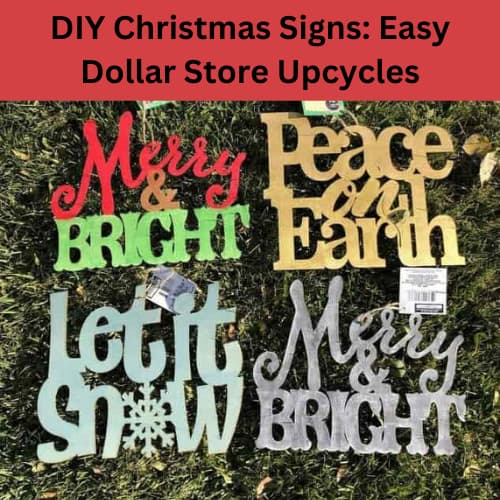
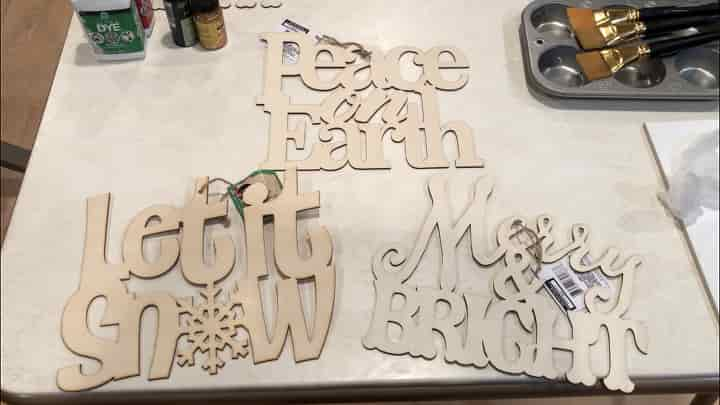
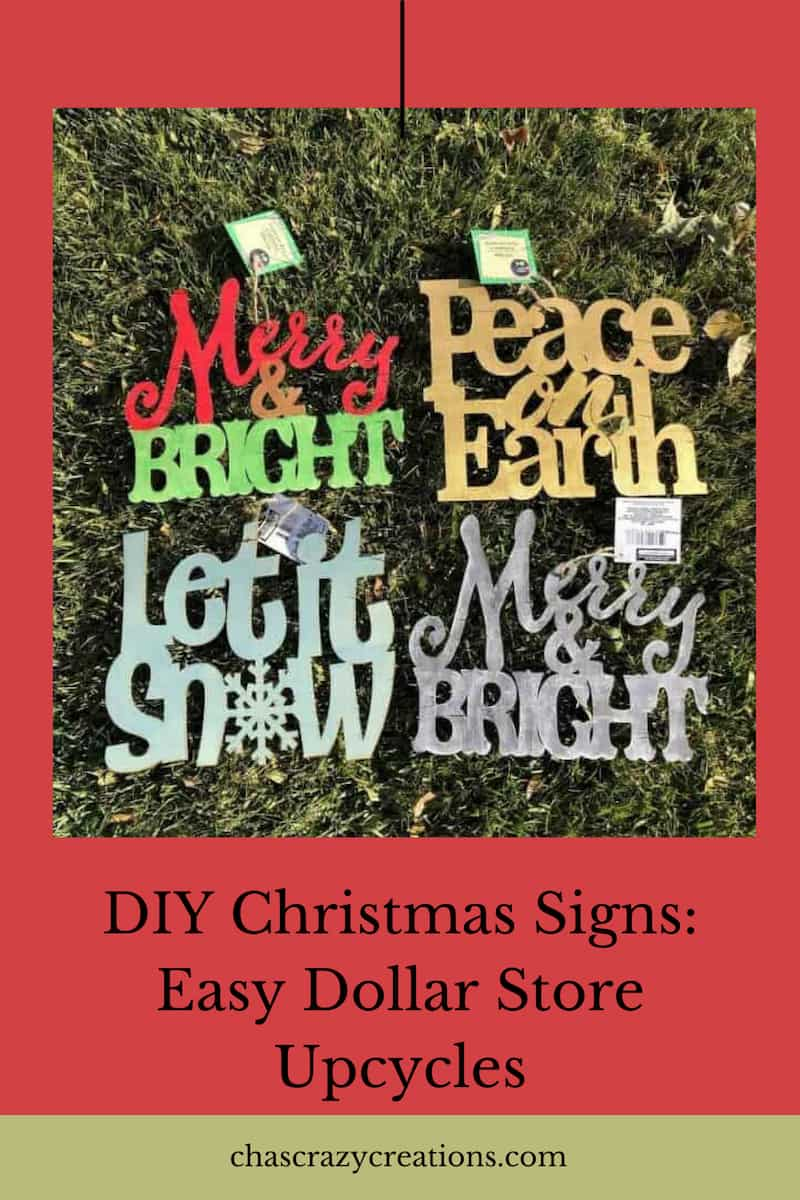
Here are the 3 wooden signs I found at the dollar store. I had accidentally grabbed 2 of the Merry and Bright so I upcycled that sign in 2 different ways.
DIY Christmas Signs Instructions
Traditional Colors Christmas Sign
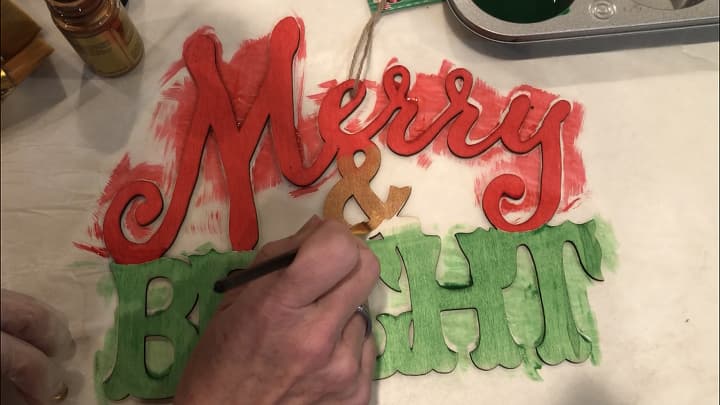
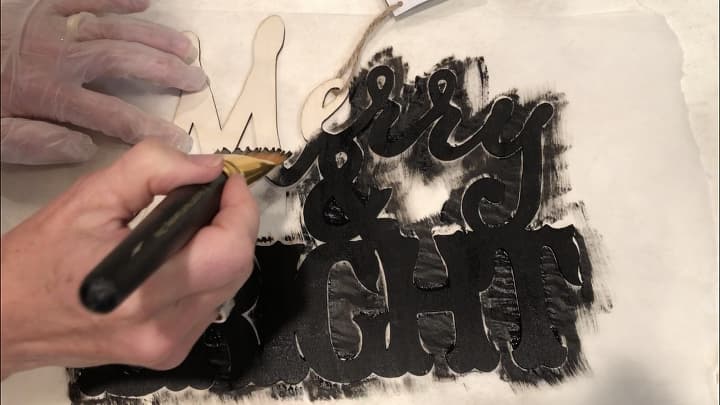
For the first Merry & Bright sign – I used Folk Art Ultra Dye in the colors Infra Red and Emerald City. I painted the “&” with Folk Art Ultra Gold in the color copper. Once this was painted I let it dry completely.
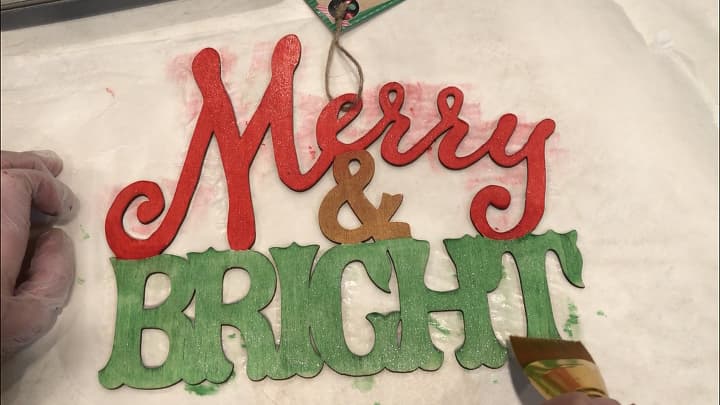
I then coated the top of the entire piece with Folk Art Dragonfly Glaze in the colors Green, Gold, and Red. It adds a beautiful sparkle and shimmer the piece.
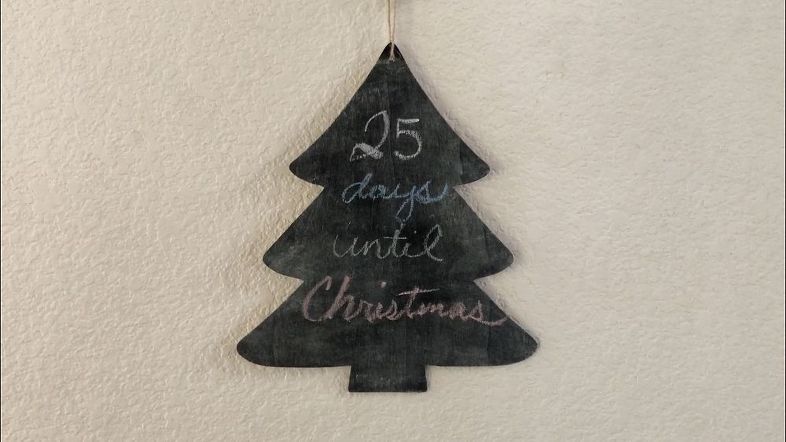
Chalkboard Christmas Sign
For my second Merry & Bright sign, I painted the entire piece with Folk Art Chalkboard paint and let that dry.
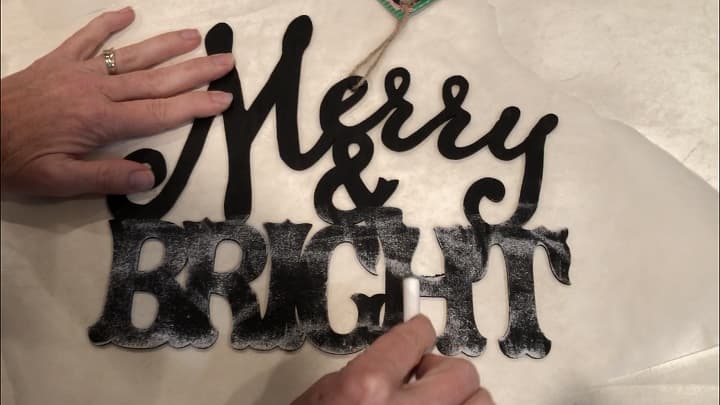
I then seasoned the chalk paint by coloring the piece with chalk.
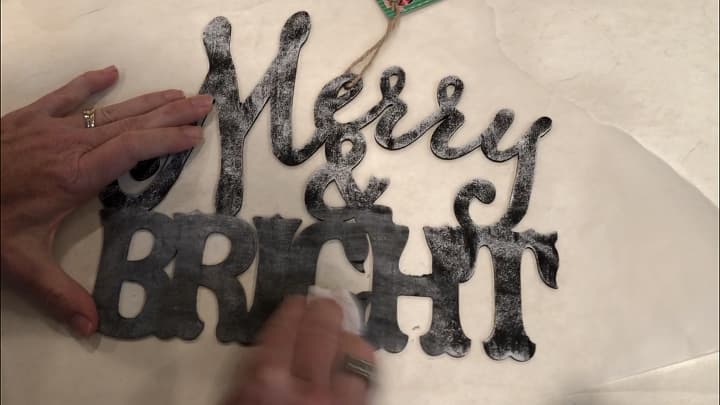
After coloring the piece, I erased it. This gave it a nice gray color. I then colored a little chalk back on it to give it a snowy effect.
Seasonal Winter Sign
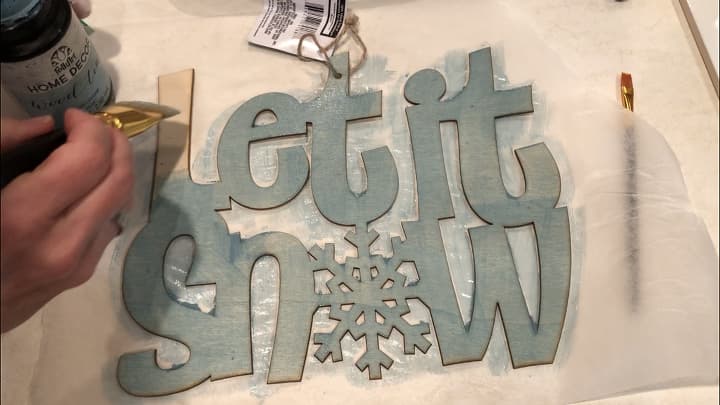
For my Let it Snow sign, I painted the entire piece with Folk Art Cascade Wood Tint and let that dry.

I then painted the entire piece with Folk Art Dragonfly Glaze in the colors Blue, Green, and Gold Shift. This again left a beautiful shimmer all over the piece giving it that frosty wintery effect.
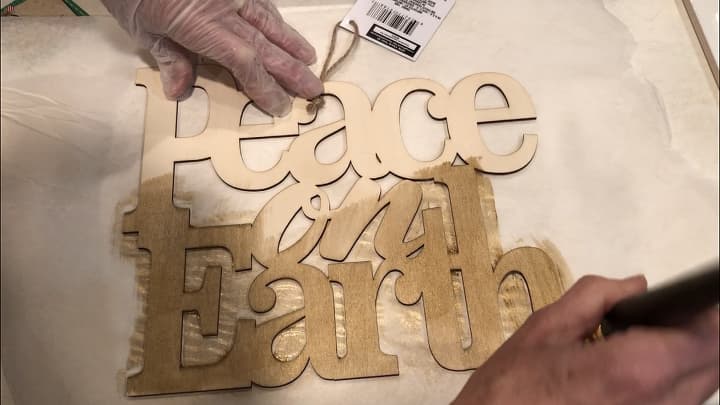
Shimmery Gold Christmas Sign
For my Peace on Earth sign, I painted the entire piece with Folk Art Treasure Gold paint and let that dry completely.
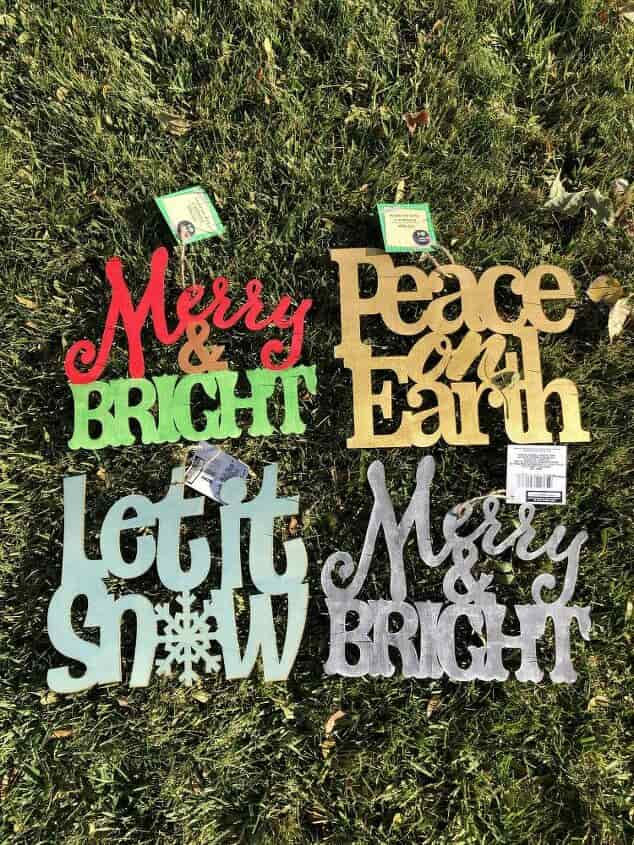
I am absolutely thrilled with how all of these signs turned out. They will make great decor for my home and great gifts for others. I will probably leave some of these signs up for the entire winter season.
DIY Christmas Signs Video
Shop any of these stores and I receive a small commission at no cost to you.
 MODE HOME 15.8"x8" Christma...Shop on Amazon
") A Christmas Carol (Calla Ed...Shop on Amazon
A Christmas Carol (Calla Ed...Shop on Amazon Sweet Water Decor Farm Fres...Shop on Amazon
 A Charlie Brown ChristmasShop on Amazon
 The Night Before Christmas:...Shop on Amazon
 PRODUCTWORKS 24-Inch Peanut...Shop on Amazon
How do you make a Merry Christmas sign with lights?
It is super easy to add lights to a sign, one way that I have done it is with my canvas art.
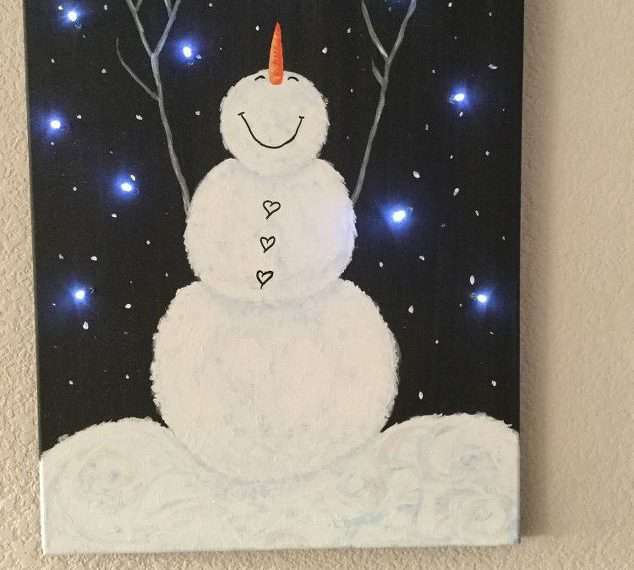
For this piece, I painted on a snowman, poked holes in the canvas, poked battery operated LED lights through the holes and hot glued it to the back of the canvas. You can see the full tutorial at How To Make A DIY Light Up Canvas Art
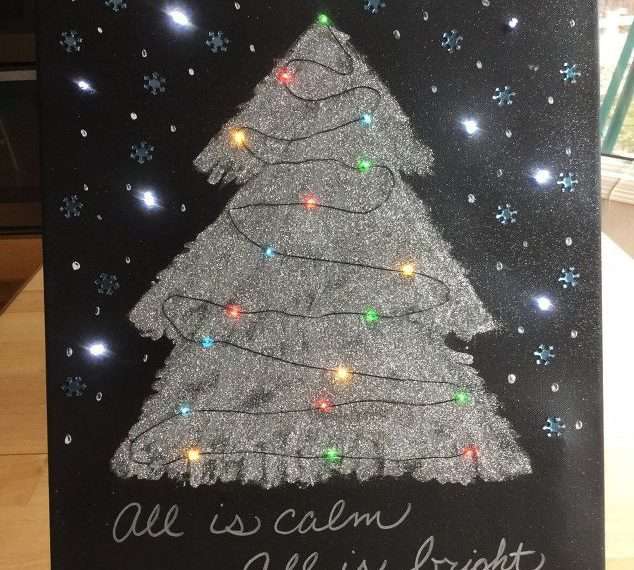
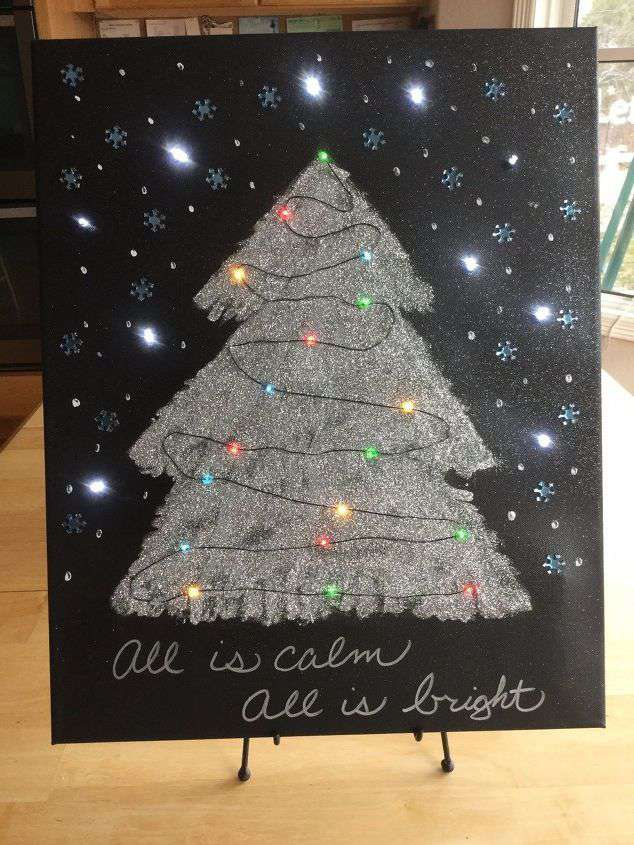
I painted this canvas black, and added some Mod Podge to it along with some glitter to make a tree. I hot glued battery operated LED lights to the front of this one. I embellished it with jewel stickers. You can find the full tutorial at Christmas Light Up Canvas Art – Hometalk Live DIY!
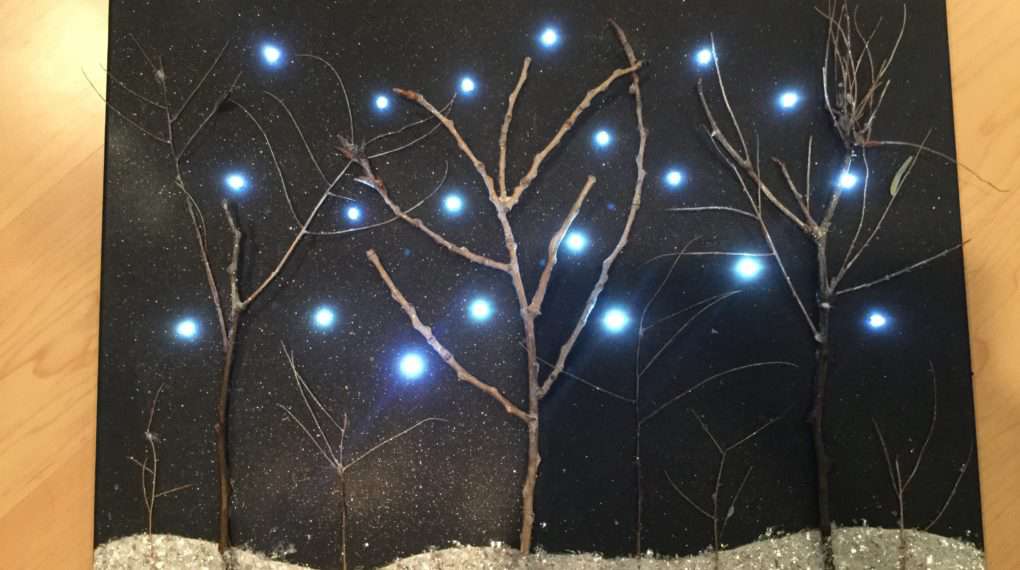
For this piece, I made a wintery scene by painting the canvas, adding some branches, and faux snow, and spraying on glitter. I poked holes through the back of the canvas and poked LED lights through the back to shine through. You can find the full tutorial at Winter Light Up Canvas Art
What are some easy Christmas crafts to make?
Check out some of my other Christmas decor!
- Easy and Cute Dollar Tree DIY Gnome Christmas Tree
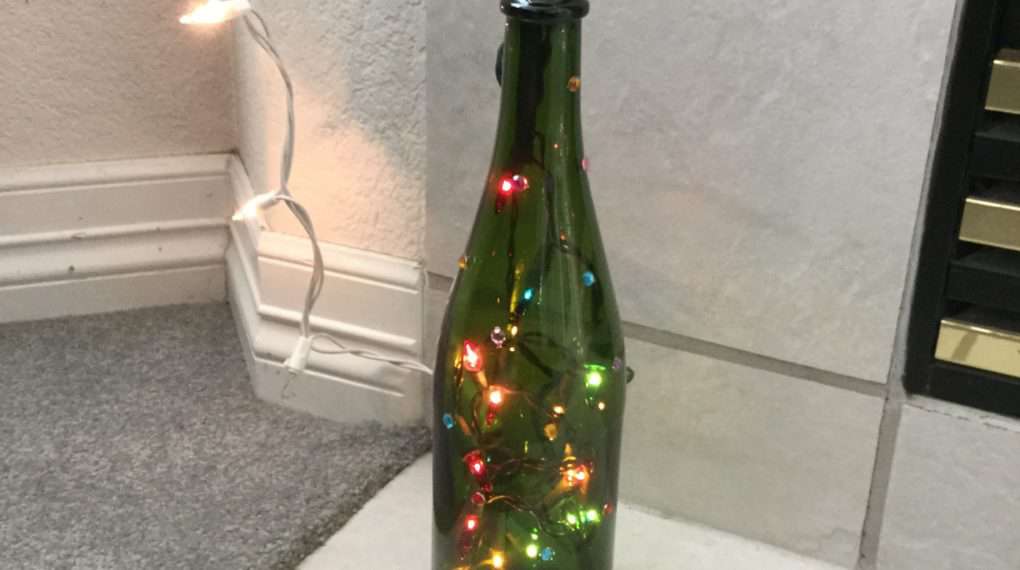
- Wine Bottle to Christmas Tree
- Easy and Amazing Dollar Tree Mini Red Solo Cup Lights for Christmas
- 50+ Easy Christmas Crafts To Make and Sell
DIY Christmas Signs Tips and Tricks
Embarking on a DIY project can be a delightful experience, especially with a few handy tips and tricks. Beginners, fear not—we’ve got your back. Learn about harmonious color combinations, lettering styles that capture the holiday spirit, and overall design tips to make your Christmas signs stand out. Personalize your creations with ease by incorporating our suggestions tailored to individual preferences.
Here’s a list of practical tips and tricks to help you create beautiful DIY Christmas signs:
- Plan Ahead:
- Outline your design and plan the layout before starting to ensure a cohesive and well-balanced sign.
- Choose the Right Materials:
- Select materials suitable for your intended display location. For outdoor signs, use weather-resistant materials.
- Prepare the Surface:
- Sand and clean your surface before painting to ensure proper paint adhesion and a smooth finish.
- Use Stencils or Templates:
- To achieve precise lettering or intricate designs, consider using stencils or templates for a professional look.
- Practice Your Lettering:
- If hand-lettering, practice your technique on scrap material to build confidence before working on your actual sign.
- Experiment with Colors:
- Try different color combinations to find the palette that best suits your holiday decor and personal style.
- Layering for Depth:
- Create depth in your design by layering paint or adding shadowing to make certain elements stand out.
- Add Texture:
- Incorporate texture using techniques like distressing, sponging, or adding texture paste for a more dynamic look.
- Consider Size and Scale:
- Ensure your design is appropriately sized for the space where you plan to display the sign. Larger fonts may be necessary for signs viewed from a distance.
- Use Sealant for Outdoor Signs:
- If placing your sign outdoors, apply a clear sealant to protect it from the elements and prolong its lifespan.
- Experiment with Lettering Styles:
- Explore different lettering styles, such as calligraphy or block letters, to find the one that complements your overall design.
- Create a Focal Point:
- Designate a focal point on your sign where the eye is naturally drawn. This could be a central image, phrase, or design element.
- Incorporate Embellishments:
- Add extra flair with embellishments like ribbon, bows, or small ornaments to enhance the festive feel of your sign.
- Use a Level:
- Ensure your letters and designs are level by using a straight edge or level tool. This simple step enhances the professional appearance of your sign.
- Fix Mistakes Creatively:
- If you make a mistake, don’t panic. Turn it into a design element, cover it with additional paint, or incorporate it into the overall aesthetic.
- Test Colors Beforehand:
- Always test your color choices on a small, inconspicuous area before committing to the entire sign.
- Work in Layers:
- Build your design in layers, allowing each layer to dry before adding the next. This prevents smudging and maintains clean lines.
- Protect Your Work Area:
- Cover your work surface to prevent accidental spills and splatters, especially if you’re working with vibrant or permanent paints.
DIY Christmas Signs Personalization Ideas
‘Tis the season to infuse your personality into your creations. Discover the joy of adding your personal touch to the signs, customizing them for specific themes or family traditions.
Personalizing your DIY Christmas signs adds a unique touch that makes them truly special. Here are some creative personalization ideas to consider:
- Family Names and Established Year:
- Incorporate your family name and the year your family was established for a warm and personal touch.
- Individual Family Member Names:
- Create a personalized sign with the names of each family member, making it a tribute to everyone in your household.
- Favorite Holiday Quote:
- Choose a favorite holiday quote or a line from a beloved Christmas song to evoke sentiment and nostalgia.
- Seasonal Greetings in Different Languages:
- Add a multicultural twist by including “Merry Christmas” or other seasonal greetings in different languages that represent your family’s heritage.
- Family Traditions:
- Highlight specific family traditions on your sign, such as baking cookies, decorating the tree, or watching favorite holiday movies together.
- Pet Inclusion:
- If you have pets, incorporate their names or paw prints into the design to make them a part of the festive celebration.
- Handprints or Footprints:
- Capture the size of your children’s hands or feet with paint, leaving an imprint on the sign. This adds a nostalgic and personalized element.
- Special Dates:
- Include important dates, such as birthdays or anniversaries, on the Christmas sign to celebrate significant moments in your family’s history.
- Illustrations of Family Members:
- Create simple illustrations or caricatures of family members, perhaps engaged in holiday activities, to give the sign a playful and personal touch.
- Custom Colors:
- Tailor the color scheme of the sign to match your home’s decor or your family’s favorite holiday colors.
- Photo Collage:
- Incorporate small photo prints of your family members enjoying past holiday celebrations for a nostalgic touch.
- Favorite Christmas Symbols:
- Integrate symbols that hold personal significance to your family, such as a favorite holiday ornament, a snowflake, or a particular Christmas flower.
- Hobbies and Interests:
- Showcase the hobbies and interests of each family member, whether it’s reading, skiing, or baking, to make the sign uniquely reflective of your family.
- Map of Special Places:
- Include a map or coordinates of special places, like where you spend holidays or where family members live, to add geographical significance.
- Seasonal Wishes or Resolutions:
- Share your family’s holiday wishes or resolutions for the upcoming year on the sign, creating a positive and forward-looking message.
- Favorite Christmas Memory:
- Feature an illustration or written description of your family’s favorite Christmas memory, creating a sentimental and heartfelt element.
- Monogram or Initials:
- Use your family’s initials or a monogram as a central design element for a classic and timeless personalized touch.
- DIY Photo Transfer:
- Incorporate DIY photo transfers onto the sign for a vintage and personalized look.
DIY Christmas Sign Display and Usage Suggestions
With your Christmas signs ready, it’s time to showcase them in style. Explore ideas on where and how to display your handmade treasures. Get tips on coordinating the signs with other decorations to create a cohesive holiday look. Plus, discover innovative ways to use your DIY signs as thoughtful gifts or eye-catching party decor.
Here’s a list of creative ideas for displaying your DIY Christmas signs:
- Front Door Greeting:
- Welcome guests with a festive DIY sign on your front door.
- Hang a cheerful sign that sets the tone for your holiday decor.
- Mantel Magic:
- Adorn your fireplace mantel with a series of Christmas signs.
- Mix and match sizes and styles for a dynamic display.
- Festive Foyer:
- Place a holiday sign on a console table or entryway for a warm welcome.
- Consider adding greenery or twinkling lights for extra flair.
- Kitchen Cheer:
- Brighten up your kitchen by displaying a Christmas sign on the countertop.
- Pair it with holiday-themed kitchen accessories for a cohesive look.
- Cozy Corner:
- Create a cozy reading nook with a small Christmas sign on a side table.
- Surround it with plush blankets and festive pillows for extra comfort.
- Dining Delight:
- Centerpiece your dining table with a DIY Christmas sign.
- Incorporate candles or a festive table runner for a complete look.
- Window Wonderland:
- Hang Christmas signs in your windows for a charming exterior display.
- Use suction cups or ribbon to secure them in place.
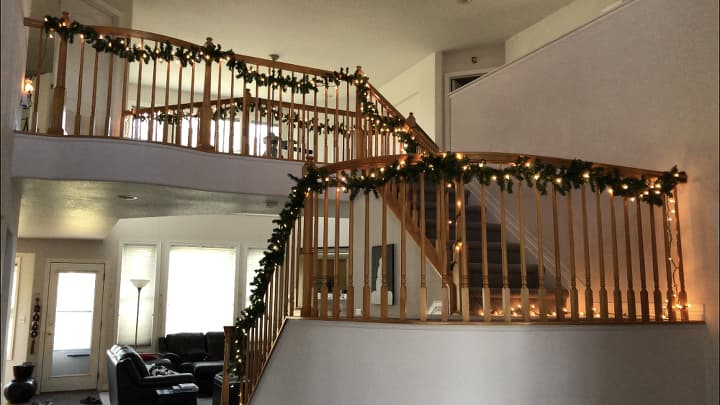
- Staircase Showcase:
- Line your staircase with a garland of Christmas signs.
- Attach signs to the railing or hang them at varying heights for visual interest.
- Bedroom Bliss:
- Add a touch of holiday spirit to your bedroom with a small Christmas sign on your nightstand.
- Opt for calming, festive colors to create a cozy atmosphere.
- Outdoor Oasis:
- Place a weather-resistant Christmas sign on your porch or patio.
- Consider a DIY sign with a protective sealant to withstand the elements.
- Holiday Buffet:
- Decorate your buffet or sideboard with Christmas signs.
- Mix in other seasonal elements like candles and ornaments.
- Gift Wrapping Station:
- Enhance your gift wrapping area with a Christmas sign.
- Create a designated space for wrapping with a festive touch.
- Wall Art Gallery:
- Arrange a gallery wall of Christmas signs in your living room or hallway.
- Vary the sizes and designs for an eclectic and eye-catching display.
- Bookshelf Showcase:
- Integrate Christmas signs into your bookshelves for a subtle holiday touch.
- Nestle them among books and decorative items for a cohesive look.
- Holiday Bar Cart:
- Transform your bar cart into a festive display with a Christmas sign as the centerpiece.
- Include holiday-themed glassware and drink accessories.
- Kids’ Corner:
- Create a special corner in your home for the little ones with a child-friendly Christmas sign.
- Add stuffed animals, books, and holiday-themed toys.
- Ceiling Suspense:
- Hang Christmas signs from the ceiling using clear fishing line for a whimsical touch.
- Create a floating effect by varying the heights.
- Bathroom Elegance:
- Surprise guests with a small Christmas sign in the bathroom.
- Keep it simple yet festive to maintain a touch of holiday spirit.


I love your ideas for these DIY signs. I also like your idea about leaving them up all winter or even all year long. The only sign I haven’t found is the Let it Snow. But I am going to look for it, hopefully there will be some left. Hope to see more of your creations.
Maria
Thank you so much Maria! I’m so glad you like it and want to make them too. You can ask the store manager if he/she can hold them for you too if they get more in. I also have called and checked with the other stores as well.
Hope you are feeling better. I am new to your channel and just love all your ideas. Your projects turn out beautiful. Thank you. God bless.
You are incredibly sweet Maryann, thank you so much for the kind words. I’m doing well and on the slow road to recovery, thanks for asking. I’m thrilled to have you as part of my subscriber family and feel free to email me anytime. Sending hugs
Thank you for sharing at #OverTheMoon. Pinned and shared. Have a lovely week. I hope to see you at next week’s party too! Happy Holiday!
Thank you so much Marilyn, and I’ll see you at the next one
These are so pretty! I bought the Let it Snow sign a while back and still haven’t done anything with it yet. You’ve inspired me to get it painted! 😀
Thank you Julie 🙂
These turned out great!
Thank you so much – Happy Thankgiving
Best of Luck with your hip surgery. Prayers go into surgery with you.
Thank you so much Mary 🙂