
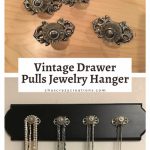
Crafting Elegance: DIY Hanging Jewelry Organizer with Vintage Charm
Discover this innovative DIY hanging jewelry organizer project to elevate your accessory storage. Explore step-by-step guides and creative ideas for crafting your personalized jewelry display at home.
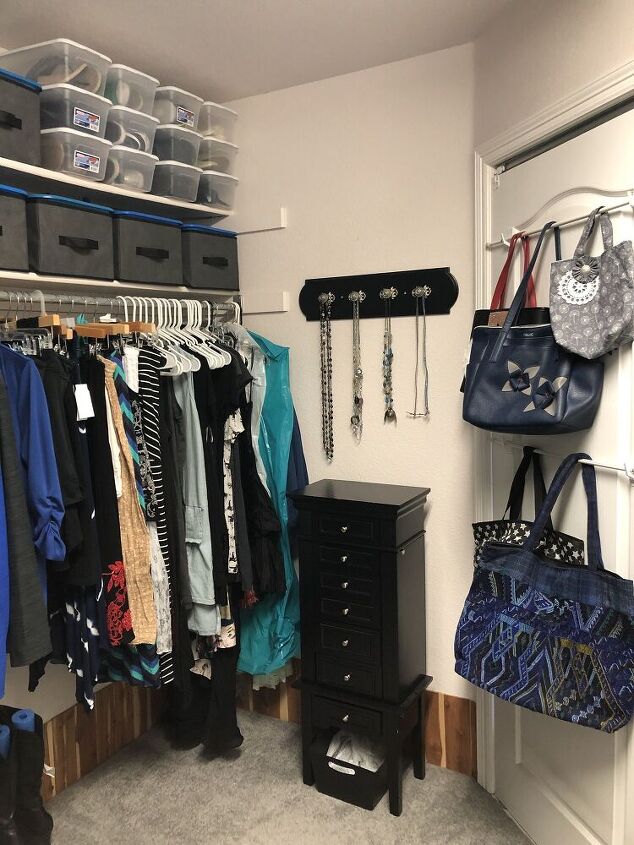
Revamp your space with a touch of vintage allure! I stumbled upon some exquisite glass pulls at a flea market and transformed them into a delightful jewelry hanger for my home.
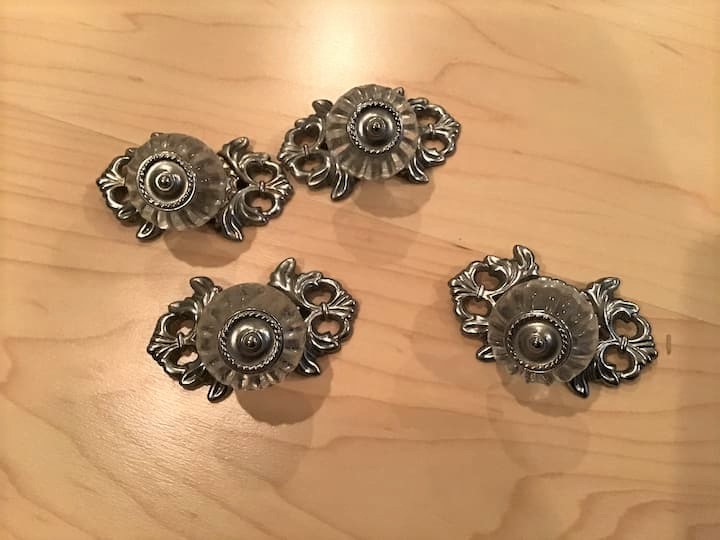
I found these vintage door pulls at the flea market, and the best part? I snagged them for just a couple of dollars!
DIY Hanging Jewelry Organizer Materials
- A pine board
- Stain or paint of your choice
- Drill
- Drawer Knobs

DIY Hanging Jewelry Organizer Instructions
Acquire a Pine Board: We purchased a pine board from Hobby Lobby.
Measure and Drill: Measure and drill four holes in the pine board.
Smooth It Out: Lightly sand the board to ensure a smooth surface and wipe it off.
Add Some Color: Paint a couple of coats of Varathane 8 oz. Ebony Premium Fast Dry Interior Wood Stain.
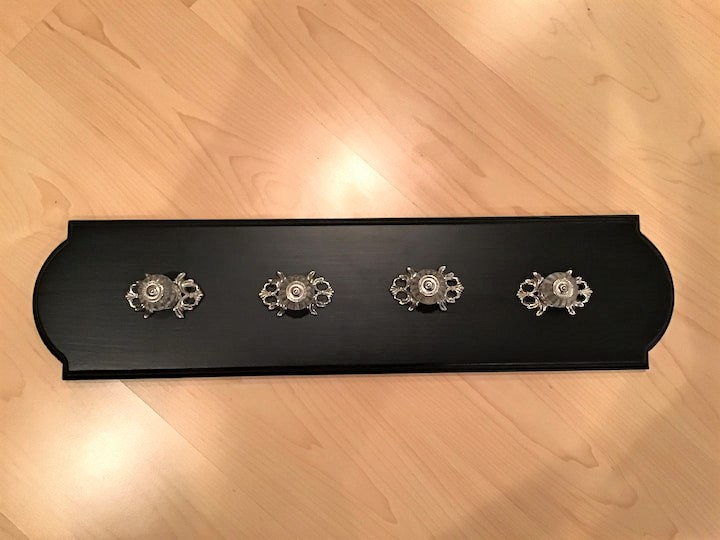
Attach Vintage Glass Pulls: Screw the vintage glass pulls onto the board.
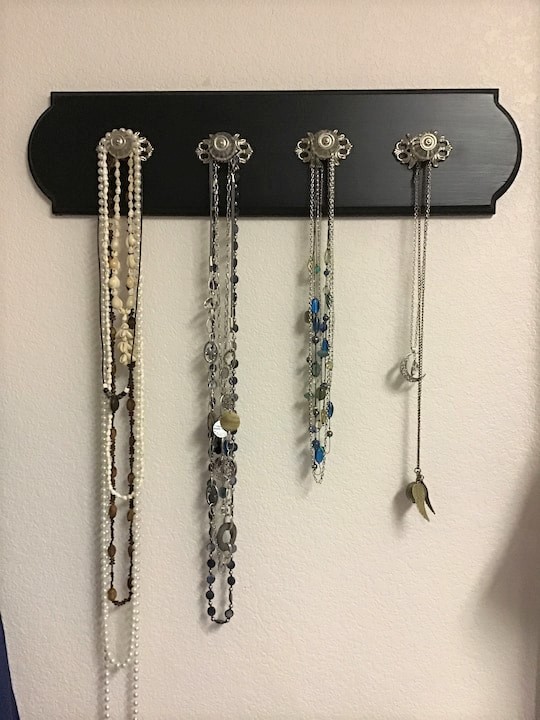
Secure in Place: Screw the board into studs for stability.
Hang Your Treasures: Adorn your new jewelry organizer with your favorite pieces.
It’s hanging in my closet and here’s my post on Tips on Closet Organization.
Shop any of these stores and I receive a small commission at no cost to you.


More DIY Hanging Jewelry Organizer Ideas
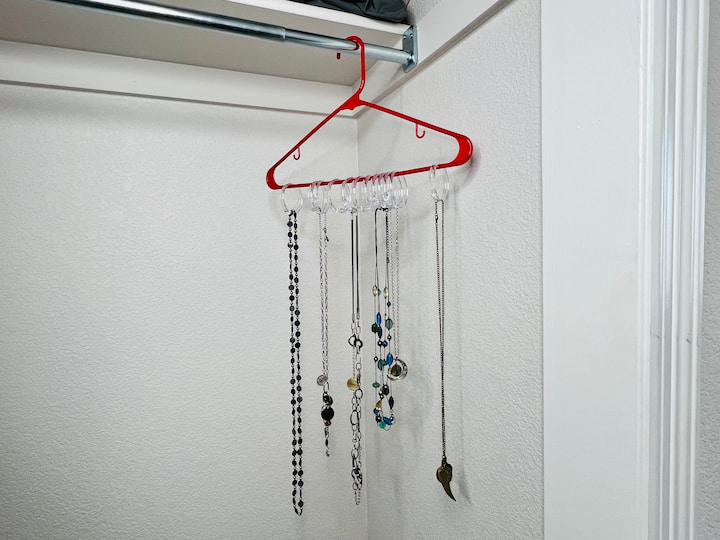
DIY Hanging Jewelry Organizer with Shower Curtain Rings and Hanger
Create a stylish and functional jewelry organizer using everyday items like shower curtain rings and a hanger. Transform your closet into a jewelry haven with this easy DIY project.
Materials Needed:
- Shower Curtain Rings
- Hanger
- Spray Paint (optional)
- Ribbon or Fabric Strips
- Hot Glue Gun
- Hooks (optional)
Instructions:
- Prepare the Rings: Start by gathering your shower curtain rings. If desired, spray paint them in a color that complements your aesthetic.
- Arrange on Hanger: Take a sturdy hanger and arrange the shower curtain rings evenly along its length. You can use the hanger as is or paint it to match your decor.
- Attach Rings: Use hot glue to secure each shower curtain ring to the hanger. Ensure they are evenly spaced to allow easy access to your jewelry.
- Add Decorative Touch: Enhance the visual appeal by wrapping ribbon or fabric strips around the hanger, covering any visible glue and adding a decorative touch.
- Optional Hooks: For additional storage, attach small hooks to the bottom of the hanger. These can be used for hanging necklaces or bracelets.
- Hang Your Jewelry: Once the glue is dry, start hanging your necklaces, bracelets, and even earrings on the shower curtain rings. The open design allows for easy visibility and access.
Benefits of This DIY Jewelry Organizer:
- Space-Saving: Hang it in your closet to save space and keep your jewelry within reach.
- Customizable: Personalize the colors and materials to match your style.
- Quick and Budget-Friendly: A simple yet effective DIY project that won’t break the bank.
Say goodbye to tangled necklaces and misplaced accessories. With shower curtain rings and a hanger, you’ll have a practical and visually appealing jewelry organizer that adds a touch of creativity to your space.
You can find tutorials and more examples for these at
- Inexpensive and Easy Dollar Tree Organization Hacks For Your Home
- Creative Home Hacks for Using Hangers Around the House
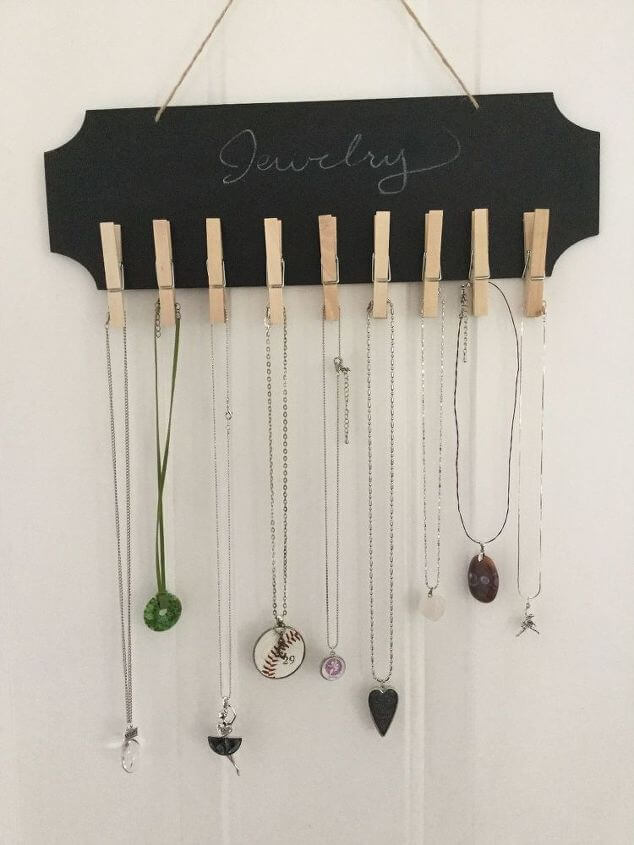
DIY Hanging Jewelry Organizer with Clothespins and Wood
Unleash your creativity with a charming DIY jewelry organizer using clothespins and a simple piece of wood. This easy project adds a touch of rustic elegance to your space while keeping your accessories organized and easily accessible.
Materials Needed:
- Wooden Board (size of your choice)
- Clothespins
- Wood Glue
- Spray Paint (optional)
- Decorative Ribbon (optional)
- Small Hooks (optional)
Instructions:
- Prepare the Wood: Begin by selecting a wooden board of the desired size. Sand the edges to ensure a smooth surface for your DIY organizer.
- Arrange Clothespins: Lay out the clothespins on the wooden board to determine the spacing and arrangement. Consider the size and layout of your jewelry items.
- Glue Clothespins: Using wood glue, securely attach each clothespin to the wooden board. Ensure they are evenly spaced and leave enough room between each clothespin for hanging jewelry.
- Optional Spray Paint: If you wish to add a pop of color, spray paint the wooden board and clothespins. Choose a color that complements your room’s decor.
- Decorative Touch: Add a decorative touch by wrapping a ribbon around the edges of the wooden board. This not only conceals any visible glue but also enhances the overall aesthetic.
- Optional Hooks: For additional hanging space, attach small hooks to the bottom of the wooden board. These hooks can be used for hanging longer necklaces or bracelets.
- Let It Dry: Allow the wood glue and paint (if used) to dry completely before hanging your jewelry.
Benefits of This DIY Jewelry Organizer:
- Versatile Display: The clothespins provide a versatile and adjustable display for various jewelry items.
- Budget-Friendly: An affordable and creative solution using common household items.
- Customizable: Personalize the colors and decorative elements to match your style.
Transform a simple wooden board and clothespins into a functional and aesthetically pleasing DIY hanging jewelry organizer. Enjoy a clutter-free space while showcasing your favorite accessories with this charming and budget-friendly project.
You can find the full tutorial for this and even more ideas at Things To Make with Clothespins: Easy and Amazing DIYs on a Budget
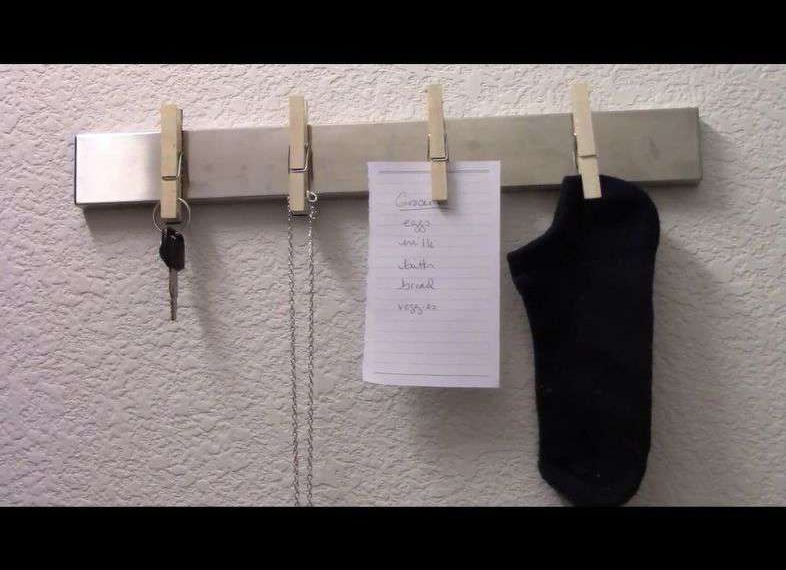
DIY Magnetic Wall Jewelry Organizer with Clothespins
Elevate your jewelry storage with a magnetic wall organizer using a magnetic strip commonly used for kitchen utensils. This stylish and functional DIY project allows you to showcase your favorite accessories with ease.
Materials Needed:
- Magnetic Strip (typically used for kitchen utensils)
- Clothespins
- Strong Adhesive or Mounting Tape
- Decorative Ribbon (optional)
- Small Hooks (optional)
Instructions:
- Select a Magnetic Strip: Choose a magnetic strip of sufficient length to accommodate your jewelry collection. Magnetic strips designed for kitchen utensils work exceptionally well for this purpose.
- Attach Clothespins: Affix small, strong magnets to the back of each clothespin. Ensure the magnets are securely attached to provide optimal support for your jewelry items.
- Arrange on the Magnetic Strip: Arrange the clothespins on the magnetic strip, spacing them evenly to create an organized and visually appealing display. The magnetic strip will securely hold the clothespins in place.
- Decorative Touch: If desired, add a decorative ribbon along the edges of the magnetic strip. This not only conceals any adhesive or mounting tape but also adds a touch of elegance to the organizer.
- Optional Hooks: For additional hanging space, consider attaching small hooks to the bottom of the magnetic strip. These hooks can accommodate longer necklaces or bracelets.
- Mount on the Wall: Use a strong adhesive or mounting tape to secure the magnetic strip to your wall. Ensure the surface is clean and dry before applying the adhesive.
- Hang Your Jewelry: Once the magnetic strip is securely mounted, start hanging your jewelry on the clothespins. (Makes a great necklace holder) The magnetic design allows for easy rearrangement and quick access to your accessories.
Benefits of This DIY Jewelry Organizer:
- Space-Saving: Maximize wall space and keep your jewelry visible and within reach.
- Adjustable Display: Easily rearrange clothespins to accommodate different jewelry items.
- Sleek and Modern: The magnetic strip adds a contemporary touch to your decor.
Transform your wall into a magnetic jewelry showcase with this innovative and space-efficient DIY organizer. Enjoy the convenience of a clutter-free space while displaying your favorite accessories with style and flair.
You can find the full tutorial and more tips at Magnetic Strip: Easy Installation and Several Amazing Uses For Your Home
Enhancing Your DIY Jewelry Holder
Looking for more DIY jewelry storage ideas? Here are some additional projects to inspire you:
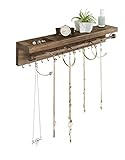
DIY Wall Jewelry Organizer
Create a chic and space-saving jewelry display on your wall using an old picture frame, hooks, and burlap fabric.
Easy DIY Bracelet Holder
Repurpose candlesticks into a stylish bracelet holder. Simply attach cup hooks to the top for easy bracelet storage.
Earring Organizer Tutorial
Craft an earring holder using a wooden dowel and fabric. Hang stud earrings and dangle earrings for a functional and beautiful jewelry display.
Jewelry Cabinet Makeover
Transform an old dresser into a stunning jewelry box with spray paint, new hardware, and added shelving.
DIY Jewelry Tree
Repurpose a vase and branches to create a unique jewelry tree. Hang necklaces and bracelets for a decorative and practical solution.
DIY Jewelry Organizer with Frame and Chicken Wire
Create a trendy jewelry display with a repurposed frame and chicken wire. This stylish organizer allows you to showcase your accessories creatively while adding a touch of rustic charm to your space. Simply hang your necklaces, earrings, and bracelets on the chicken wire for an organized and visually appealing storage solution.
DIY Hanging Jewelry Organizer Q & A
To make a hanging jewelry organizer, you can start by finding a piece of wood or a decorative board. Then, attach hooks, knobs, or vintage drawer pulls to the board to hang necklaces, bracelets, and other jewelry items. You can also add small nails or hooks to hang earrings and rings. Finally, attach a string, ribbon, or wire to the top of the board for hanging. This creates a stylish and functional hanging jewelry organizer that keeps your jewelry easily accessible and neatly displayed.
You can use a variety of items as a jewelry hanger, such as a decorative wooden board with hooks or knobs attached, a repurposed vintage drawer pull board, a wall-mounted jewelry organizer, or even a simple decorative tree branch. Be creative and make sure it suits your personal style and space.
Marie Kondo organizes jewelry by using her KonMari method, which involves decluttering and organizing items by category, and then keeping only those items that spark joy. She recommends storing jewelry in a way that allows each piece to be visible and easily accessible, such as using small individual boxes or trays within a drawer or using decorative hooks or hangers for necklaces and bracelets.
To make a homemade jewelry stand, you can start by finding a piece of wood or a decorative wooden board. Then, you can attach hooks, knobs, or vintage drawer pulls to the board to hang necklaces, bracelets, and other jewelry items. Alternatively, you can repurpose items like a decorative tree branch, a picture frame, or even a cheese grater to create a unique and personalized jewelry stand. The key is to be creative and use materials that suit your style and needs.
Instead of a traditional jewelry box, you can use a variety of alternative storage and display options for your jewelry. Consider using a hanging jewelry organizer, a decorative tray or dish, a wall-mounted jewelry holder, a jewelry tree, or even repurposed items such as vintage drawer pulls mounted on a board. These alternatives can add a unique and personalized touch to your jewelry storage while keeping your items organized and easily accessible.

Are you ready to run to thrift stores and make an easy jewelry organizer? Let me know in the comments below which easy DIY jewelry organizer you’ll use!
Find out “What Exactly Does It Mean To Repurpose Or Upcycle“, save money, and create the most amazing things.
Crafting Creativity: DIY Hanging Jewelry Organizer
Equipment
- Drill
Materials
- A pine board
- Stain or paint of your choice
- Drawer Knobs
Instructions
- e measured and drilled 4 holes in the pine board.
- We lightly sanded the board to make sure it was smooth and wiped it off.
- We painted one couple of coats of Varathane 8 oz. Ebony Premium Fast Dry Interior Wood Stain.
- I screwed the vintage glass pulls onto the board.
- We screwed it into studs and I hug my jewelry onto the jewelry organizer.


Such a great idea! I really need to make one of these!
Chas, what a cool idea this is to hang and display your jewelry. I love the vintage knobs you used. Thanks for sharing!
Not only is this super cute, it’s so clever and functional, too! Love it. xoxo, Kristi
Chas! I only wish I had a nice organized closet like yours! This jewelry holder is right up my alley! I love black & glass. Excellent tutorial!
I love this idea, a fantastic and pretty way to organize your jewelry!
This is such a great way to hang your necklaces! Thanks for the idea!
Thank you so much Angie 🙂
Your closet is so organized!! I love it!!
Thank you Jennifer 🙂
Those knobs are gorgeous and I love what you did with them!
Thank you so much
I love this idea. Our new closet is missing space for me to hang my jewelry and this would work. Now I think we need to go to the flea markets together! ?
Yes, let’s totally go together! Would be so much fun!!!
My grand-daughters will LOVE this for all their fun fashion jewelry. Great gift idea!
Thank you so much Meegan
What a cute idea!
Thank you Cindy
Such a smart and cute idea! Thanks for sharing.
Good score and great way to use them!
Thank you Lora
This looks great in your closet and it is so useful!
Thank you so much Paula