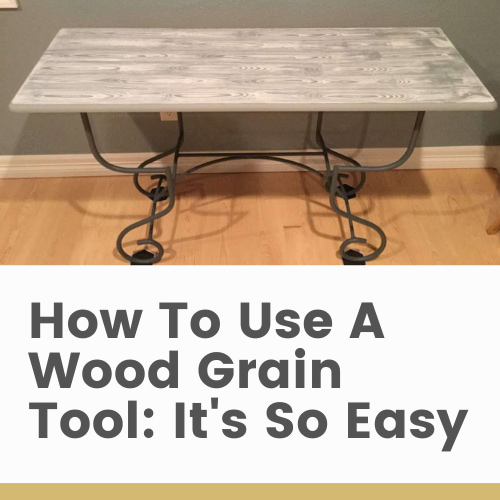
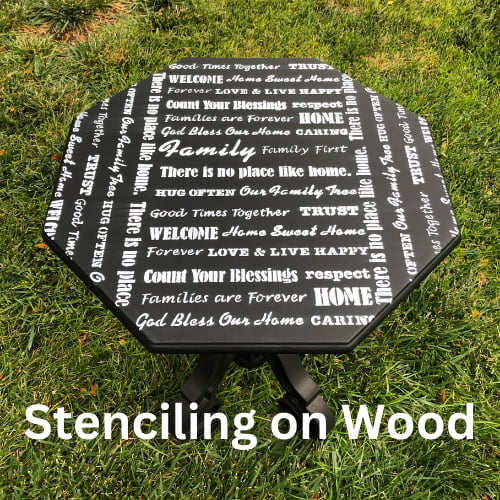
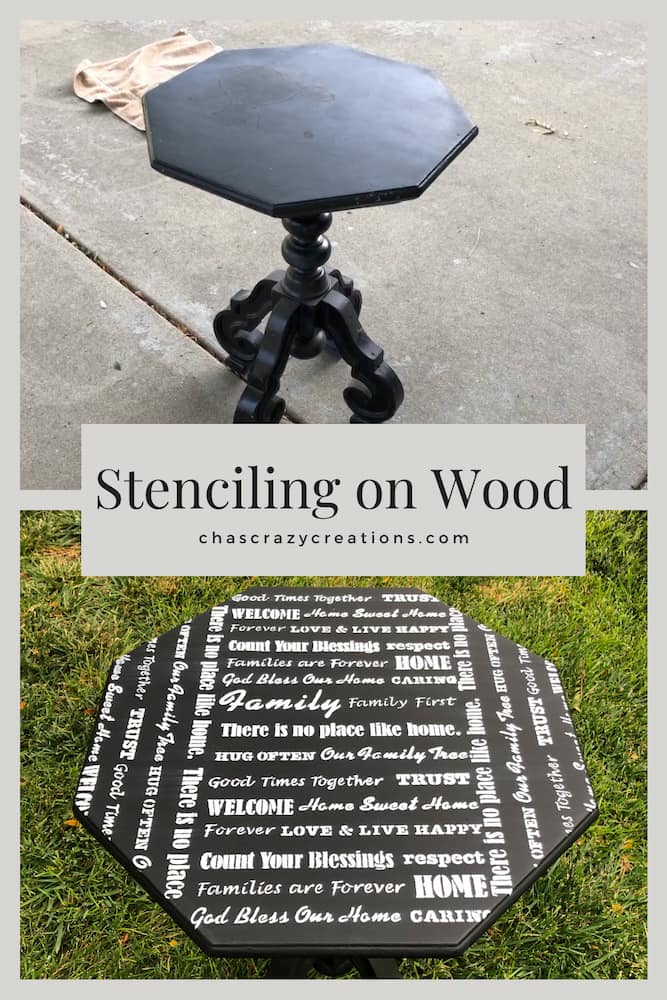
Upcycling a Side Table with Stenciling on Wood
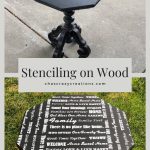
Are you looking to add a unique touch to your furniture? Have you considered stenciling on wood? In this blog post, I’ll take you through my process of upcycling a side table that I found at a thrift store. With a few materials and some creativity, I transformed this piece into a statement item that fits perfectly in my home.
Stenciling on Wood Materials Needed
- Side table
- Sandpaper or orbital sander
- Denatured alcohol
- Chalk paint (I used Folk Art Home Decor Chalk Paint in Rich Black and Java)
- Stencil brush
- Plaid Folk Art stencil
- Stencil tape
- Paper plate
- Varnish (I used Folk Art Home Decor Varnish)
Stenciling On Wood Video Tutorial
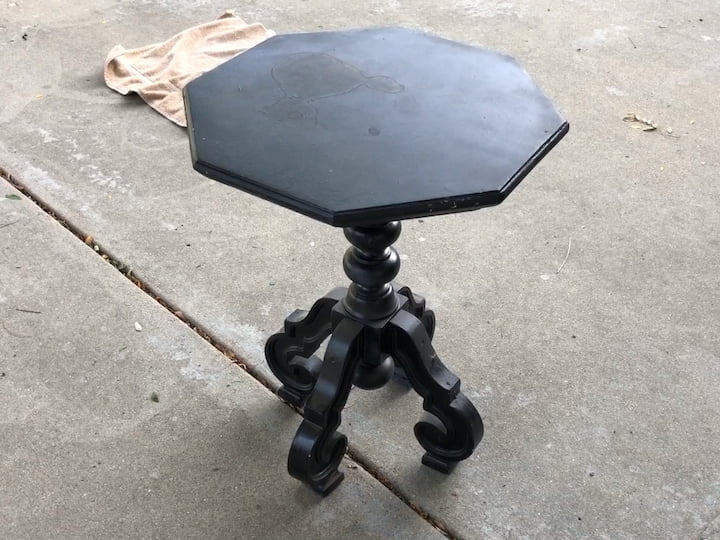
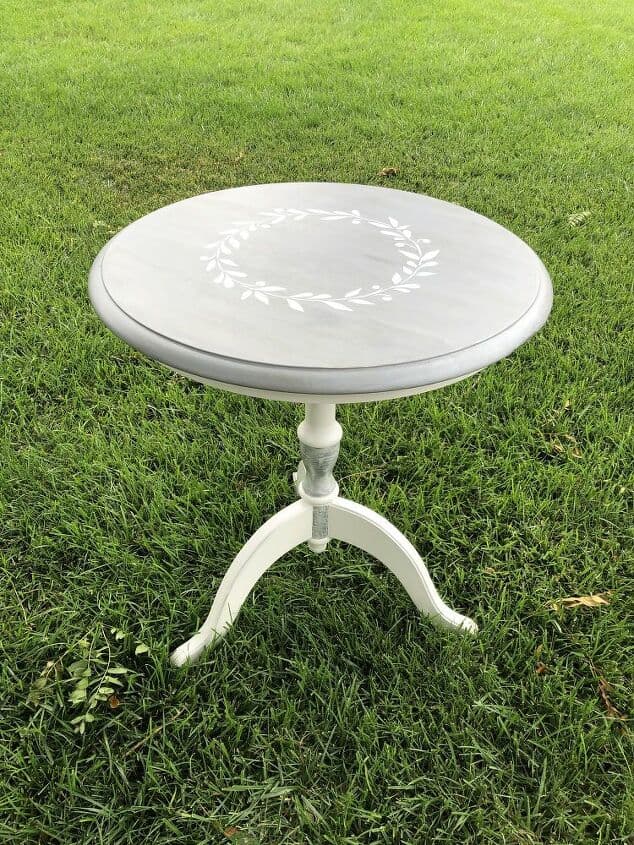
The side table I found at the thrift store was in decent shape, but the top had some water damage.
Stenciling on Wood Instructions

Step 1: Sanding and Cleaning
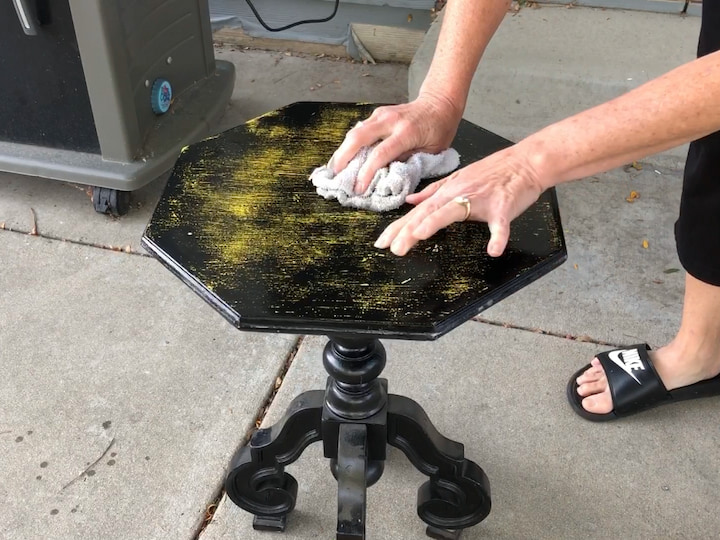
I started by sanding the top and the edges of the piece with my black Decker orbital sander. I then learned that the piece had been coated in wax, so I sprayed the entire piece down with denatured alcohol and paper towels to get rid of the wax that would be hard to sand off.

Step 2: Painting
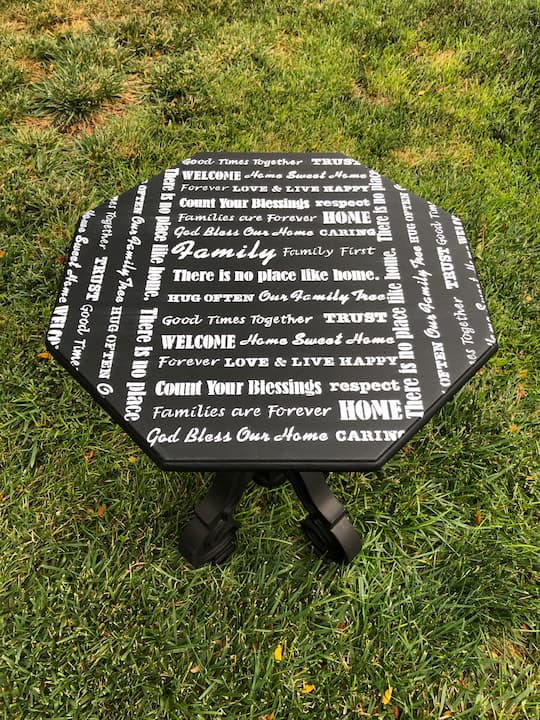
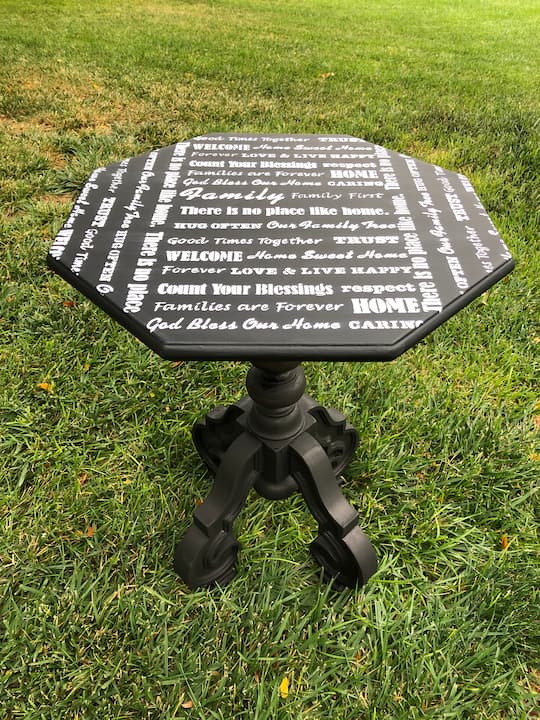
Next, I used Folk Art Home Decor Chalk Paint in Rich Black to paint the entire surface of the table. I let it dry between coats and added a second coat. This chalk paint is water-based, making it easy to clean up any spills.
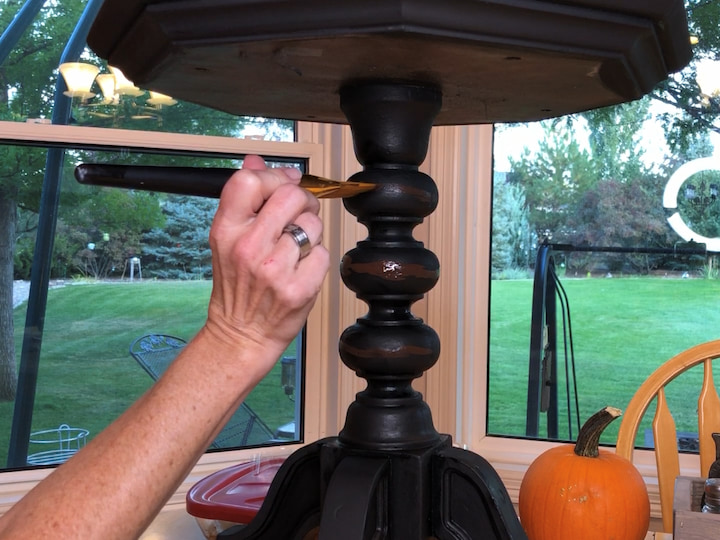
After doing a little touch-up, I decided to paint the entire base as well. I used Folk Art Home Decor Chalk Paint in Java to create the accent I was looking for. I put the Java paint around the curves of the base stem of the piece to mimic the faux distress look on my other existing pieces.
The number of coats of paint is really up to you and the piece you’re painting.
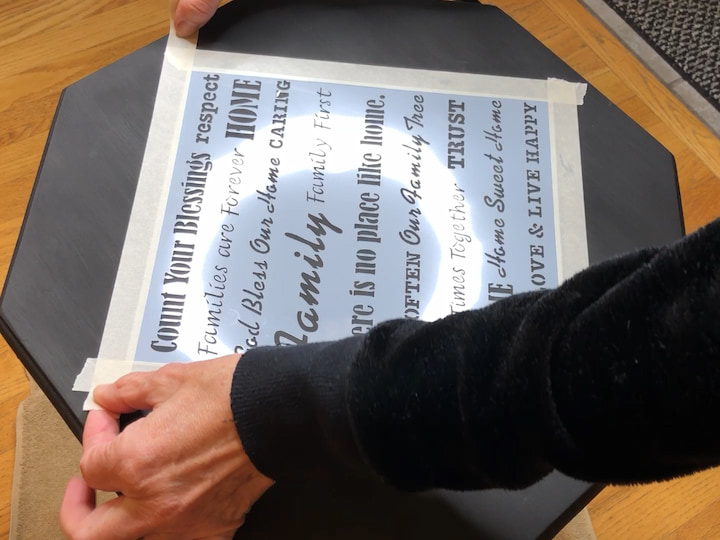
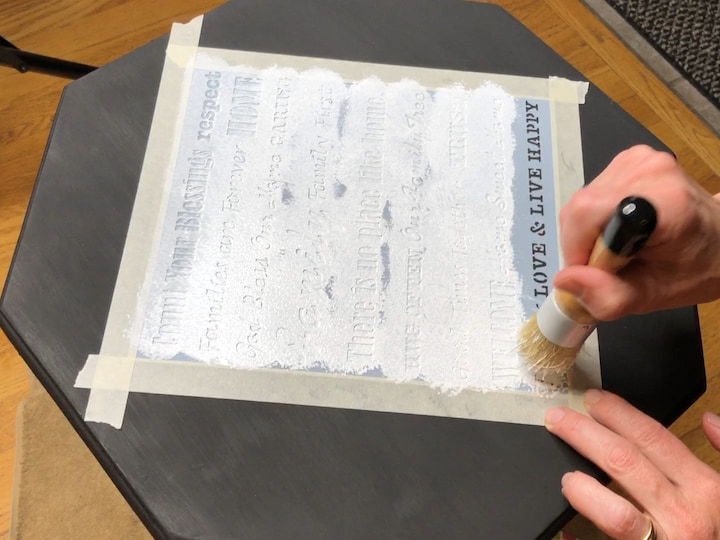
Step 3: Stenciling
Once the paint was dry, I was ready to stencil. I used stencil tape (running it along the stencil edge) to hold the Plaid Folk Art stencil in place on the table while I painted it with Folk Art Home Decor Chalk Paint in White. I dipped my stencil brush (pick the right kind of paint brushes for you) into the paint, dabbed off the excess onto a paper plate, and then pounced the brush onto the stencil to put the paint through the stencil and onto the table.
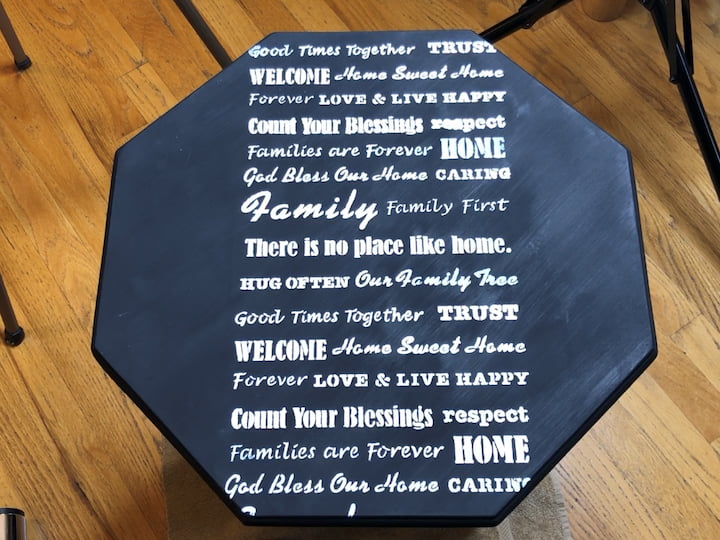
I carefully lifted the stencil tape and lifted the stencil off the table. I then added more stencil to the top and the bottom of the original stencil so now it went from the top of the table to the bottom. I repeated this process on each side, making sure to let the stencil dry between each application.
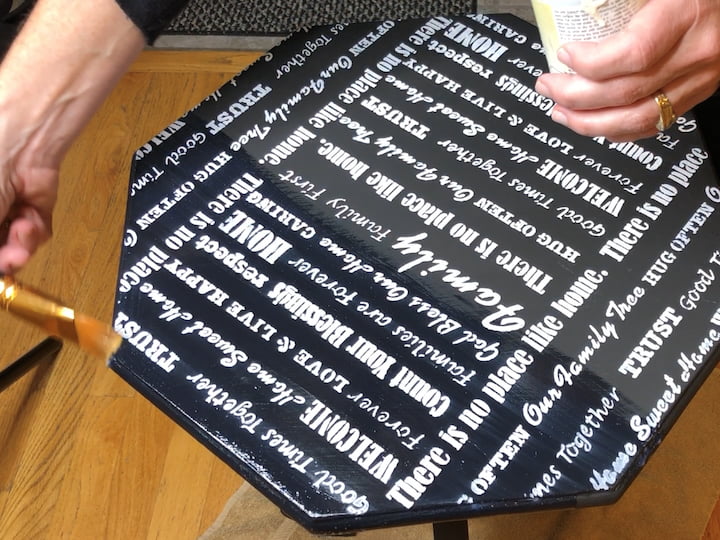
Step 4: Varnishing
Finally, once the table was entirely finished, I let it dry completely before moving on to varnishing. I used Folk Art Home Decor Varnish to seal the top and protect the table. I did a light coat and then let it dry before repeating the process for a total of three coats.
Shop any of these stores and I receive a small commission at no cost to you.
 Furinno JUST Side Table, 3-…Shop on Amazon
 Yoobure C Shaped End Table,…Shop on Amazon
 Decor Therapy Simplify End …Shop on Amazon
") Decor Therapy Simplify Roun…Shop on Amazon
Decor Therapy Simplify Roun…Shop on Amazon
Stenciling On Wood Video Tutorial
Stenciling on Wood Q & A
Stenciling on wood can be a fun and creative way to add a personal touch to your home decor, but one of the challenges that you may face is bleeding. Bleeding occurs when paint seeps under the stencil, causing the edges of your design to be blurred and uneven. However, there are several techniques you can use to prevent bleeding when stenciling on wood:
Sand the wood surface: Sanding the wood surface before stenciling helps to create a smoother surface that the stencil can adhere to. Sanding with a fine-grit sandpaper will also remove any rough spots or splinters that may cause the stencil to lift and allow paint to bleed.
Use painter’s tape: Applying painter’s tape around the edges of the stencil can help to hold it in place and prevent paint from seeping underneath. Make sure to apply the tape firmly, pressing it down along the edges of the stencil.
Spray adhesive: Applying a small amount of spray adhesive to the back of the stencil can help to hold it in place and prevent paint from bleeding. However, be sure to use a light mist of spray adhesive, as too much can cause the stencil to stick too strongly to the wood and make it difficult to remove.
Use the right kind of paint: Water-based acrylic paints and chalk paints are popular choices for stenciling on wood because they dry quickly and are less likely to bleed. Latex paint and oil-based paints can also be used but may require more drying time.
Dab, don’t brush: When applying paint over the stencil, use a stencil brush or a makeup sponge to dab the paint onto the wood surface instead of brushing it on. Dabbing helps to prevent excess paint from seeping under the stencil and causing bleeding.
Remove the stencil carefully: After applying the paint, remove the stencil carefully and slowly to avoid smudging or smearing the design. If there is any bleeding, use a small paintbrush to touch up the edges of the stencil.
By following these tips, you can stencil on wood without worrying about bleeding and achieve crisp, clean lines for your stenciled designs.
There are a few different types of paint that can be used for stenciling on wood, but the most common ones are acrylic paint, chalk paint, and latex paint. Acrylic paint is a popular choice because it dries quickly and is water-based, so it’s easy to clean up. Chalk paint is another option that has gained popularity in recent years because it can create a matte finish and gives a vintage look. Latex paint is a more traditional option and can be a good choice if you want a glossy finish. Ultimately, the type of paint you choose will depend on your personal preference and the look you’re trying to achieve.
More Stenciling on Wood Projects
- How To Stencil On Wood
- Awesome and Easy Furniture Makeover with Video
- Updated Side Table
- Easy and Awesome How To Paint A Bench with Video
- Quick and Easy Side Table Makeover On A Budget
- How To Stencil With A Printable
- Easy How To Paint with Chalk Paint with Video
- Sofa Arm Tray Useful and Fun DIY
Click here for Plaid Enterprises, Inc. Disclosure @PlaidCrafts #PlaidCrafts #PlaidCreators
Stenciling on Wood Tips
If you are a fan of DIY projects, you may have already tried stenciling on wood. It’s a great way to add a personal touch to your home decor, whether you want to make wood signs, decorate furniture, or create custom art pieces. Stenciling allows you to easily create crisp lines and beautiful designs, even if you don’t have much artistic ability.
One important step in stenciling on wood is to properly prepare the wood surface. You’ll want to start by sanding the wood to create a smooth surface for the paint to adhere to. Use a sandpaper with a fine grit to avoid scratches on the wood surface. Once you have sanded the wood, use a towel to remove any dust and debris from the surface.
Now, it’s time to choose your stencil. You can purchase stencils in a variety of materials, including adhesive stencils, vinyl stencils, and even make your own stencils using a Cricut. When selecting your stencil, make sure it’s the right size for your project, and that it’s made from a material that’s compatible with the kind of paint you plan to use.
Next, you’ll want to secure the stencil onto the wood surface. You can use painter’s tape or spray adhesive to keep the stencil in place. Make sure to press down the edges of the stencil firmly to prevent paint bleeding under the stencil. If you’re using letter stencils, pay attention to the edges of the stencil to make sure your letters come out clean and neat.
When it comes to the paint, there are many options available. Some popular choices include acrylic paint, latex paint, and chalk paint. Chalk paint is a great option for stenciling on wood because it has a matte finish and is water-based, which makes it easy to clean up. Use a foam brush or a sponge brush to apply a small amount of paint onto the stencil, being careful not to overload the brush or the sponge.
To avoid stencil bleeding, use a pouncing motion to dab the paint onto the wood surface. You can also use a makeup sponge to apply the paint if you prefer. After you have stenciled the design onto the wood surface, carefully remove the stencil and allow the paint to dry completely. If you notice any stencil bleeding or mistakes, you can use a small amount of paint to fix the problem.
Once your design is complete and the paint has dried, you’ll want to seal the wood surface to protect your work. You can use mod podge or a sealant like varnish or polyurethane to do this. Apply a light coat of sealant using a foam brush or a roller, and allow it to dry before applying additional coats.
In full disclosure, some of the links in this post may be affiliate links. If you make a purchase through one of these links, I may earn a small commission, which helps support my blog and YouTube channel. However, rest assured that I only recommend products that I personally use and love.
Overall, stenciling on wood is a fun and creative way to add a personal touch to your home decor. With a few simple tricks and the right tools, you can create beautiful designs and wood signs that will impress your friends and family. Be sure to check out step-by-step tutorials and video tutorials for more tips and inspiration for your next craft project.
Stenciling on wood is a simple way to add a personal touch to your furniture. With a few materials and some creativity, you can transform an old piece into a statement item that fits perfectly in your home. I hope this post inspires you to upcycle something of your own.