
Super Easy and Awesome Tin Can Crafts on a Budget
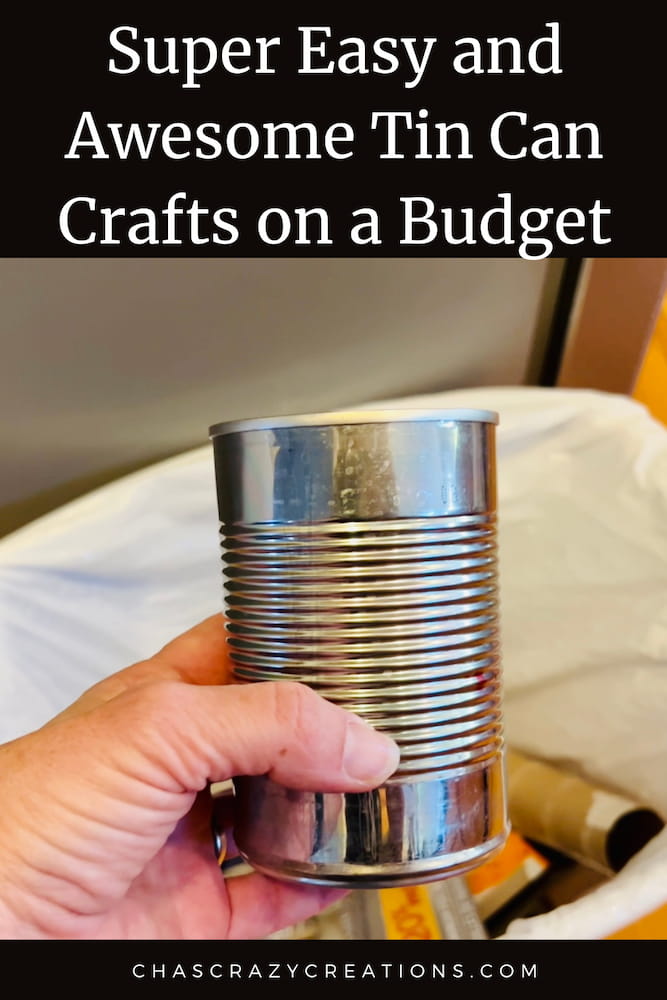
Are you looking for some tin can crafts? I have several super easy crafts that you can make on a budget starting today!
Wait, stop, don’t throw those empty tin cans in the recycling bin, we’re gonna make something fun with that humble tin can. As you all know I love to find creative ways to put everyday items to good use.
This is an easy project and a great way to make good use of plain old tin cans. You can use canned food cans, soup cans, or any old can you have on hand. You can adjust this creative project to fit tin cans of all sizes. With just a little bit of paint and a few craft supplies, you can turn these empty cans into seasonal DIY home decor. This is a fun project kids of all ages will enjoy. So here you go with a full tutorial.
Tin Can Crafts Materials
- cans
- Rustoleum spray paint
- buttons
- felt
- diamond adhesive wrap
- ribbon
- hot glue gun
- googly eyes
- sharpie markers
 Blysk Empty Metal Paint Can…Shop on Amazon
 Rust-Oleum 334020 Painter's…Shop on Amazon
 Resin Buttons, Assorted Siz…Shop on Amazon
") 28pcs Thick 1.4mm Soft Felt…Shop on Amazon
28pcs Thick 1.4mm Soft Felt…Shop on Amazon 8 Rolls Rhinestone Ribbons,…Shop on Amazon
, Decorative Ribbon for Gift Wrapping, Crafts Hair Bows, Flower Bouquet, Wedding Party Decorat") LIUYAXI 3/8 Inch Satin Ribb…Shop on Amazon
LIUYAXI 3/8 Inch Satin Ribb…Shop on Amazon - Dual Temp, Precision Nozzle, and Easy Squeeze Trigger") Gorilla Mini Hot Glue Gun K…Shop on AmazonShop on Amazon
Gorilla Mini Hot Glue Gun K…Shop on AmazonShop on Amazon Sharpie Permanent Markers, …Shop on Amazon
Tin Can Crafts Video
Tin Can Crafts instructions
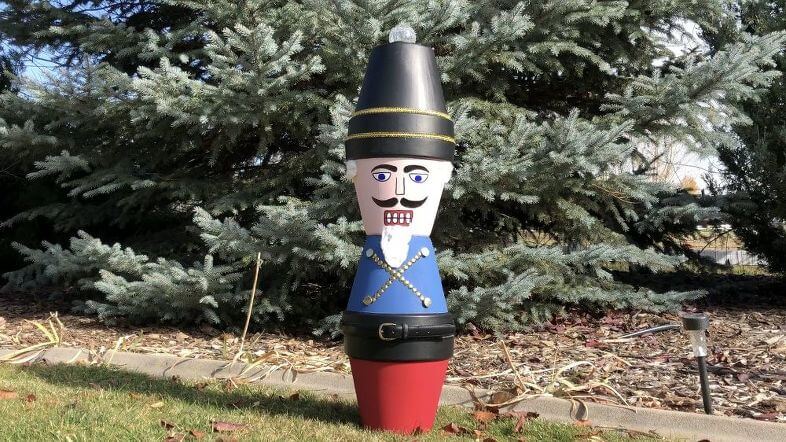
Easy Solider Can Craft
The easiest way to get an even coat of paint on all these cans is to use spray paint.

- I’m going to be painting three cans with Rust-Oleum spray paint in the color white.
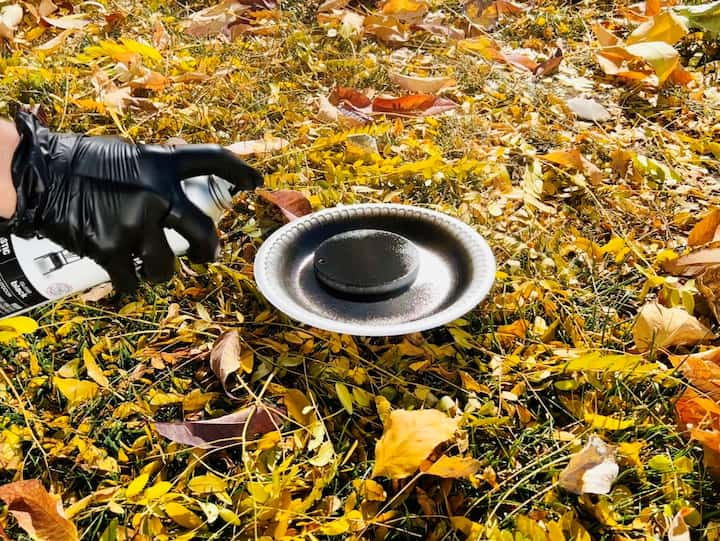
- I’m also going to be spraying three cans with Rust-Oleum black paint.
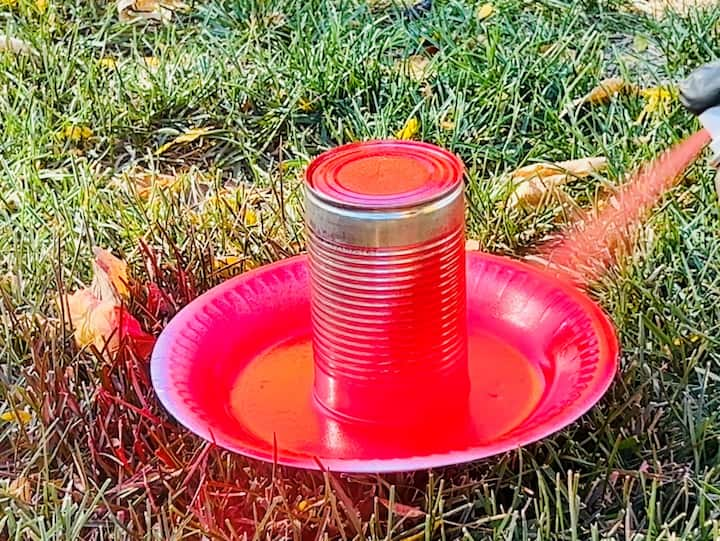
- I’ll be painting one can with Rust-Oleum spray paint in the color red.
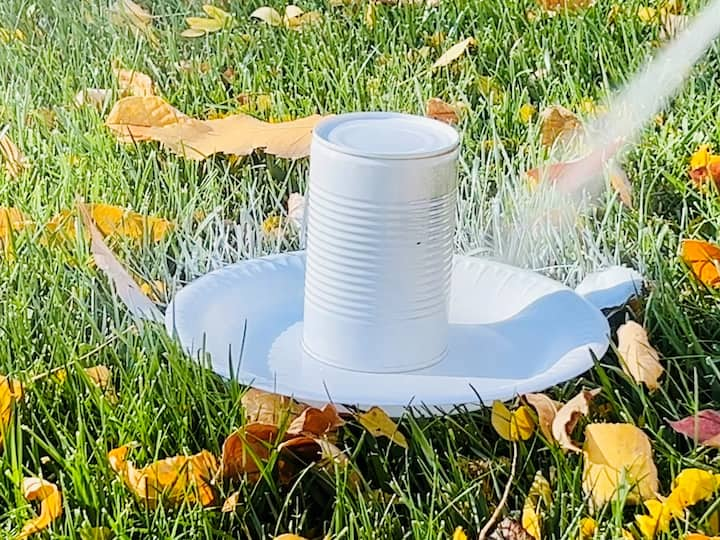
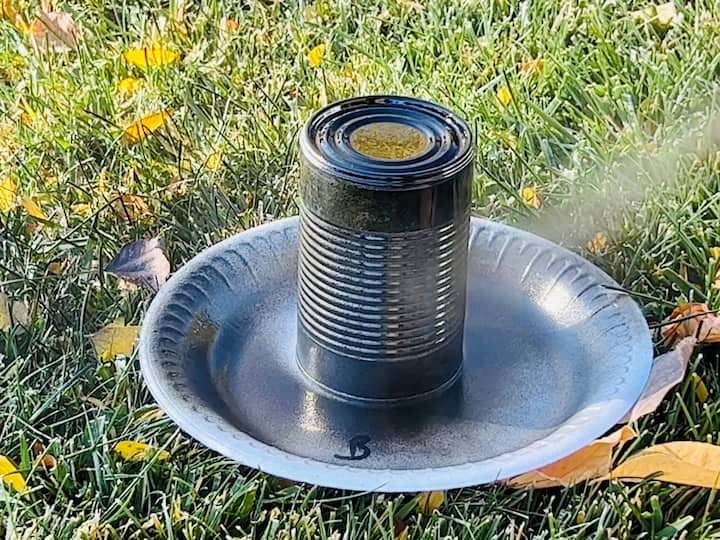
- I also have these garden decor discs that kind of look like coasters and I’m going to be painting two of them with Rust-Oleum black spray paint.
Now that they’re all painted I need to let them all dry completely before I move on to the next step.
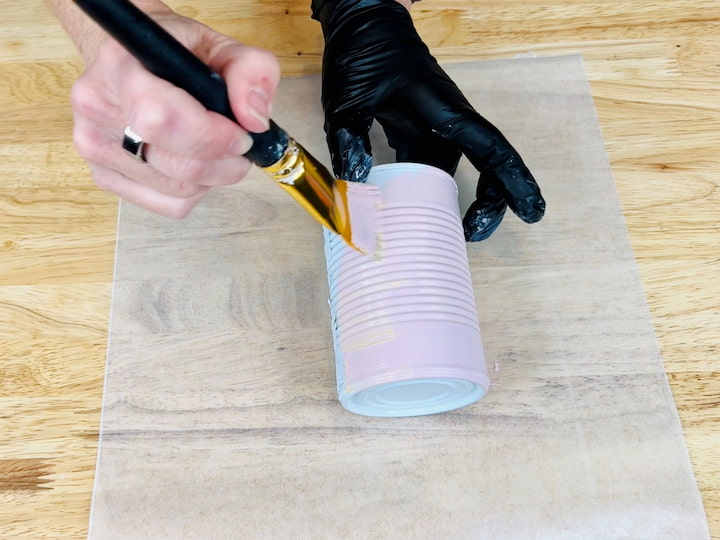
Once they are all dry, start with one of the white cans. I used Waverly chalk paint in the color ballet slipper to achieve a skin tone. The white paint was just a primer so the chalk paint would adhere nicely. Paint the entire can and let it dry.
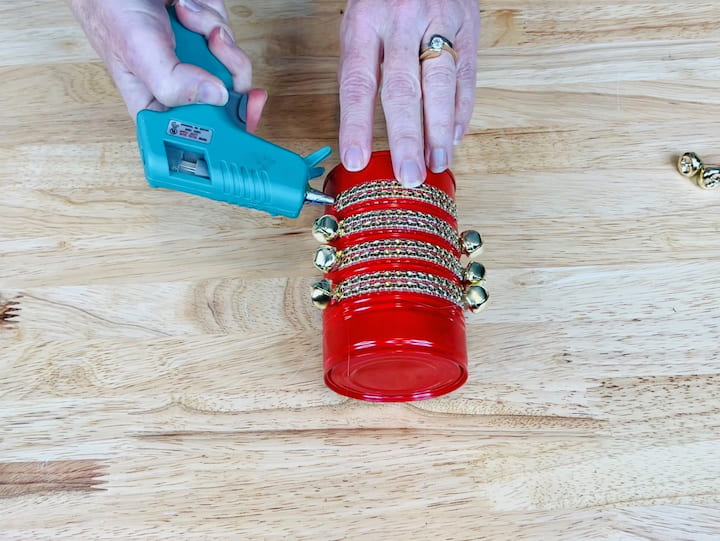
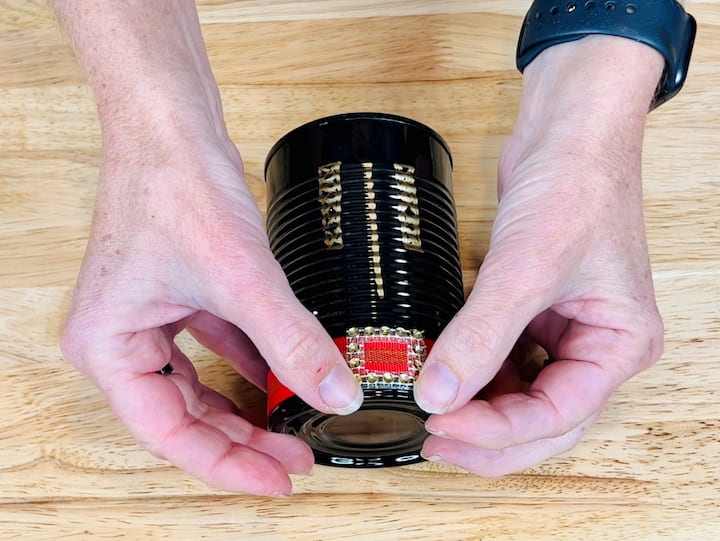
While that’s drying I’m going to use some adhesive Diamond wrap paper. Cut a strip with two rows and then cut that in half. Peel off the backing and place all four strips onto the red cans, spacing them evenly apart.
Next, I’m going to take some Jingle Bells. I will be using eight Jingle Bells in total and I will use a hot glue gun to attach them on either side of the diamond adhesive wrap. Now that the red can is done I’m going to set that aside and focus on one of the black cans.
I’m going to use my gold Sharpie to make an x pattern on the black can, halfway down on either side. These will represent the boots or laces. I’m also going to draw a line down the center to define the pants.
I will use a piece of red ribbon and hot glue it around the top of the black can. This will become the belt. I’ve cut another piece of the diamond wrap in the shape of a belt buckle and I’m peeling off the backing to place it on top of the ribbon.
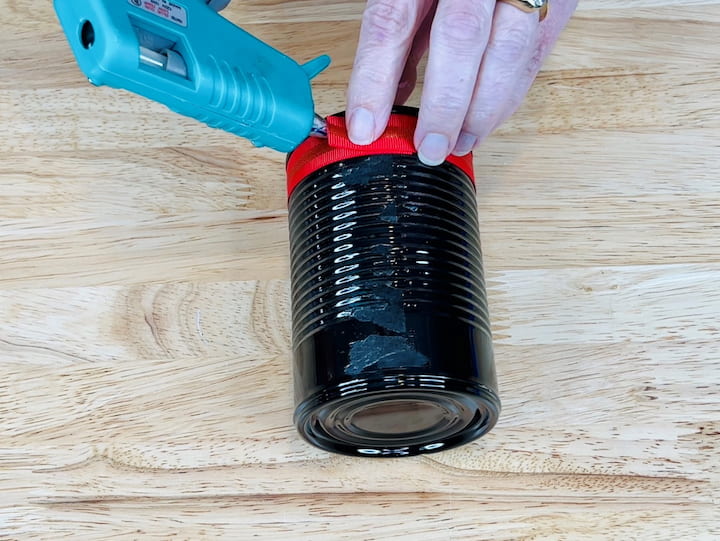
Now the bottom half can is done. I’m going to repeat this with the top can. Using another black can I will wrap the ribbon around it and adhere it with hot glue. This will become my hat.
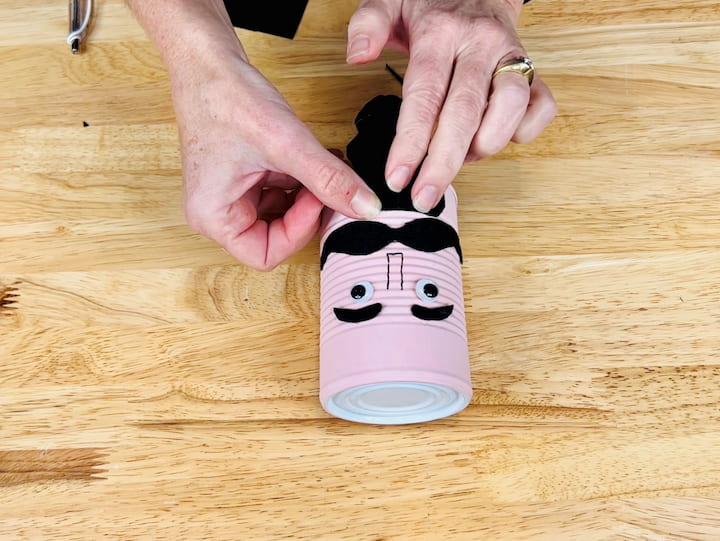
Three of our cans are done. Now we’re going to work on that pink. This will be the face.
I will take some black felt and cut it into a mustache shape. I will also be cutting a couple of eyebrows as well. I’m going to glue two googly eyes on the pink can and draw a nose with a black Sharpie. I’m going to hot glue the eyebrows into place over the top of the googly eyes and hot glue the mustache into place underneath the nose. I’ve also cut out a beard and I’m going to hot glue that into place.

I wanted to add a little mouth so I used folk art home decor chalk paint in the color white to make some teeth. Once that was dry I took a red Sharpie and traced around it to make the lips. I cut some hair out of the felt, as well, and hot glued that into place on the top of the can.
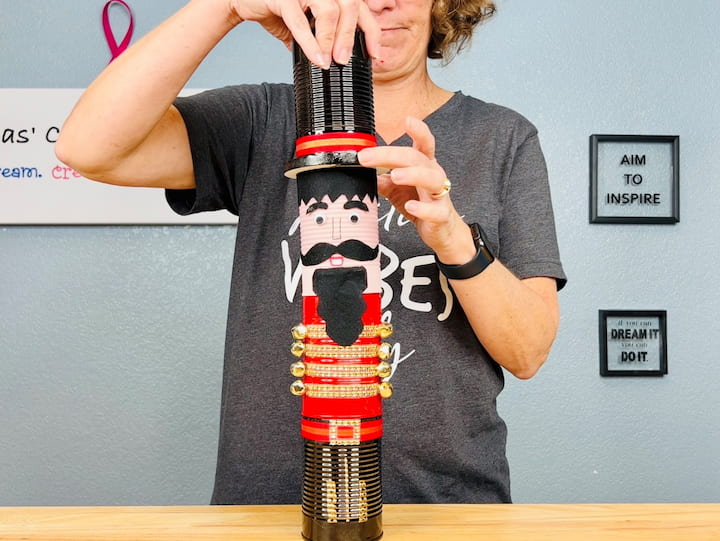
Now it’s time to put them together. We start with the base with the feet and add the top which is the shirt. Next, we add the head with the beard that drapes over the top of the shirt. Lastly, we add the coaster and then the hat. You could hot glue all of these into place if you like, or you can just stack them, it’s really up to you.
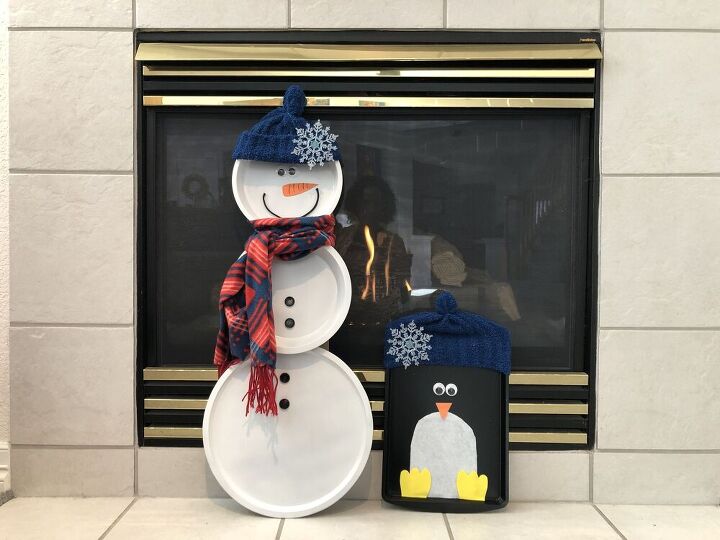
Snowman Can Craft
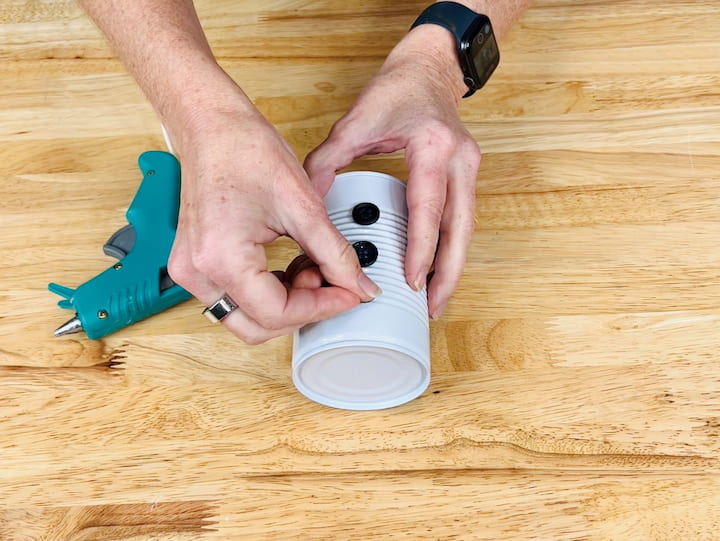
For this next project, I’m going to take the white can and place three buttons on it and hot glue them into place
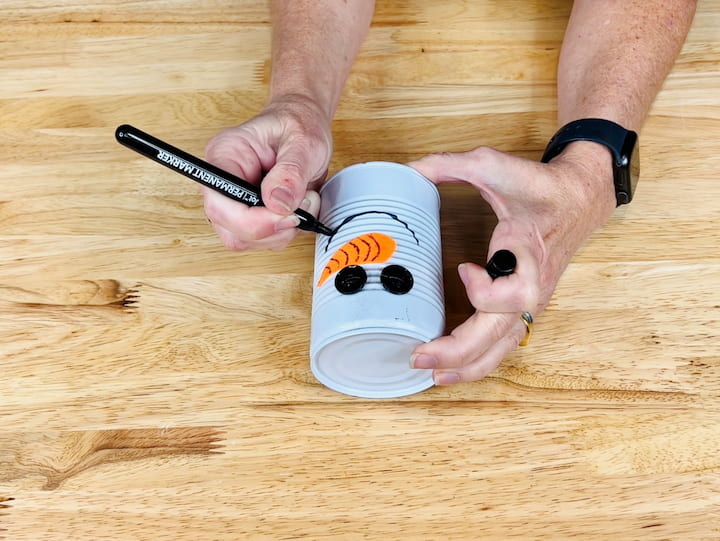
I’m going to take the second white can and hot glue two large eyes out of buttons. I’ve taken some orange felt and I’ve cut a carrot-shaped nose out of it. With a black permanent marker, I made some stripes to give it more of a carrot look. I hot glued the carrot into place underneath the button eyes. I then took my black permanent marker and drew a smiley face to make a snowman.
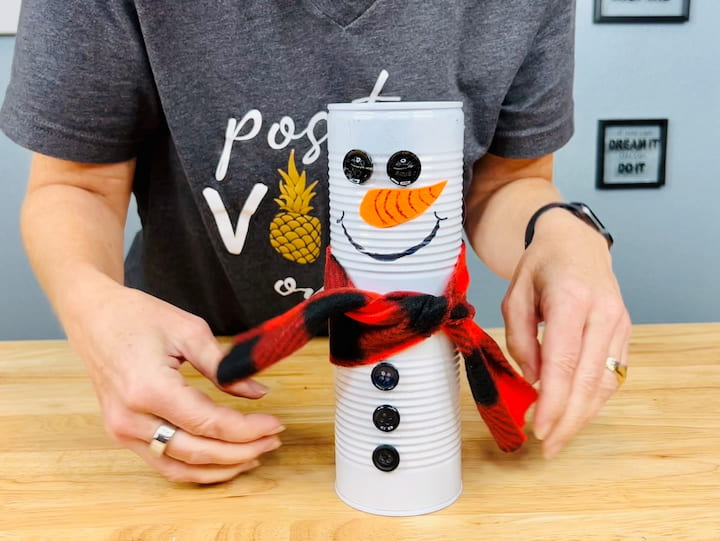
I took a scarf from Dollar Tree and cut a strip to become the snowman’s scarf. I placed the head on the body and then I tied the scarf around the two.
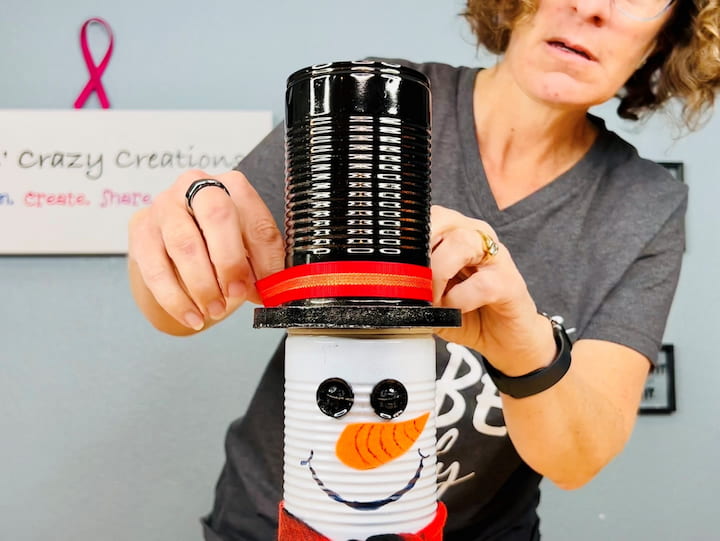
I placed the coaster on top of the head and added the black can on top of that. The last thing I did was take a piece of red ribbon. I cut it to the length around the top can and hot glued that into place.
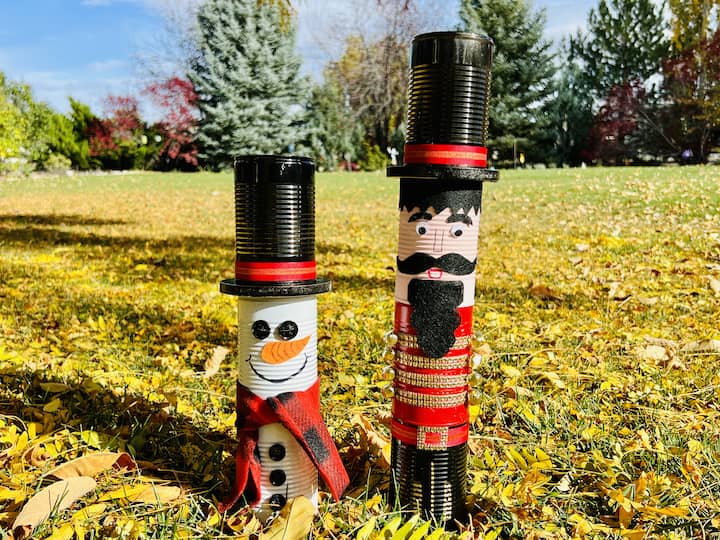
Here they are all finished. I’m absolutely thrilled with how they turned out. I think this is a unique way to turn simple tin cans into fun Christmas decor.
Tin Can Crafts Video
Shop any of these stores and I receive a small commission at no cost to you.
 GOOSH Lighted Christmas Sno…Shop on Amazon
 Fancy Pets Cat Grass Treats…Shop on Amazon
 Farmhouse Beads Long Length…Shop on Amazon
 SMIRLY Charcuterie Large Ba…Shop on Amazon
 National Tree Company 24 in…Shop on Amazon
 Interchangeable Seasonal We…Shop on Amazon
More Tin Can Crafts Video
More Tin Can Crafts

Super Easy Dollar Tree Candle Holders DIY To Light Up Your Life
Do you love Dollar Tree? Me too! I sharing fantastic Dollar Tree Candle Holders DIY with you that are easy and inexpensive. This project can be adapted indoors or out. You can find the full tutorial at Super Easy Dollar Tree Candle Holders DIY To Light Up Your Life
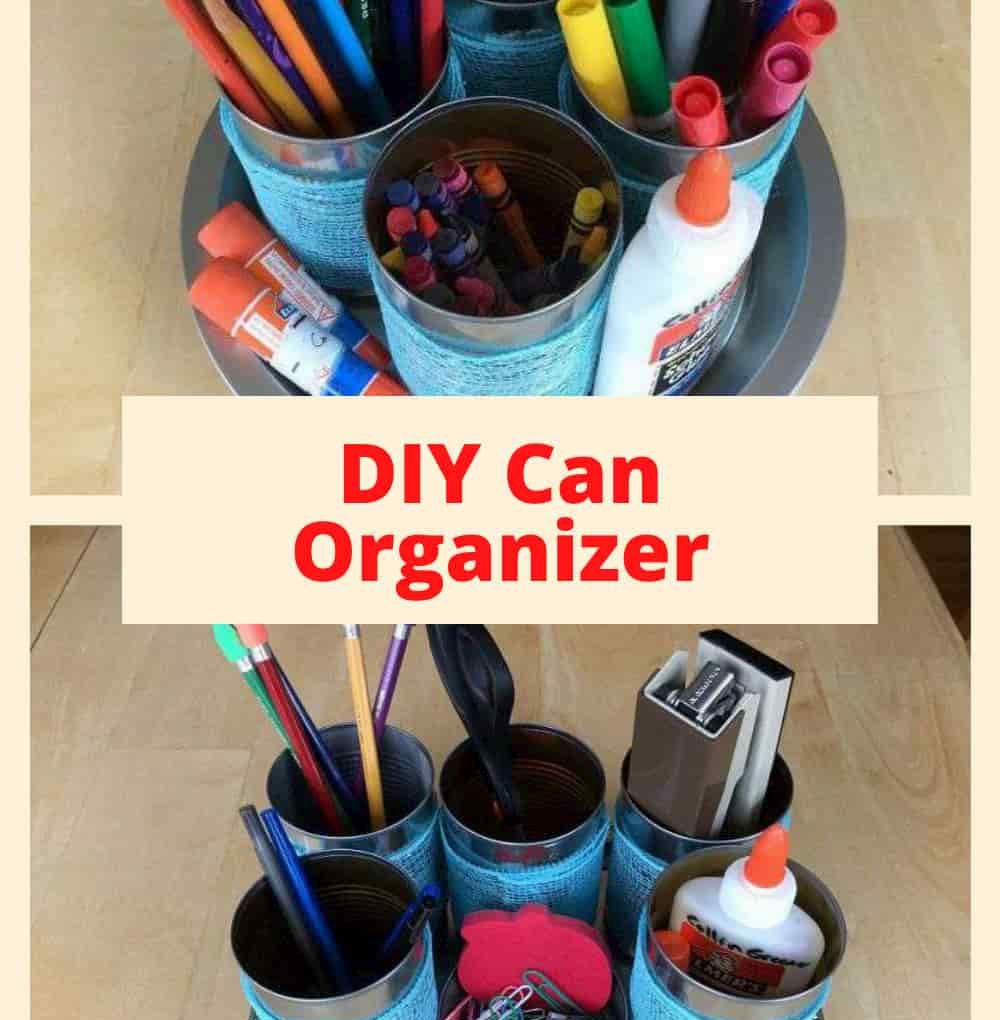
How To DIY A Can Organizer for Supplies
Do you love to reuse and recycle? Do you love to organize? I’m sharing how to DIY a can organizer for supplies. Create this easy desk organizer or craft caddy to hold things like a paint brush, pom poms, scissors, acrylic paints, and more!
In this post I share a few different ways to use this concept in your home. Create your own lazy susan and place cans in it. This craft makes a great homework station to hold school supplies or as a pencil holder. You can find the full tutorial at How To DIY A Can Organizer for Supplies
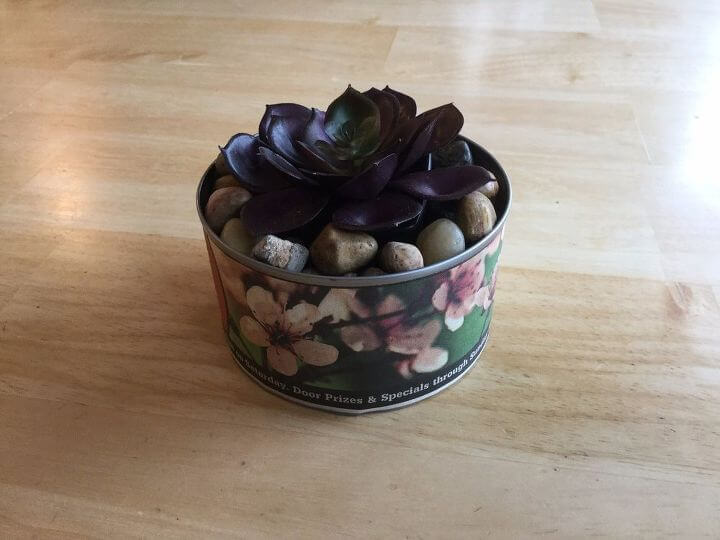
Recycled Cans As Planters
Make an herb garden with them or plant your favorite flowers or plant real plants in them. I had some cans lying around and rather than recycle them I wanted to reuse them. I created 4 different ways to use them as planters. See the tutorial below for all of the planters.
This one pictured above is a faux planter. I took some newspaper that actually had some flowers on it. I taped it around a tuna can. I filled it with some rocks and added a faux succulent to it. I love the way this planter turned out.
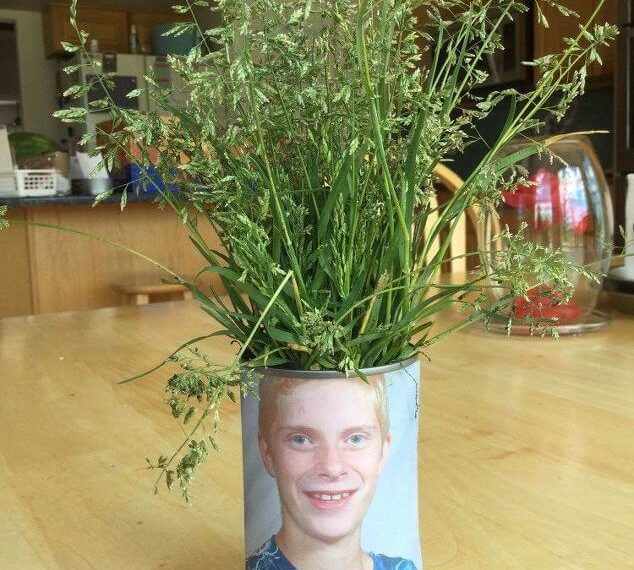
This next planter can be a lot of fun. It reminds me of the Chia Pets. I cut a picture of my son out and made sure to cut his head off. Trust me, that was intentional for the grass to be his hair. Then I taped it, or you can Mod Podge it, around a can. Inside of it is a bunch of grass seed. You get to have a lot of fun trimming the grass in any hair shape or haircut you want it to have. I think it’s fun to just have the hair sticking out of it.
You can find the full tutorial for these DIY planters at Recycled Cans As Planters
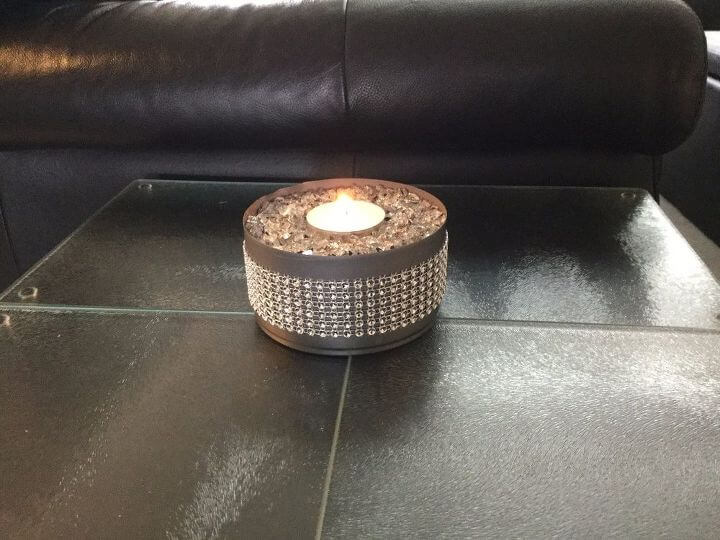
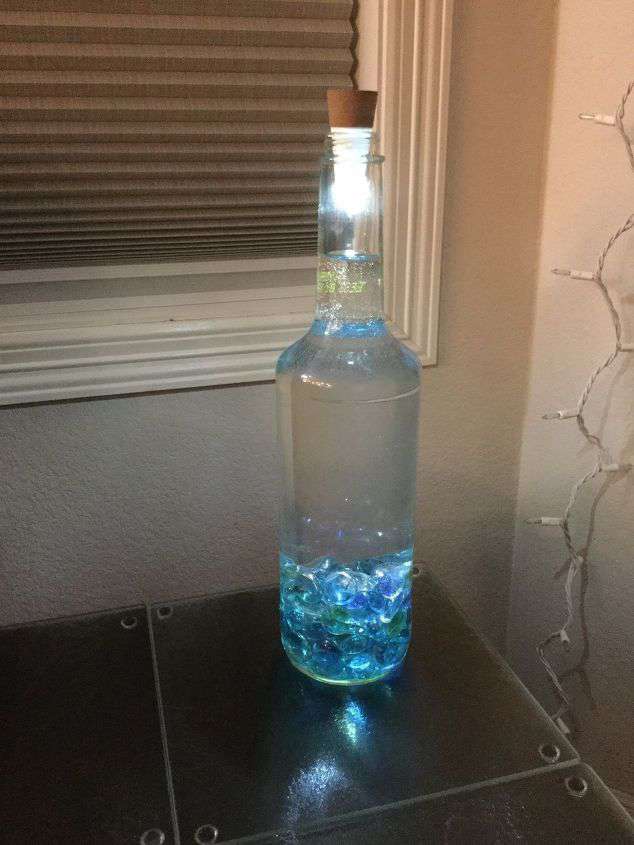
Upcycled Tuna Can Candle Holder
Take an old tuna can and turn it into a DIY tin candle holder. I added a little bling with diamond wrap and filled crushed glass as a decorative filler. I used a tealight but you can add a candle of your choice. You have an easy and inexpensive upcycled tuna can candle holder. You can find the full tutorial at Upcycled Tuna Can Candle Holder. If you like making candle holders, here is another idea for a candle upcycle.
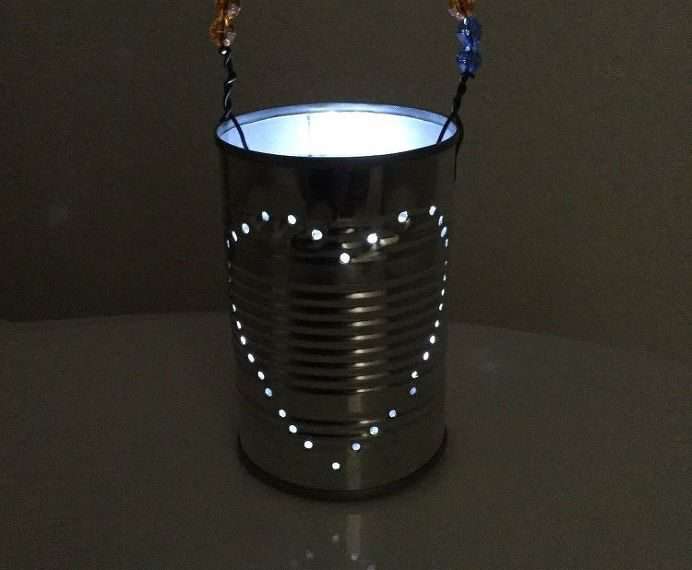
Repurposed Can to Lantern
Here is an easy and inexpensive way to create lanterns and luminaries from cans just in time for summer! You could place a lot of things inside to glow. Try using some solar lights, fairy lights, or candles.
You can see the full tutorial below, but I am going to give you a BIG tip to this tin can craft. I add some ice into the cans and fill them up with water. I place them in the freezer and wait till they get nice and solid. The ice holds the can shape together while you are adding the holes so they do not bend or dent.
You can use a drill to make the holes or a punch and hammer. For a drill and a bit, make sure to use safety goggles and follow all the protocols needed before moving forward using a power tool. This hammer works great if you’re working with kids and if you don’t like working with power tools.
You can find the full tutorial at Repurposed Can to Lantern.
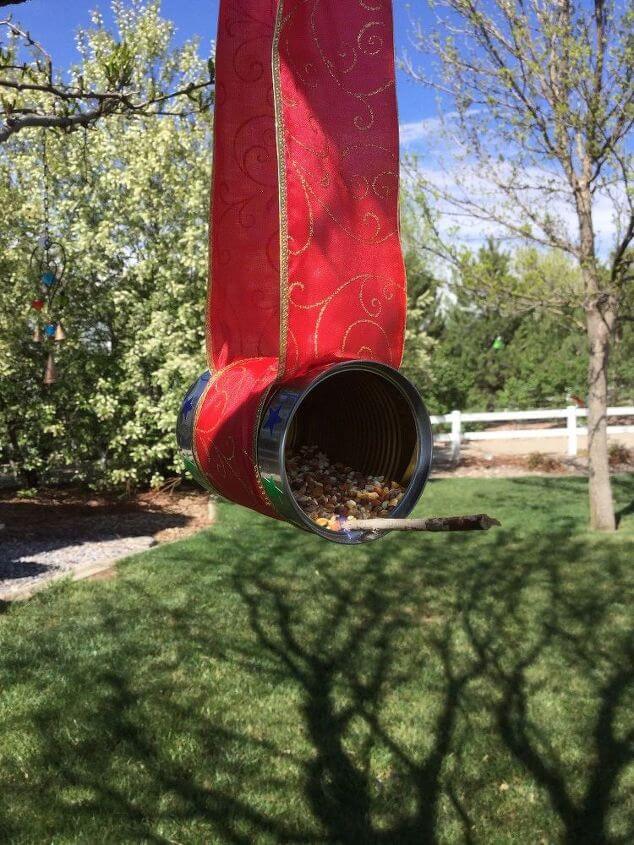
DIY Bird Feeders with Recycled Materials
I like creating bird feeders out of recycled materials. All you need is a recycled can, some ribbon, and a little stick. I place them around the yard to remind me of my grandparents and to keep them out of my garden and fruit trees while they’re growing. You can find the full tutorial at DIY Bird Feeders with Recycled Materials.

DIY Tin Can Wind Chime
I spray painted some cans that were a variety of sizes. I added some twine through them and made myself a wind chime. I had twine on hand. You can use ribbon or yarn instead. It is fun to see what you have around the house to recycle for crafts.
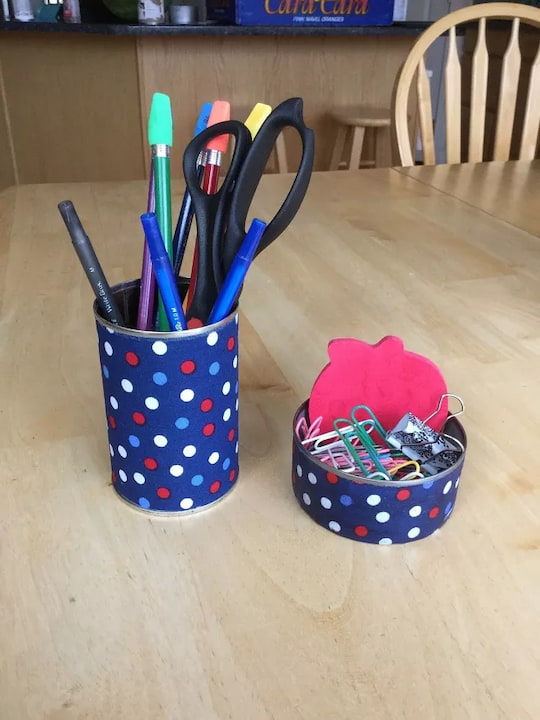
DIY Office Supply Organizer
There are a lot of ways to make decorative tin cans. Here I’m using fabric. I’ve measured and cut some fabric out to cover the can. I’m going to paint some Mod Podge all over the can and stick the fabric to the can. Over that, I’m going paint another layer of Mod Podge to seal it. Make sure that it’s nice and dry.
I’ve been known to use these to hold office supplies. This DIY project is a fun way to store office supplies on your desk. You can use them in the kitchen, too, to hold cooking utensils or silverware.
Be careful what kind of can opener you use as sometimes it leaves sharp edges.
Other Tin Can Craft Ideas:
- Paint them and stack them to create a Christmas Tree
- Use them as storage containers
- Create a wind chime
- Place candles inside to make candle holders
- Hold kitchen utensils with them.
- Make a flower vase
- Upcycle tin cans using duct tape, washi tape, scrapbook paper, wrapping paper, contact paper, etc.
Are you ready to create some upcycled tin cans for yourself?
I hope this inspires you to create some repurposed tin can creations of your own. I’d love it if you’d subscribe to my YouTube channel and my blog. Thanks for watching and I’ll see you in my next video and don’t forget to like, share and subscribe.

I love all your up-cycle creations! I am also a breast cancer survivor and appreciate your comments on your and your mother’s journey. I live in SW FL. Hope you can come this way some day. I am a retired Social Worker.
You are so very sweet, thank you, Lucy. Yes, I would love to connect with you on one of my trips to Florida!