
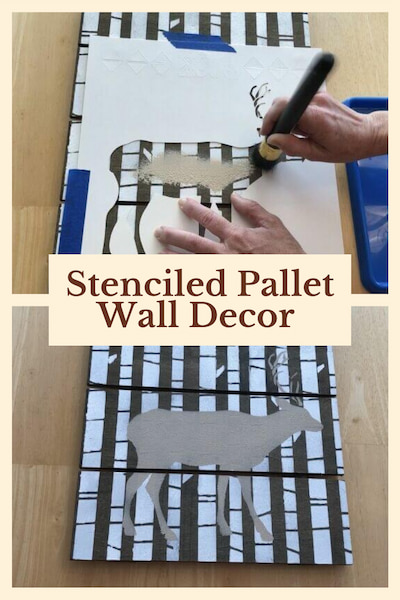
How to Paint Glass Windows: A Fun and Easy DIY Project
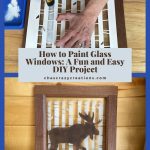
Are you looking to add a creative touch to your home decor? Are you wondering how to paint glass windows? Painting glass windows can be a fun and unique project that allows you to express your personality. In this step-by-step tutorial, I’ll guide you through the process of transforming a cabinet door into a beautiful piece of art using stencils and paints. Join me as we explore the world of glass window painting and unleash our creativity!
How to Paint Glass Windows Materials Needed:
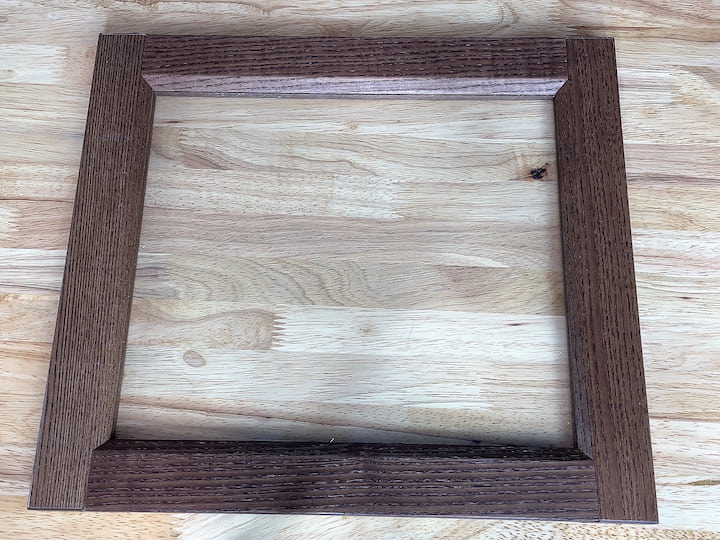
- Cabinet door (or picture frame)
- Folk Art stencils
- Apple Barrel multi-surface outdoor and indoor paint in white
- Acrylic Paints – Folk Art raw umber paint
- Stencil brush
- Paper towels
- Gloves
- Painter’s tape
- Acrylic sealer (optional)
- Dish soap
- Rubbing alcohol
- Razor blade (for cleaning)
- White vinegar (for cleaning)
- Rag or paper towel (for cleaning)
How to Paint Glass Windows Video
How to Paint Glass Windows
Step 1: Gather the Materials
To start this project, find a cabinet door that can be repurposed for painting. I found a great deal on an IKEA cabinet door in the clearance area for only five dollars. Alternatively, you can use a picture frame for this project as well. Ensure you have all the necessary materials mentioned above before proceeding.
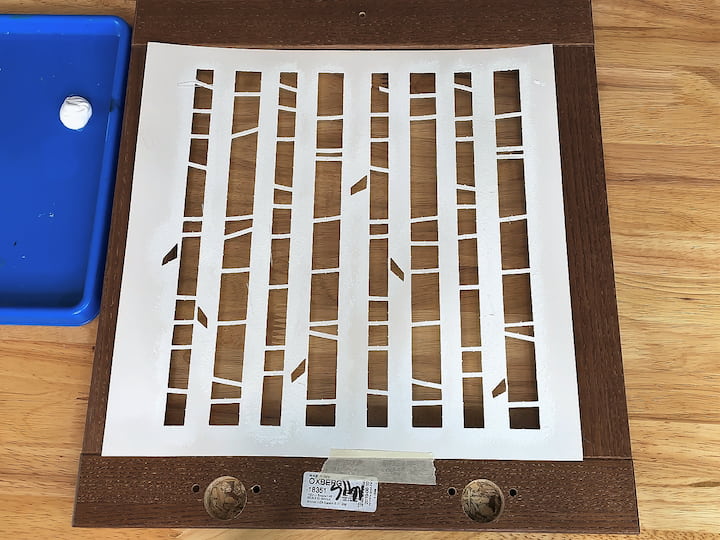
Step 2: Preparing the Back Side
- Flip the cabinet door over to the backside.
- Place the first stencil onto the back of the cabinet door, aligning it as desired.
- Use painter’s tape to secure the stencil in place, especially if you’re painting with kids to avoid any accidental smudging.
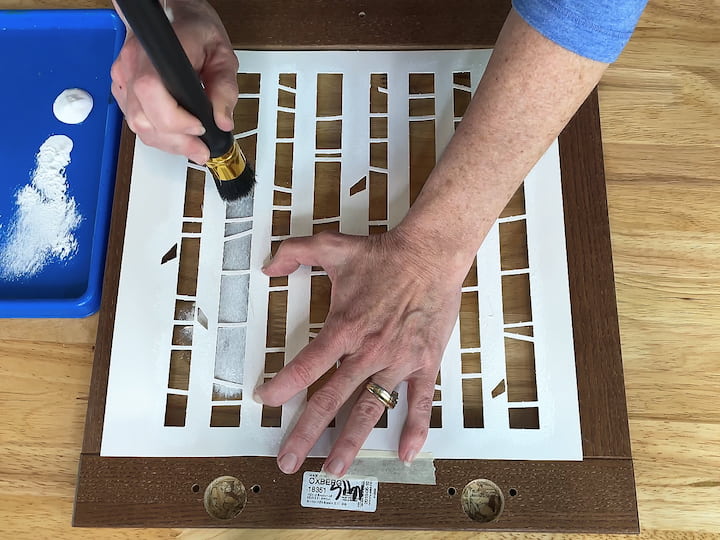
Step 3: Painting the Back Side
- Use Apple Barrel multi-surface paint in white for this step. It is an acrylic enamel paint known for its durability and is suitable for glass painting projects.
- Dip the stencil brush into the paint and then offload the excess paint onto a paper towel. This step is crucial to prevent bleeding.
- Tap the brush lightly onto the glass surface, pouncing the paint onto the glass. Synthetic brushes with soft bristles work well for smooth surfaces like glass.
- Continue tapping until you achieve the desired look, covering the entire stencil. For more precise outlines, you can use a paint liner or a smaller brush.
- If you make any mistakes or want to remove excess paint, you can use rubbing alcohol on a paper towel or cotton ball to clean it up.
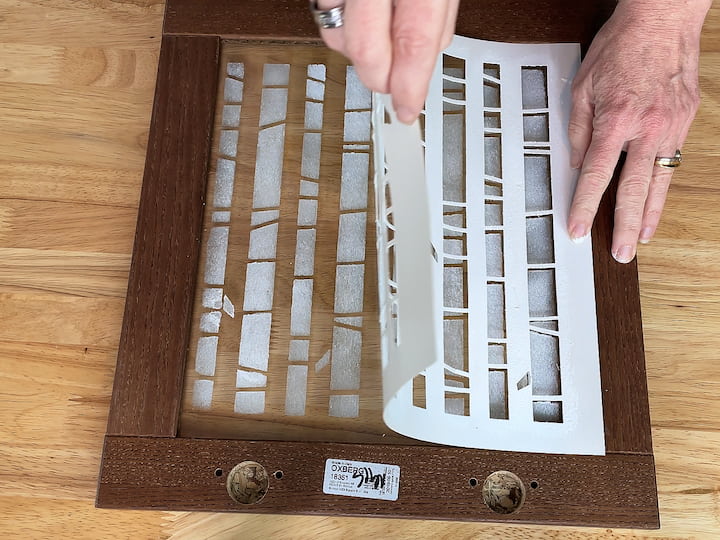
Carefully remove the stencil right away before the paint dries. This will stop the paint from sticking to the stencil and pull off with it when you remove it.
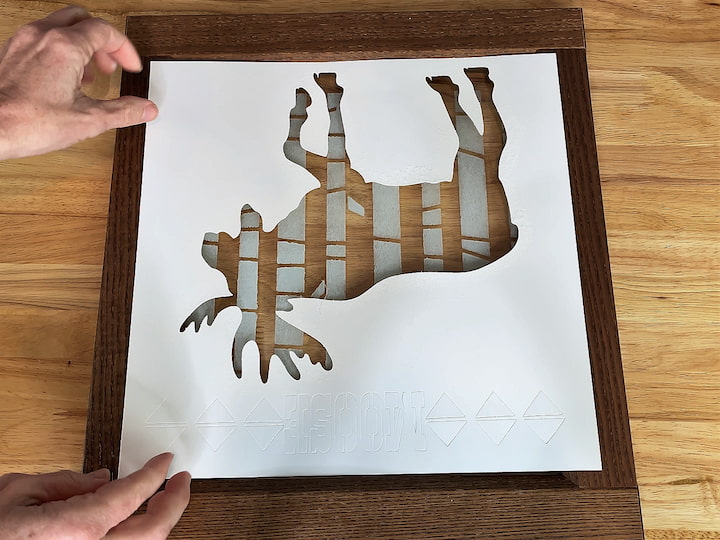
Step 4: Preparing the Front Side
- Flip the cabinet door over to the front side.
- Place the second stencil on top of the glass surface, aligning it as desired.
- Use painter’s tape to secure the stencil in place.
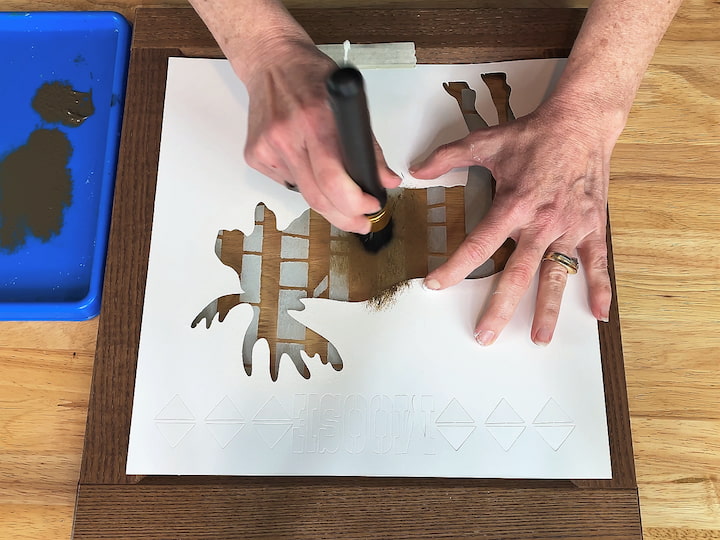
Step 5: Painting the Front Side
- Use Folk Art raw umber paint for this step. It creates a beautiful contrast to the white paint on the backside.
- Follow the same process as Step 3, using the stencil brush to pounce the paint onto the glass.
- Apply a light coat of paint first, and if needed, let it dry before adding a second coat for better coverage.
- Remove the stencil carefully, ensuring not to smudge the paint.
- If you want to create a stained-glass effect, you can use different colors and techniques to enhance the design.
Step 6: Cure Time and Optional Sealing
- Allow the painted glass to dry completely. Refer to the cure time instructions on the paint bottles to ensure proper drying and durability.
- If desired, you can apply an acrylic sealer to protect the paint from dirt and provide a glossy or matte finish.
- Before sealing or hanging the painted glass, make sure it’s clean. Use a mixture of dish soap and water or white vinegar to clean the surface, and wipe it dry with a rag or paper towel.

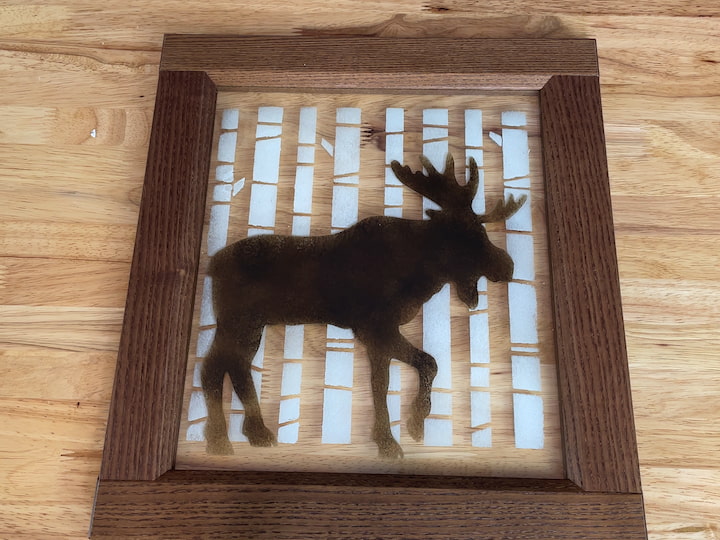
Step 7: Final Touches and Hanging
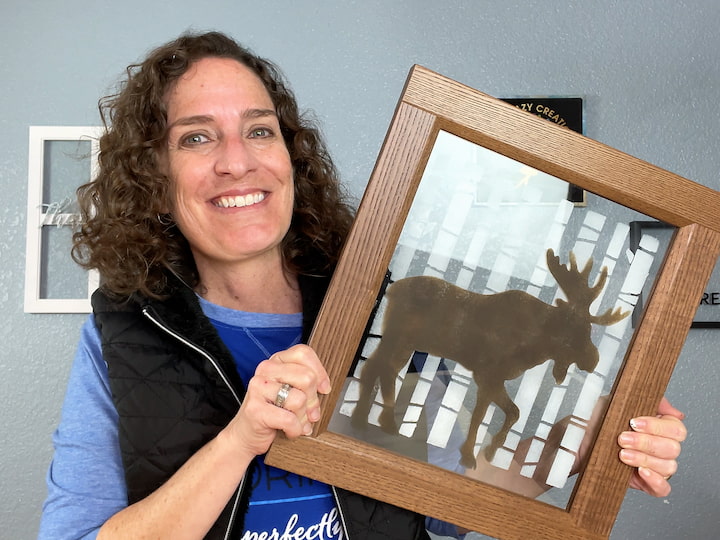
- Admire your finished glass window painting! The combination of the backside and frontside designs creates a captivating three-dimensional effect.
- Insert the painted glass into a frame or find a suitable window frame to hang it.
- Choose a location that allows the painted glass to shine while providing the desired level of privacy.
- If you’re painting windows that need to be washable, consider using washable window paint or a dishwasher-safe Mod Podge for easy maintenance.
How to Paint Glass Windows Video
Shop any of these stores and I receive a small commission at no cost to you.
") FolkArt 16 Piece Multi Surf…Shop on Amazon
FolkArt 16 Piece Multi Surf…Shop on Amazon, 12\" x 12\"") FolkArt Die Cut Paper, Wood…Shop on Amazon
FolkArt Die Cut Paper, Wood…Shop on Amazon") Sensory4u Stained Glass Sun…Shop on Amazon
Sensory4u Stained Glass Sun…Shop on Amazon Tuitessine Tree of Life Sta…Shop on Amazon
How to Paint Glass Windows Q & A
What kind of paint do you use on glass windows?
When painting glass windows, there are several types of paint you can use. Make sure to check the bottle’s instructions to make sure it’s recommended for glass. Here are some popular options:
- Acrylic Enamel Paint: Acrylic enamel paints are versatile and commonly used for glass painting projects. They provide good coverage, and durability, and come in a wide range of colors.
- Water-Based Paints: Water-based paints, such as acrylic glass paint or tempera paint, are another suitable choice for painting on glass. They are easy to work with, dry quickly, and are typically non-toxic.
- Oil-Based Paints: Oil-based paints can also be used on glass windows, but they require longer drying times and can have a stronger odor. They are known for their glossy finish and durability.
- Glass Paints: Specifically formulated for glass surfaces, glass paints offer excellent adhesion and durability. They often come in opaque or translucent options, allowing for various artistic effects like a stained-glass window.
- Spray Paints: Spray paints designed for glass surfaces can provide a smooth and even finish with no brush strokes to worry about.. They are convenient for larger projects or achieving gradient effects. A popular spray paint is frosted glass which is great for privacy.
When selecting paint for glass windows, consider the desired finish (matte, gloss, etc), ease of application, drying time, and durability. Additionally, be sure to follow the manufacturer’s instructions and any safety precautions specified for the chosen type of paint.
Does glass paint wash off?
No, glass paint is typically designed to be permanent and does not wash off easily. Once the paint has fully cured, it forms a strong bond with the glass surface, providing long-lasting adhesion and durability.
However, it’s important to note that the washability of glass paint can vary depending on the specific type and brand of paint used. Some glass paints are formulated to be washable, allowing you to clean the painted surface without compromising the design. These washable glass paints are often water-based and can withstand gentle cleaning with mild soap and water.
On the other hand, if you use permanent or solvent-based glass paints, they are not intended to be washable. These types of paints are specifically designed to create a lasting and resistant finish on glass surfaces.
To maintain the appearance and longevity of your painted glass, it’s advisable to follow any care instructions provided by the paint manufacturer. If you need to clean the painted glass, use a soft cloth or sponge and gentle cleaning solutions, avoiding abrasive materials or harsh solvents that could damage the paint.

What kind of paint will wash off?
If you’re looking for a paint that can be easily washed off from glass surfaces, temporary or washable window paints are the best options. These paints are specifically designed for temporary applications and are meant to be easily removable without leaving permanent marks or stains on the glass.
Washable window paints often come in the form of markers, crayons, or liquid paints that can be applied directly to the glass surface. They are typically water-based and non-toxic, making them safe for use by children and easy to clean up.
When using washable window paints, it’s important to note that their washability can vary depending on the specific brand and product. Some may require gentle scrubbing with mild soap and water, while others may come off more easily with just a damp cloth. Always follow the instructions provided by the manufacturer for best results.
It’s worth mentioning that washable window paints are not as durable as permanent glass paints. They are primarily intended for temporary decorations, holiday displays, or events where easy removal is desired. If you’re looking for a long-lasting and permanent paint for glass surfaces, it’s recommended to use one of the permanent paint options mentioned earlier in the previous response.
How do you paint glass for privacy?
If you want to paint glass for privacy, there are a few techniques you can use to achieve the desired effect. Here are two common methods:
- Frosted Glass Effect:
- Clean the glass surface thoroughly to ensure proper adhesion of the paint.
- Use frosted glass spray paint or frosted glass window film. These products create a translucent, frosted appearance on the glass while still allowing light to pass through.
- If using spray paint, apply thin and even coats, following the instructions on the can. Hold the can at a distance from the glass to avoid drips or pooling of paint.
- If using window film, carefully measure and cut the film to fit your glass surface. Peel off the backing and apply the film to the glass, smoothing out any air bubbles or wrinkles.
- Allow the paint or film to dry and cure completely according to the manufacturer’s instructions.
- Stained Glass Effect:
- Clean the glass surface thoroughly to ensure proper adhesion of the paint.
- Use translucent or opaque glass paints in various colors to create a stained-glass effect.
- Plan your design beforehand and sketch it lightly on the glass with a pencil, if desired.
- Apply the glass paint using a brush or squeeze bottles, following your design or creating abstract patterns.
- Allow the paint to dry completely between layers or colors to prevent smudging.
- If needed, use a fine-tip brush or paint liner to create outlines and add details.
- Once the painting is complete, allow it to dry and cure according to the manufacturer’s instructions.
Both of these techniques can provide privacy while still allowing light to enter the space. The frosted glass effect creates a diffused view, while the stained glass effect adds color and artistic elements. Choose the method that best suits your preferences and the overall aesthetic you want to achieve.
Can you use Mod Podge to seal acrylic paint on glass?
Yes, Mod Podge can be used to seal acrylic paint on glass surfaces. Mod Podge is a popular sealer, adhesive, and finish that works well on various materials, including glass.
To seal acrylic paint on glass with Mod Podge, follow these steps:
- Ensure that the acrylic paint is completely dry before applying Mod Podge. This is important to prevent smudging or smearing of the paint.
- Apply a thin, even layer of Mod Podge over the painted surface of the glass using a brush or sponge applicator. Make sure to cover the entire painted area.
- Allow the Mod Podge to dry completely. The drying time will depend on the specific formula and environmental conditions. Refer to the instructions on the Mod Podge bottle for guidance.
- If desired, you can apply additional layers of Mod Podge for added durability and protection. Allow each layer to dry fully before applying the next one.
- Once the final layer of Mod Podge is dry, it will create a clear, glossy or matte finish, depending on the type of Mod Podge used.
Sealing acrylic paint with Mod Podge helps protect the paint from scratches, moisture, and fading. It also provides a protective barrier that makes the painted glass easier to clean.
Note that while Mod Podge provides a good level of protection, it may not make the glass paint completely waterproof or dishwasher-safe. Avoid submerging Mod Podge-sealed glass in water or harsh solvents, as it may affect the finish. Instead, clean the sealed glass with a damp cloth or gentle soap and water.
Always follow the instructions on the Mod Podge bottle for the best results and recommendations specific to the product you are using.
Related Posts:
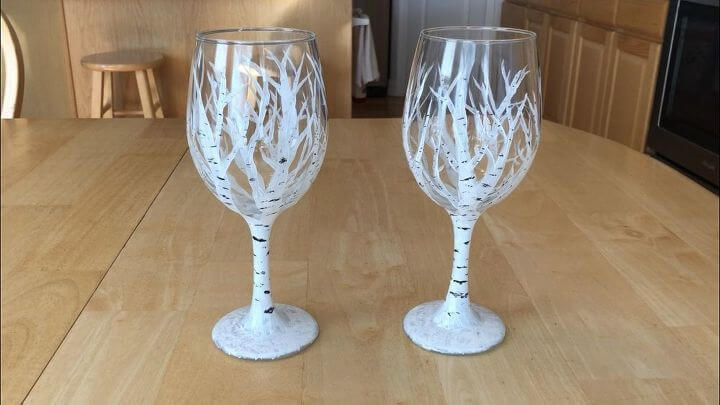
- Painting Aspen Trees To Make Easy and Stunning Wine Glasses
- Painting Glass Made Easy, Answers to The Most Common Questions
- Faux Stain Glass Sun Catcher
- Easy Way To Color Glass on a Budget For Any Occasion or Holiday
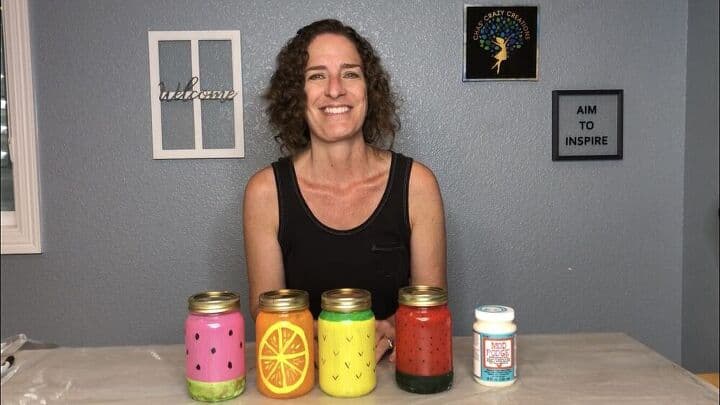
- How To Make Fruit Mason Jar Glasses with Video
- Painting Mason Jars and Distress Them Easily with Video

Congratulations on completing your glass window painting project! I hope this tutorial has inspired you to explore the world of decorating glass windows and creating beautiful artwork. Whether you’re a beginner or an experienced painter, this project offers endless possibilities for expressing your creativity. Don’t be afraid to try different techniques, colors, and types of paints like acrylic enamels or chalk paint to achieve unique effects. Remember to have fun, and enjoy the process of transforming ordinary windows into stunning focal points in your home.


WOW! This turned out really great. The pouncing made the moose look like it was real hair and I like the different parts where there was a difference in the color. Some areas were darker and some were lighter. I made it look more real. Loved, Loved, loved it.
You are so sweet Joy, thank you so much