
Entertainment Center Makeover: Easy and Quick with Video
Are you ready for a simple entertainment center makeover? When we bought our home, it came with a built-in entertainment center. We were very excited about this. Now as the years have passed and the shapes of TVs have changed, we were left with a big mess in the cabinets, and a huge hole in the center. It was time to give this built-in entertainment center a facelift!
Entertainment Center Makeover Instructions
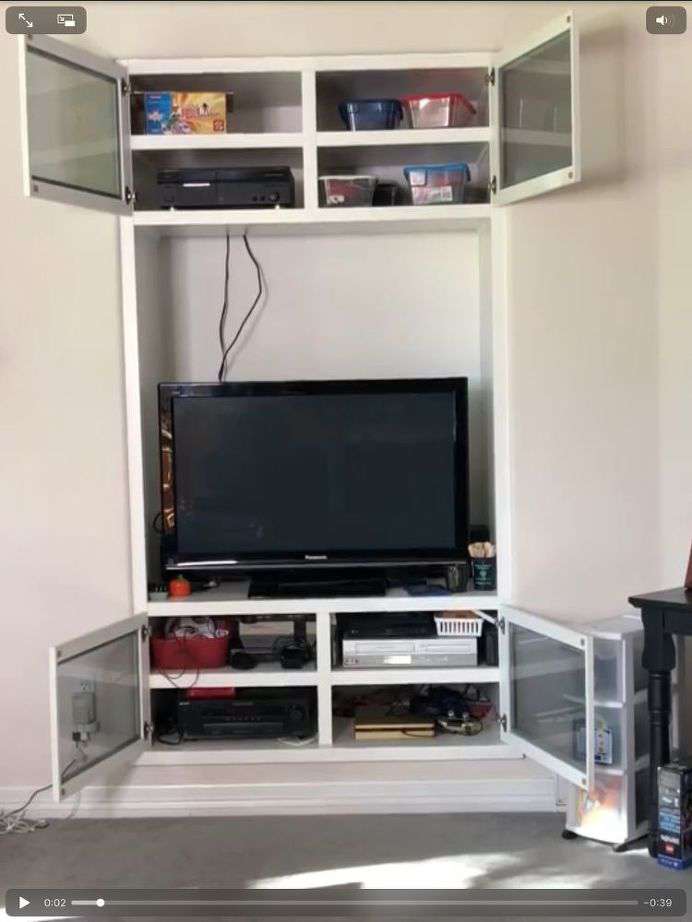
Here is the before picture of our entertainment center – cords hanging, a giant space above our TV, and way too much stuff in those cabinets… I started by gutting the whole thing, taking it all out, vacuuming the dust, and wiping down the entire space to get it clean.
(When I gutted it to start fresh I found 10 cords connected to NOTHING in the back! You know what else – I had 20 VHS tapes in that space too … we haven’t used our VHS player in I don’t know how long!)
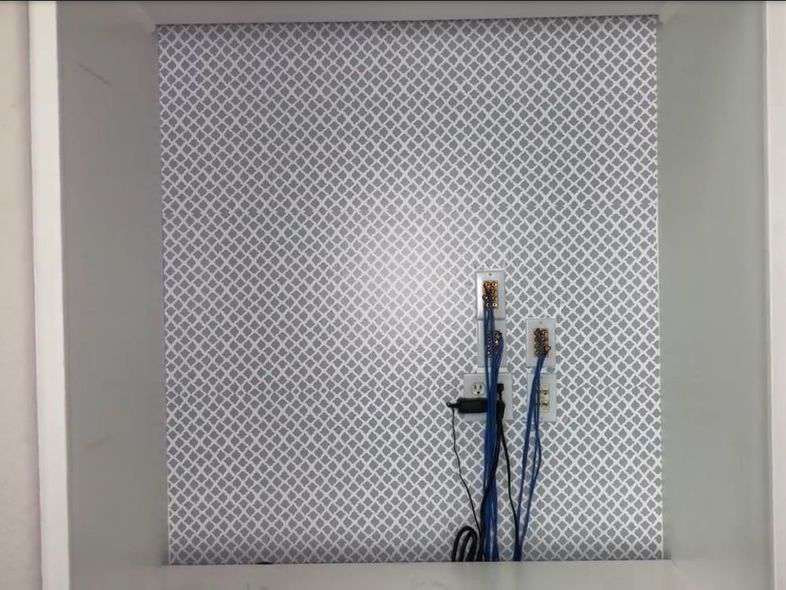
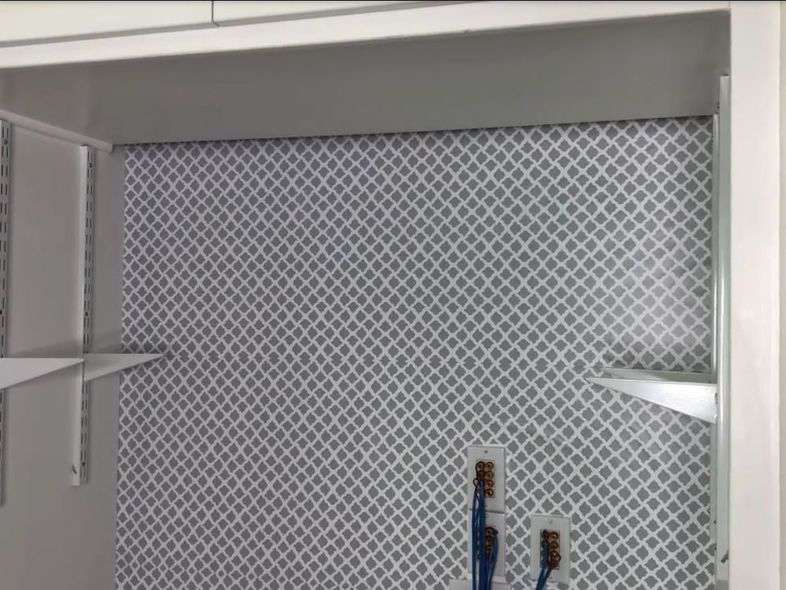
After everything was clean I put contact paper from Dollar Tree in the large space where the TV goes. All of those cords there have to stay as they are for our “full house” sound system that came with our home.
I love it because I can play music in almost every room of our home including our garage and patio. I can also play audio books and movies (and this I love while I’m cleaning).
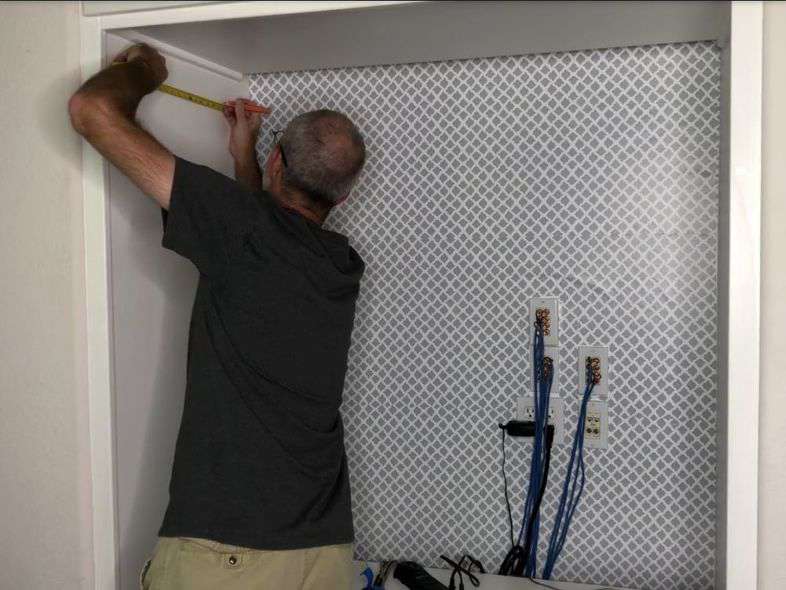
My husband then measured the sides on either side of the entertainment center space and marked where we’d be putting steel wall mounting to hang a shelf to break up the huge space. These came from our local hardware store.
Once he marked them he pre-drilled a hole where the screw would go – this will make it easier to drill in the screw. Once the pre-drilled holes were ready, he drilled in the screw. We hung steel mountings on each side of the entertainment center, and he drilled and screwed the top of each mounting first.
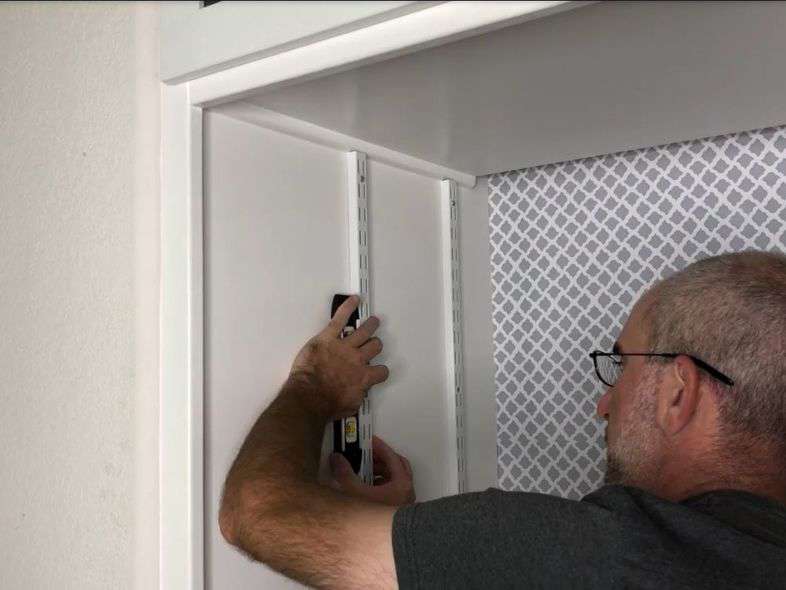
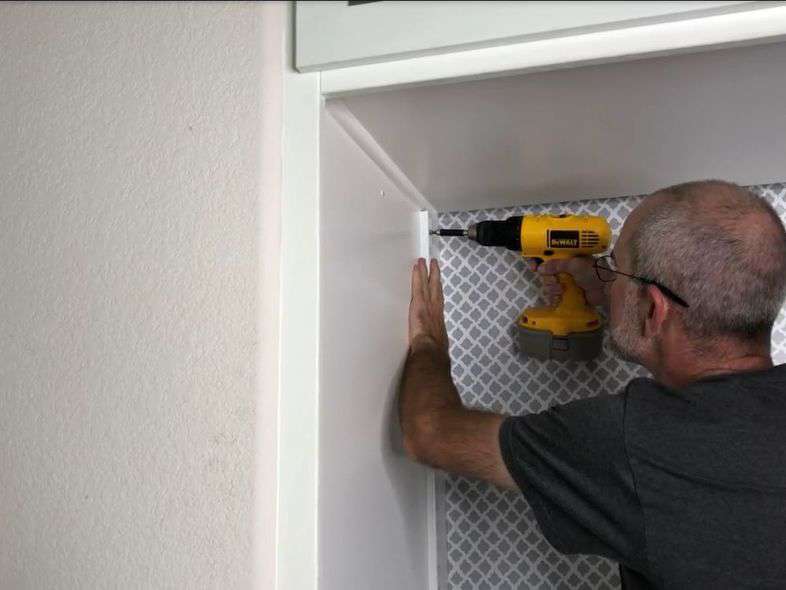
After putting the screws in the top, he then made sure the mountings were level and then pre-drilled holes and added the screws to the bottom of each mounting to secure them in place.
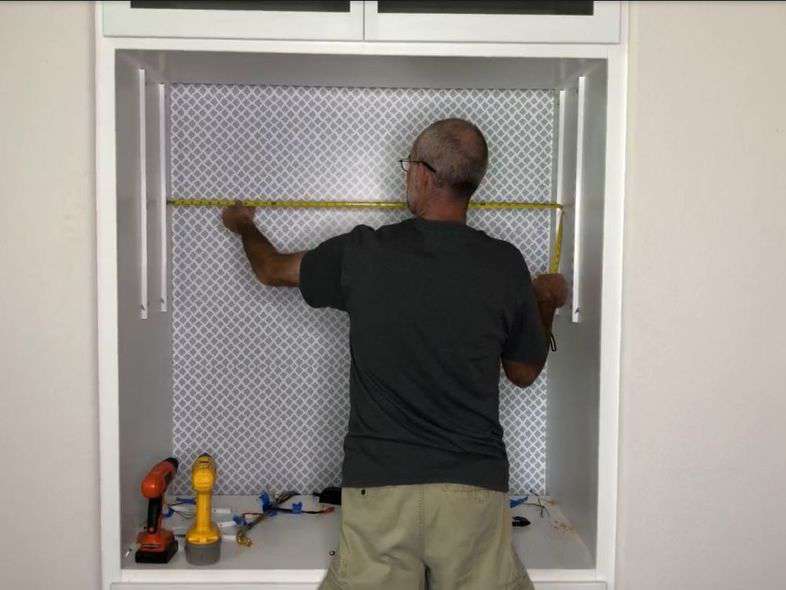
After all 4 mountings were up, he then measured for how long our shelf would need to be.
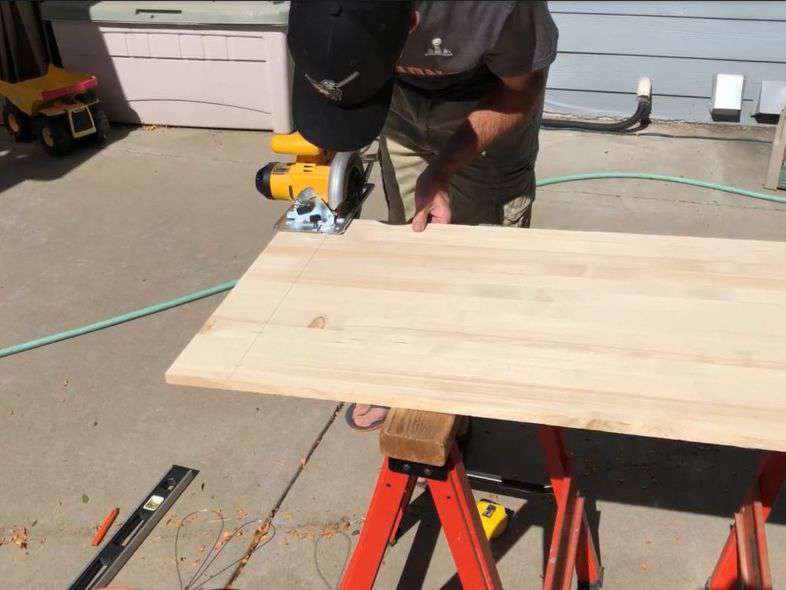
We used a Craft Master’s Spruce board that we bought at our local hardware store. He measured and marked where to cut the shelf and then cut it.
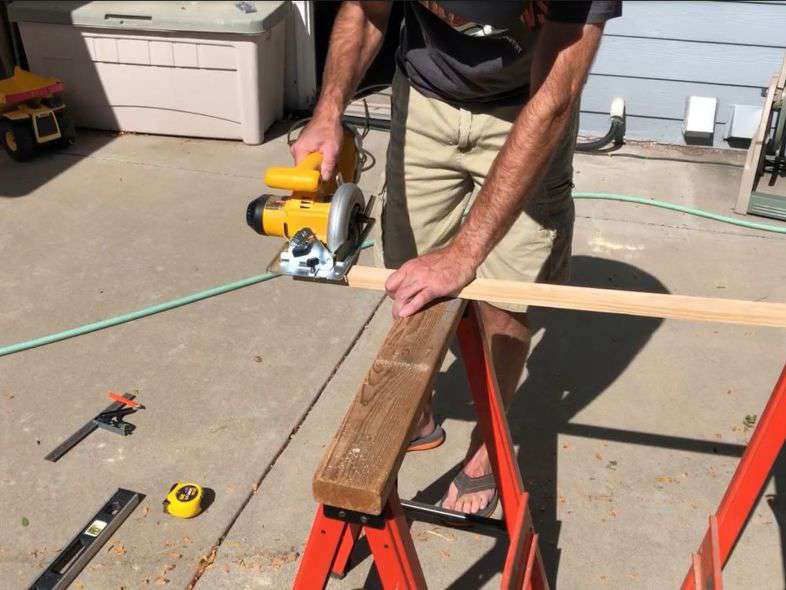
He wanted a nice front edge to the shelf so he cut a small piece of wood to be a little longer to the shelf so that he could go edge to edge. He measured the space, marked the wood and cut it to size.
We hung the brackets where we wanted the shelf to sit in the space.

We set the shelf into the space to make sure it fit. My husband then put wood glue onto the front edge of the shelf and placed the smaller piece of wood onto the front to create a nice edge.
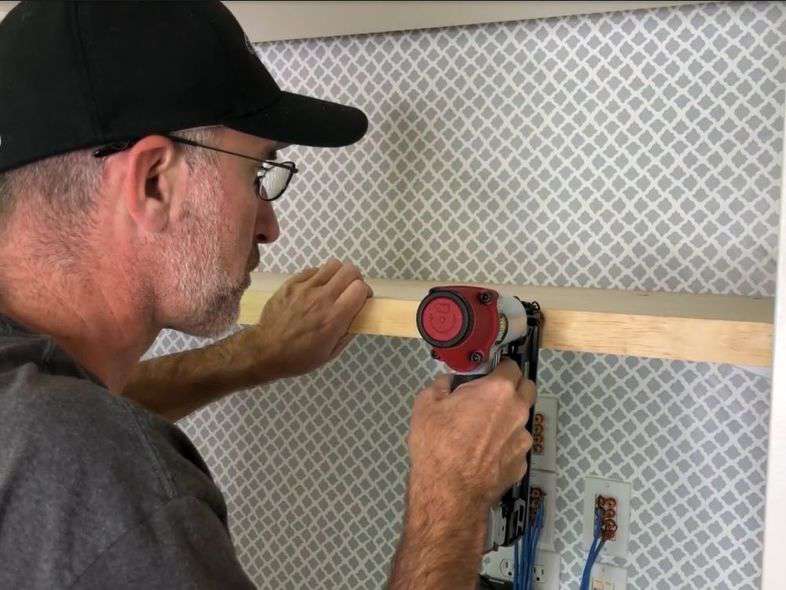
He nailed the small piece of wood onto the large piece of wood to be extra secure.

He took the shelf back outside and sanded it with medium sandpaper and then fine sandpaper. After that I wiped it clean with a damp rag.

I painted it with Valspar high gloss white paint to match our entertainment center. I did the entire things with 2 coats, letting it dry between each coat.
While the paint was drying I placed things back into our cabinets in a way that made sense and left no cords exposed.
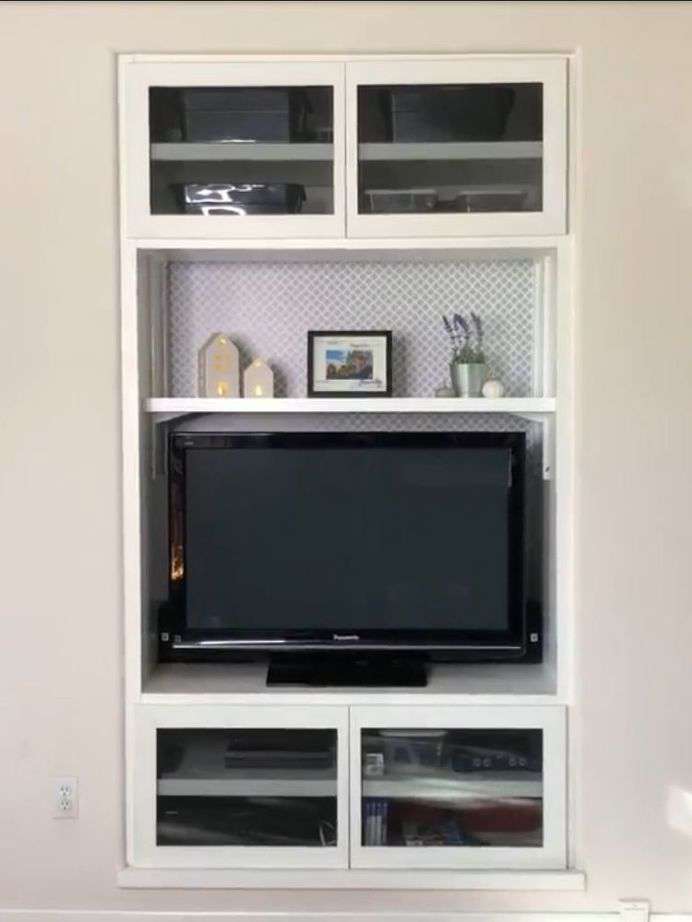
Once the shelf was dry, we placed it in our entertainment center. We think the space looks so much better.
Easy and Quick Built in Furniture Makeover Video
Here is the video I made with Hometalk.
Shop any of these stores and I receive a small commission at no cost to you.
 LEVOIT Air Purifier for Hom…Shop on Amazon
") asunflower Sectional Sleepe…Shop on Amazon
asunflower Sectional Sleepe…Shop on Amazon ChooChoo Farmhouse Coffee T…Shop on Amazon
 AMERLIFE 59" Fireplace TV S…Shop on Amazon
You might enjoy my TV stand makeover that I did with contact paper – 5 Easy Upcycles Using Contact Paper For Furniture
Items you might need to update an old entertainment center for your living room or family room
- piece of furniture, old tv armoire (update yours or grab one at a garage sale)
- chalk paint brushes or regular paintbrush or paint sprayer
- hinges
- coat of paint like annie sloan’s chalk paint, fusion mineral paint, dixie belle paint, acrylic paint, spray paint, etc
- wood filler
- sealer or dark wax
- mineral spirits
- spray adhesive
- backdrop like contact paper to add contrast
- clamps
- scissors
Items to compliment your new upcycled entertainment center
- wire baskets
- board games
- picture frames
- video games
- fridge
- drawers
- add an additional shelf
- flat screen tv or go for a wall-mounted tv
- puzzles
New Entertainment Center Looks
- update the natural wood to dark wood
- lighter color like french linen for a french country side look
- give it a farmhouse feel

Check out some of my other furniture makeovers!


Looks so updated! So funny about all of the cords that were not connected to anything!!
Thanks Chloe, and I know – crazy right?!!! We have had this up for a few years now and I’m so glad we did this.
Chas,
This looks so much better! What a great idea to cover the back wall of the cabinet. We had a really HUGE tv cabinet…..so big that if we ever sell the house it is staying there. After I had 4 guys lug it to the upstairs hallway, I turned it into a place for all my sheets, blankets, pillows, etc. I used fabric on the back wall because of the ugly holes cut into it. So glad TVs have gotten a bit thinner and smaller. Great re-do and thanks for sharing!
You are just so sweet my friend Mary! I’m so glad you like the project and what I did with that big space. Thanks for sharing your story too and LOVE that you were able to turn it into storage – great idea!!!
I love the added texture to the background and the shelf looks great and makes much more sense! GREAT Job. Thanks for sharing at last week’s RTT party: https://www.jodiefitz.com/2018/10/09/reader-tip-tuesday-weeks-craft-recipe-party-14-2-2-2-2-2-2-2-2-2-2-2-2-2-2-2-2-2-2-2-2-2-2-2-2-2-2-2-2-2-2-2-2-2-2-2-2-2-2-2-2-2-2/
Hope to see you at this week’s party.
Thank you so much Jodie, and we are so happy with the new look.
Great re-do! We have a free-standing entertainment center and I wish we could do something like this. Thank you for sharing with us at Celebrate Your Story and have a great weekend.
Thank you so much Sandra, and I hope you can change yours to something you like. It has really made a difference for us in our room.
When we bought our house, we had the same type entertainment center and the same reaction you had. Yay!!! Now, after 10 years, we have modified this “plus” and like it much better.
Thank you so much for joining our link party, we appreciate your sharing your post.
Kari@meandmycaptain
Thank you Kari, and I love hearing you guys have upgraded yours and love it as well too. Thanks for hosting a place for all of us to share our creations.
Very Nice! The wallpaper really adds to it, too…and I love the shelf there! A really nice change to that built-in…
Thank you so much Karolyn, I was surprised at how much that contact paper in the back added as well. We have been talking about updating this for probably 10 years, I’m so glad we finally got around to it.
This is such a nice upgrade, way to go! I love the little glowing houses you added, so charming.
Thank you so much Loni, and those little houses came from the Target dollar section. I thought they were so fun.
It does look so much better. Congrats on getting another project done. Thanks for sharing at #HomeMattersParty
Thank you so much Donna and thanks for stopping by.
That it totally transformed. Isn’t it funny how things change over the years and what we were once excited to have in our homes doesn’t always work anymore?
You’ve made this space work again – brilliant!
Thank you so much Julie, and you are so right. We were so excited to have the built in space so we didn’t need something else to occupy the room. I’m so glad to get this upgrade done, we’ve been wanting to do it for a while now.
It’s amazing what a little ingenuity and handyman skill can do to make something perfect for your needs – this looks great and is still really practical. #Bloggers Pitstop
Thank you so much Leanne, and thanks for stopping by.
Great job! Looks really nice. 🙂
Thank you very much Linda, I’m really happy with the way it turned out. Plus gave me an excuse to clean another area of our home out – lol.