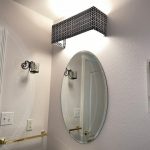
Bathroom Vanity Light Makeover DIY
Have you ever wanted to makeover a bathroom vanity light? We had a dated light in our bathroom that needed an update. This is my DIY and you could easily do this in a rental home.
Yield: 1
Cost: 10
Equipment
- Hot Glue Gun
- Scissors
- Razor
- Tape Measure
Materials
- Foam Core Board
- Fabric
- Picture Command Strips
Instructions
- The first thing I did was measure the height, width, and depth of my light fixture.
- I measured each section off on my foam core board and drew my lines of where I would need to cut the board.
- I used my razor blade to cut the foam core board.
- I laid my fabric out and placed the foam core board on top so that I could cut the fabric. I added 2 inches to every side so that I’d have plenty of fabric to glue onto the board.
- I hot glued all the foam core pieces together for the bathroom light fixture cover.
- I hot glued the fabric onto the foam core board.
- I hot glued 2 picture hanging command hooks on each side of the vanity light cover.
- I pulled off the backs of the command strips and pressed them onto the wall over the top of the bathroom vanity light.