
How To DIY A Can Organizer for Supplies: Easy and Inexpensive
Do you love to reuse and recycle? Do you love to organize? I’m sharing how to make a DIY can organizer for supplies. I’ll share a few different ways to use this concept in your home.
This post may contain affiliate links, I earn from qualifying purchases at no extra cost to you. Click here for my disclosure policy
Can Organizer Instructions
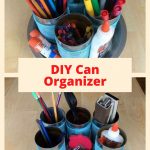
First decorate your cans – there are so many options – stickers, shelf liner, wrapping paper, fabric, ribbon, etc.
For this one I’ll be using a mesh ribbon.
You can find more of my can decorating options here:
- Fabric
- Paint
- Ribbon & Stickers
- Photos/Books/etc
How To DIY A Can Organizer for Supplies Video
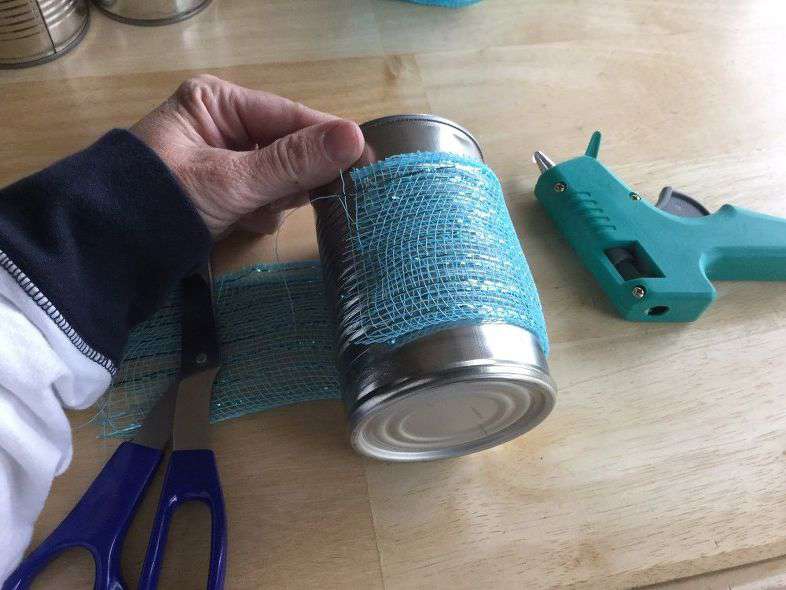
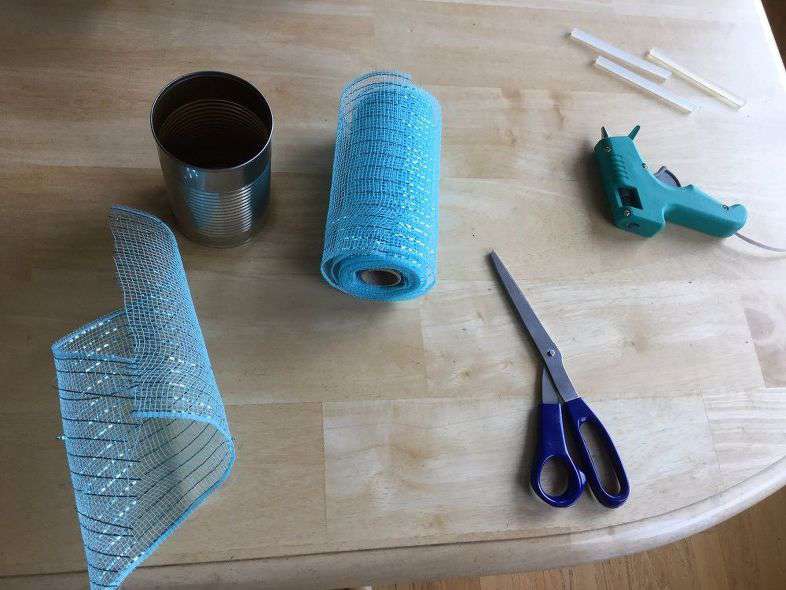
First cut your ribbon to fit your can. Place a line of hot glue and stick one side of your ribbon on it.
Place another line of glue on the end of the ribbon and stick to the can.
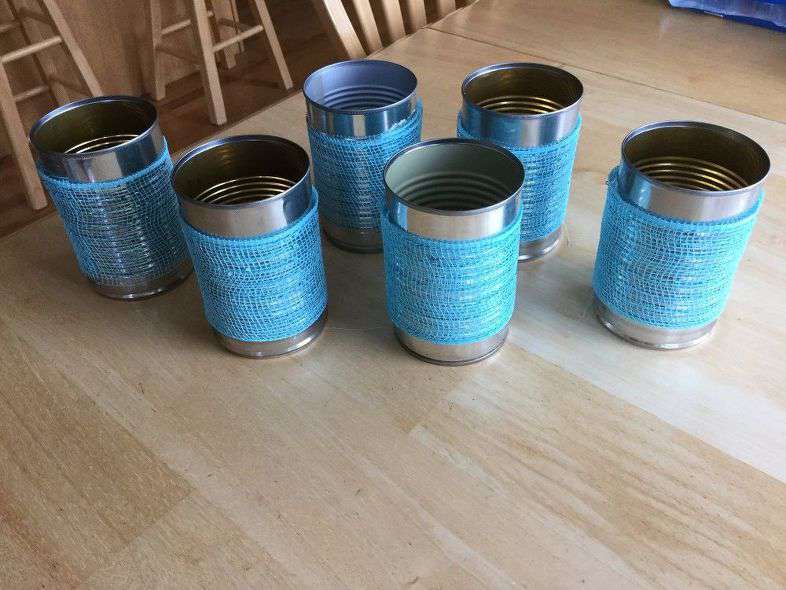
You’ll need to do 4-6 cans depending on which caddy you’ll be using/making.
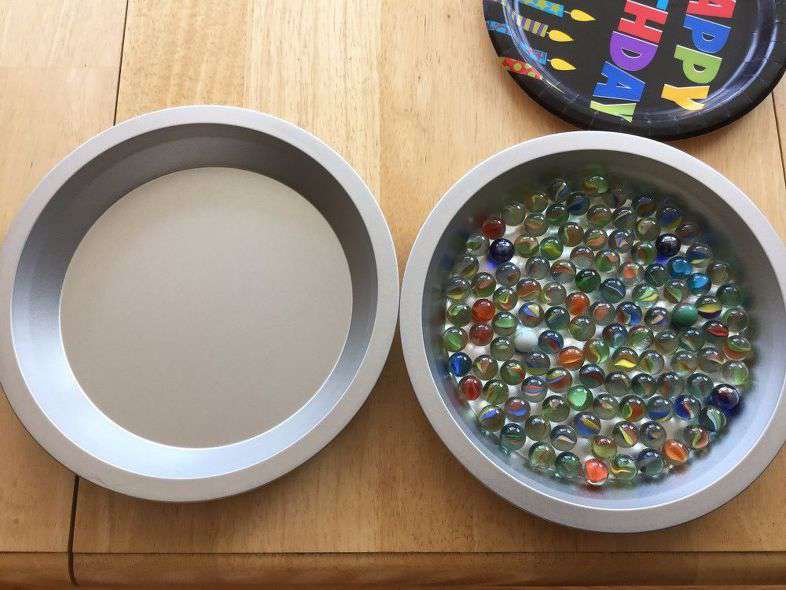
Our first caddy rotates. Place marbles in one of 2 pie pans.
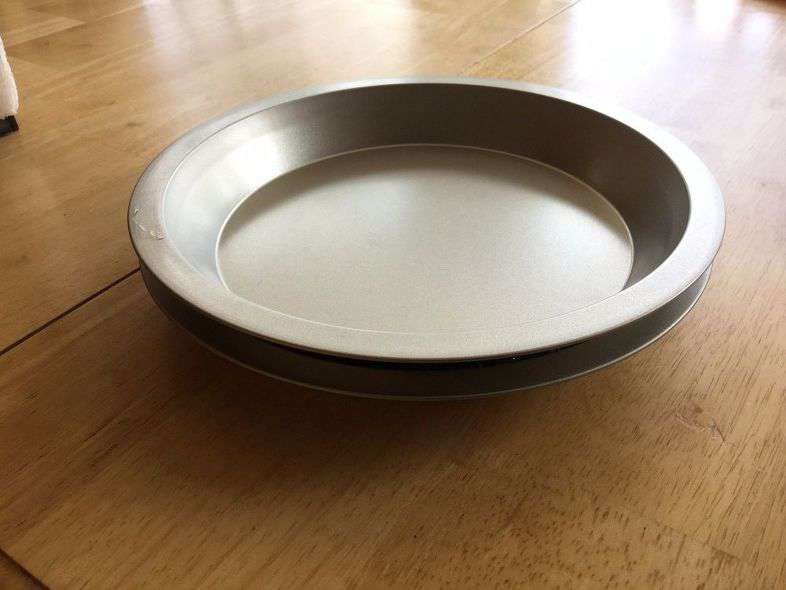
Stack the empty pie pan onto the marble pie pan.
Place 4 cans inside your empty pie pan and fill with crafting supplies.
This option is great for a work station. Great for many people working around a table at the same time. Kids will use this during crafting and homework time.
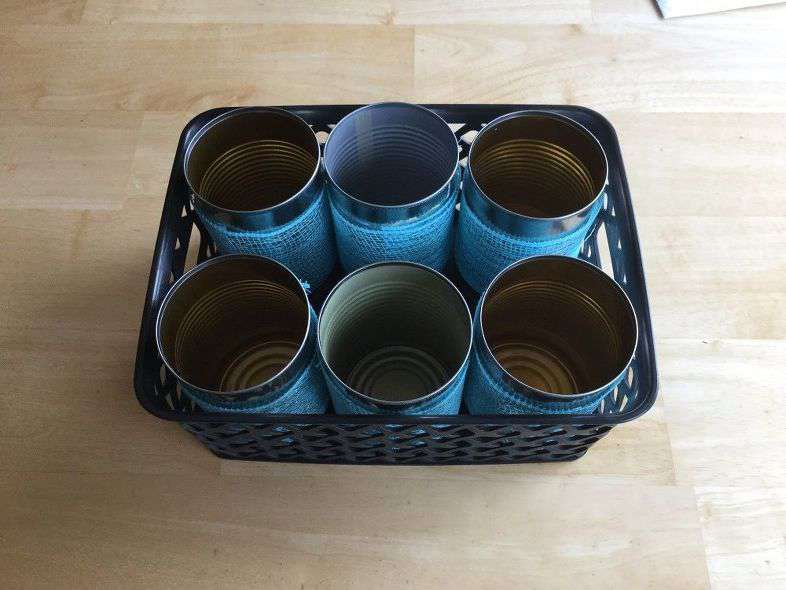
Option 2 – Place 6 cans in a basket.
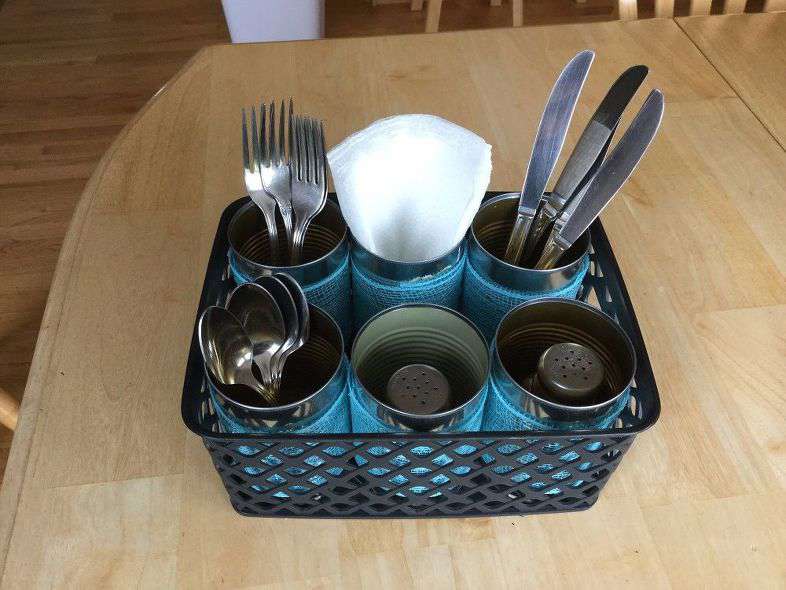
Fill the cans with silverware, napkins, salt and pepper shakers. Now you can bring this caddy inside or out with easy. This basket had more room, so I could have set the napkins & salt and pepper shakers in the middle between the cans and used those cans to hold other supplies needed.
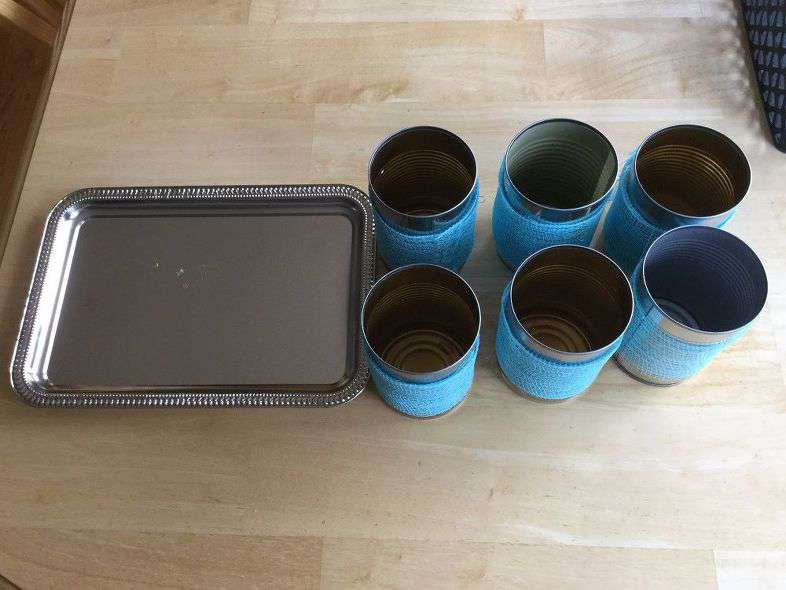
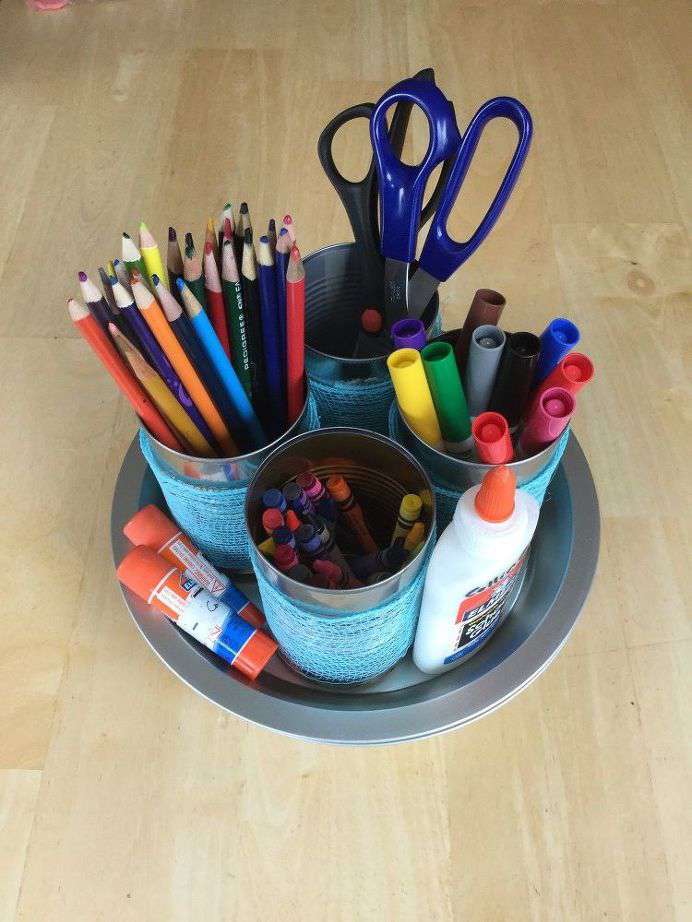
The 3rd option – Place 6 cans on a small serving tray. If you want to secure them – hot glue them, use a magnet on the bottom, or use E6000.
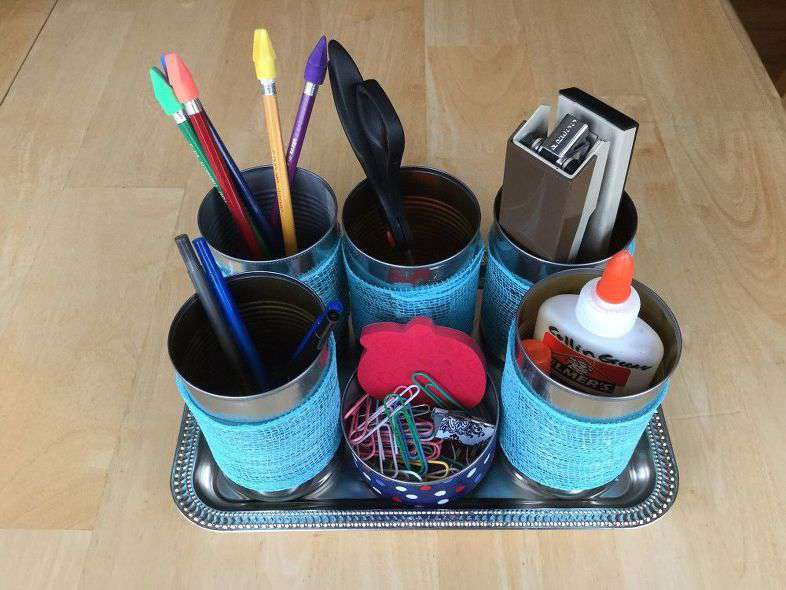
You’ll notice I decided to use 5 regular cans and 1 large tuna/chicken can. Fill with office supplies and set on your desk.
Mix and match any of these ideas to personalize for what you need.
How To DIY A Can Organizer for Supplies Video
More ideas on where you can use this easy DIY
- kitchen cabinets
- food storage ideas in your refrigerator or kitchen pantry on your pantry shelves
It’s a great way to save on storage space when you only have a small space to work with. Put them on a bottom shelf for small hands and easy access. The best part is that you can find a lot of the extra supplies you need at the dollar store. I love easy DIY projects, don’t you?
Now if you’re looking for ways to organize your cans, here are some tips for you
- check your expiration dates and put your oldest cans up front to use up first and the new cans in the back.
- get a can food organizer for your pantry, a wall-mounted can organizer, or a can dispenser. These can help hold your soup cans, chicken broth, and other canned goods like green beans, etc
- Awkward cans like large cans and cans of tuna will need a different kind of pantry organizer.
- Go to the dollar store and pick up another shelf unit, because they can act like a second shelf and then you gain another pantry shelf and this can give you a ton of space if done correctly. That extra space is huge.
- Make some lazy susans like above
- Use a magazine holder to hold your cans or other items in your pantry
- Get creative with other items like use photo boxes, and other pantry items that came in boxes like cereal that you can cut up and use again.
- Get a door storage rack that fits on your pantry door. These are the perfect spot to gain some extra space.
Here are some more storage systems that might help you with pantry storage ideas and find the perfect solution for you.
- Easy and Quick Walk in Pantry Organization Ideas
- 11 Amazing Walk In Pantry Organization Tips and Hacks
Shop any of these stores and I receive a small commission at no cost to you.
 Copco Basics Non-Skid Pantr...Shop on Amazon
") POPLAY 50 PCS Beautiful Pla...Shop on Amazon
POPLAY 50 PCS Beautiful Pla...Shop on Amazon LaRibbons Deco Mesh Ribbon ...Shop on Amazon
 MDHAND Office Desk Organize...Shop on Amazon
Learn more about “Why to Deep Clean and Organize Your Home” to save money, function better, and keep your sanity.

So cute! Great ideas for using left over cans. 🙂
Thanks so much Linda – I like the way they can be used in so many different ways. When you’re done, you can still recycle them.
Love this! I did this for the flowers on my wedding with empty cans. I was just telling my husband this morning I wanted to homeschool our future kids for the first couple years so I’ll be saving this cute, crafty idea! Found you at To Grandma’s House We Go!
Thank you so much Chelsea. I’m thrilled you want to save this idea, and thanks for participating in our link party!
I love this for Jovie. She needs it, too LOL. Thanks!
Thanks Marilyn, I’m sure she’d love it too especially spinning it round and round – lol.
These are such cute ideas! I always think that I should use the cans I throw away, and you have given me good ideas! Thanks for sharing at Thursday Favorite Things!
Thank you so much Pam and I hope this inspires you too.
Congratulations! Your post was my feature pick at #ThursdayFavoriteThings this week. Visit me at https://www.marilynstreats.com on thursday morning to see your feature! All hosts choose their own features from the comments left on their blog so be sure to return to my blog to see your feature. I invite you to leave more links to be shared and commented upon. Please don’t forget to add your link numbers or post title so we can be sure to visit!
Oh what a surprise, thank you so much Marilyn! I hope your granddaughter if you decide to make it too 🙂
You know I love a good upcycling idea, so this is one of the features over at this weeks Handmade Monday 🙂
Thank you so much Julie, I appreciate the feature. Have a great week
These are great. I keep thinking I should make something like these 🙂 Thanks for sharing at Creative Mondays, you will be one of my featured blogs today 🙂
Thank you so much for the feature Claire and for hosting a wonderful place for us to share our creations.
I did this for my desk with a two-tiered turntable I got at a thrift shop. I used 5 large cans around the top and one in the middle of the circle. Covered them with black paper and used a silver sharpie to label them. Looks classy–for cans! These cans hold my huge pen pencil marker highlighter collection, as well as scissors, magnifying glass, hole punch.
The bottom shelf has my tape dispense, stapler paper clips ( in a tuna can) etc. So handy!!!
Thanks for sharing Cathy! That sounds beautiful and functional. Love that you are using it on your desk, sounds just like where and how I’d use mine too 🙂 So glad it’s working great for you 🙂
I love these ideas, especially the one about getting the caddy to rotate using the marbles. Brilliant!
Thanks for letting me “hop” with you again this month!
-Niky @ The House on Silverado
Thank you so much Niky, and I love your project too! Thanks for the hop!
Chas, as always you remind me to upcycle! I have done this before but seem to have forgotten that you “can” do many things with “cans”. Thanks for the reminder. Love hopping with you!
Thank you so much Mary, and I can’t wait to see what you do with cans. Wonderful hopping with you
What a great way to use cans. I love the can with the sparkles and the candle. That’s such a fund idea for entertaining outdoors! Can’t wait to see you in person. Thanks for hosting.
Thank you so much Andrea and I’m so excited about getting together!!! Whoot Whoot!
The idea of the marbles in the pie pan is brilliant! This is such a great project that can be used for so many things!
Thank you so much Kristin, it’s so true, as it was our lazy Susan for a long time before I did this.
I need to make one of these for my daughter! She has SO MANY art supplies. 😀 I love the idea of the two pie pans/marbles for a rotating tray. Thanks so much for the clever idea!
Thank you so much Amy, and I’m so excited your daughter might need this too. So fun hopping with you
Great upcycle project for organizing office supplies. You are so creative!
Thank you for another inspirational project idea.
Hugs,
Kippi
Thank you so much Kippi, you are so very sweet. Wonderful hopping with you!
What a great an useful upcycle! Love the idea of using it for utensils on a table! Its always great hopping with you 🙂
Thank you so much Tarah, love projects that you can be so versatile.
Love it, i’ve got the cans ready and waiting! thanks so much for sharing on craft schooling sunday!
Thank you so much Sara, I’m thrilled you want to give it a try.